> For the complete documentation index, see [llms.txt](/ko/llms.txt)
# 1. 계정을 만들고 로그인하기
플레이어 계정을 만들고 저장한 정보로 다시 로그인합니다.
먼저 게임에 로그인할 수 있게 만들어 봅시다. 로그인한 플레이어의 ID를 화면에 표시하고, Unity의 재생을 중지해도 같은 계정으로 돌아올 수 있게 합니다.
처음에는 계정을 만들고 플레이어 ID와 비밀번호를 저장합니다. 다음 실행부터는 저장한 정보로 로그인합니다. 로그인 후 받는 액세스 토큰에는 유효 기간이 있으므로 다음에 실행할 때도 로그인 절차를 거칩니다.
## 1. 플레이어 계정을 저장할 공간 만들기
GS2에서 설정과 데이터를 나누어 보관하는 공간을 **네임스페이스** 라고 합니다. 플레이어 계정을 저장할 GS2-Account 네임스페이스를 만들어 봅시다.
**Studio**
### 계정 이전 설정 추가하기
Studio에서 `Adventure` 프로젝트를 엽니다. 왼쪽의 **Add features** 를 누르고 `Account Transfer`를 검색합니다. 메뉴가 보이지 않으면 오른쪽 위에서 **Simple** 을 선택합니다.
**Account Transfer** 카드에서 **Add** 를 누릅니다. 이 패키지에는 플레이어 계정을 저장하는 Account 설정도 들어 있습니다.
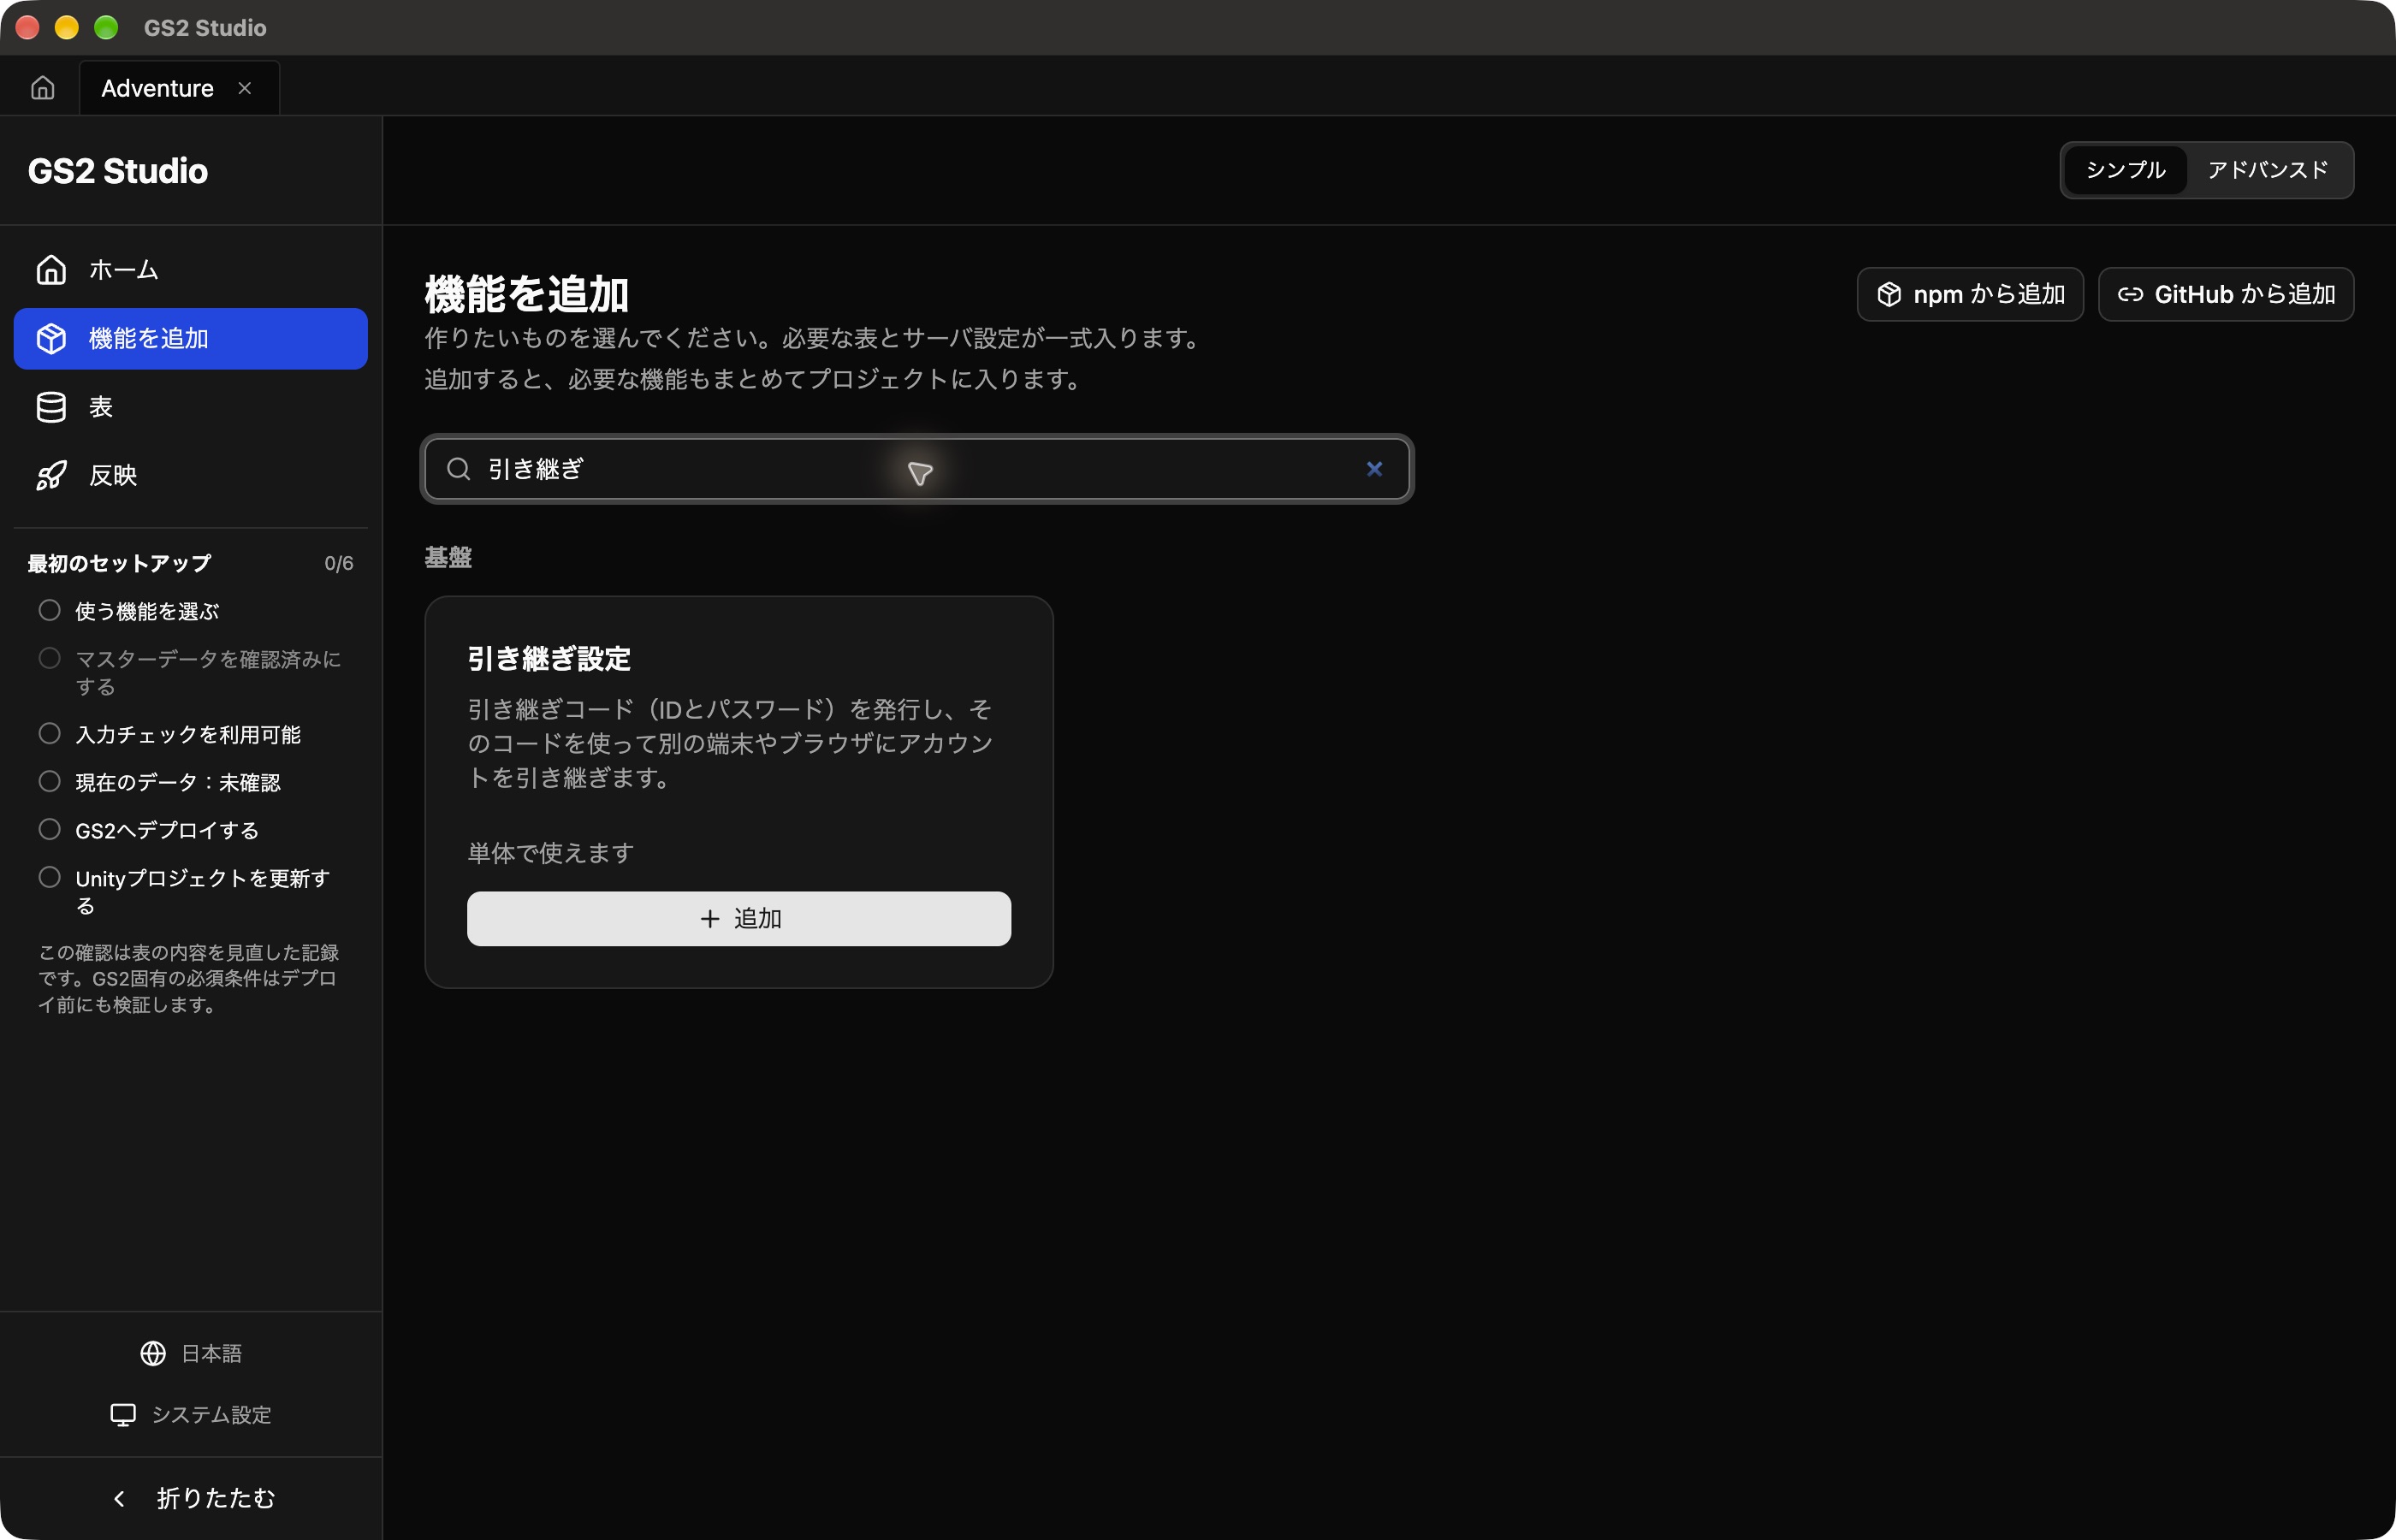 카드에 **Added** 가 표시되면 Studio에 패키지를 불러온 것입니다.
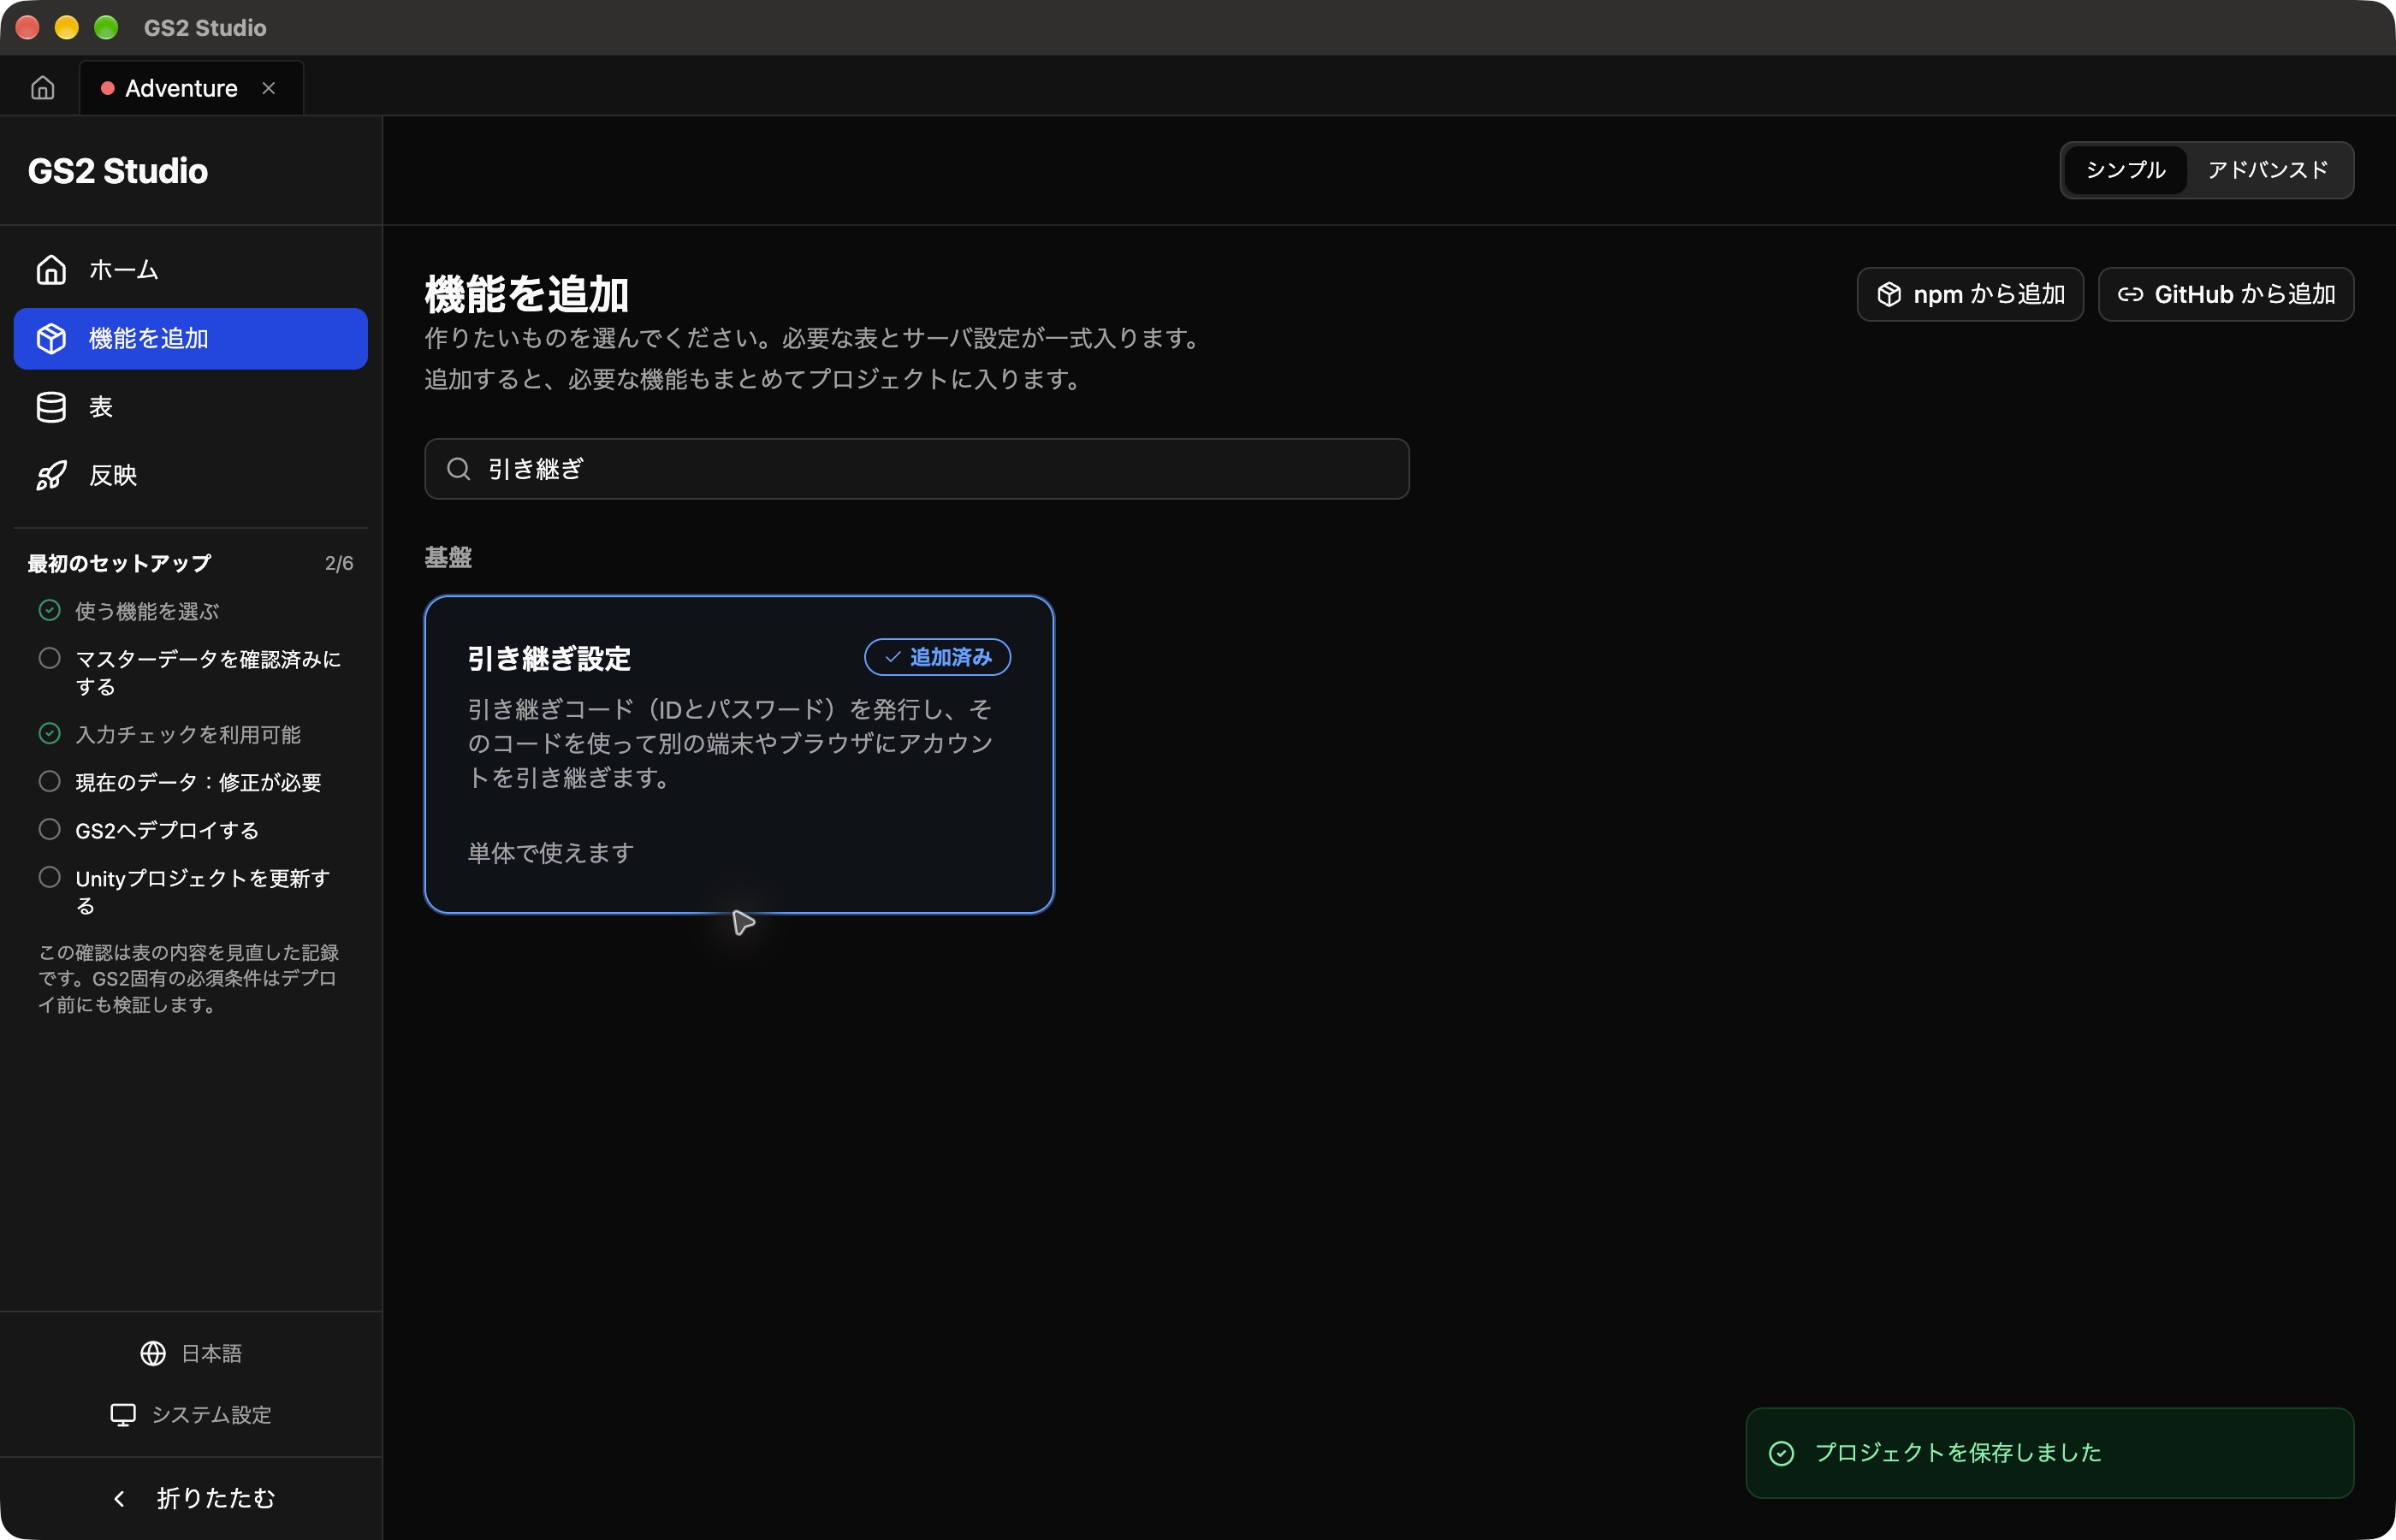 ### 서버에 반영하기
추가한 설정을 GS2에 보내 실제로 계정을 저장할 수 있게 합니다. 이 작업을 **배포** 라고 합니다.
왼쪽에서 **Publish** 를 누른 뒤 **Deploy to the server** 영역의 **Calculate server differences** 를 누릅니다.
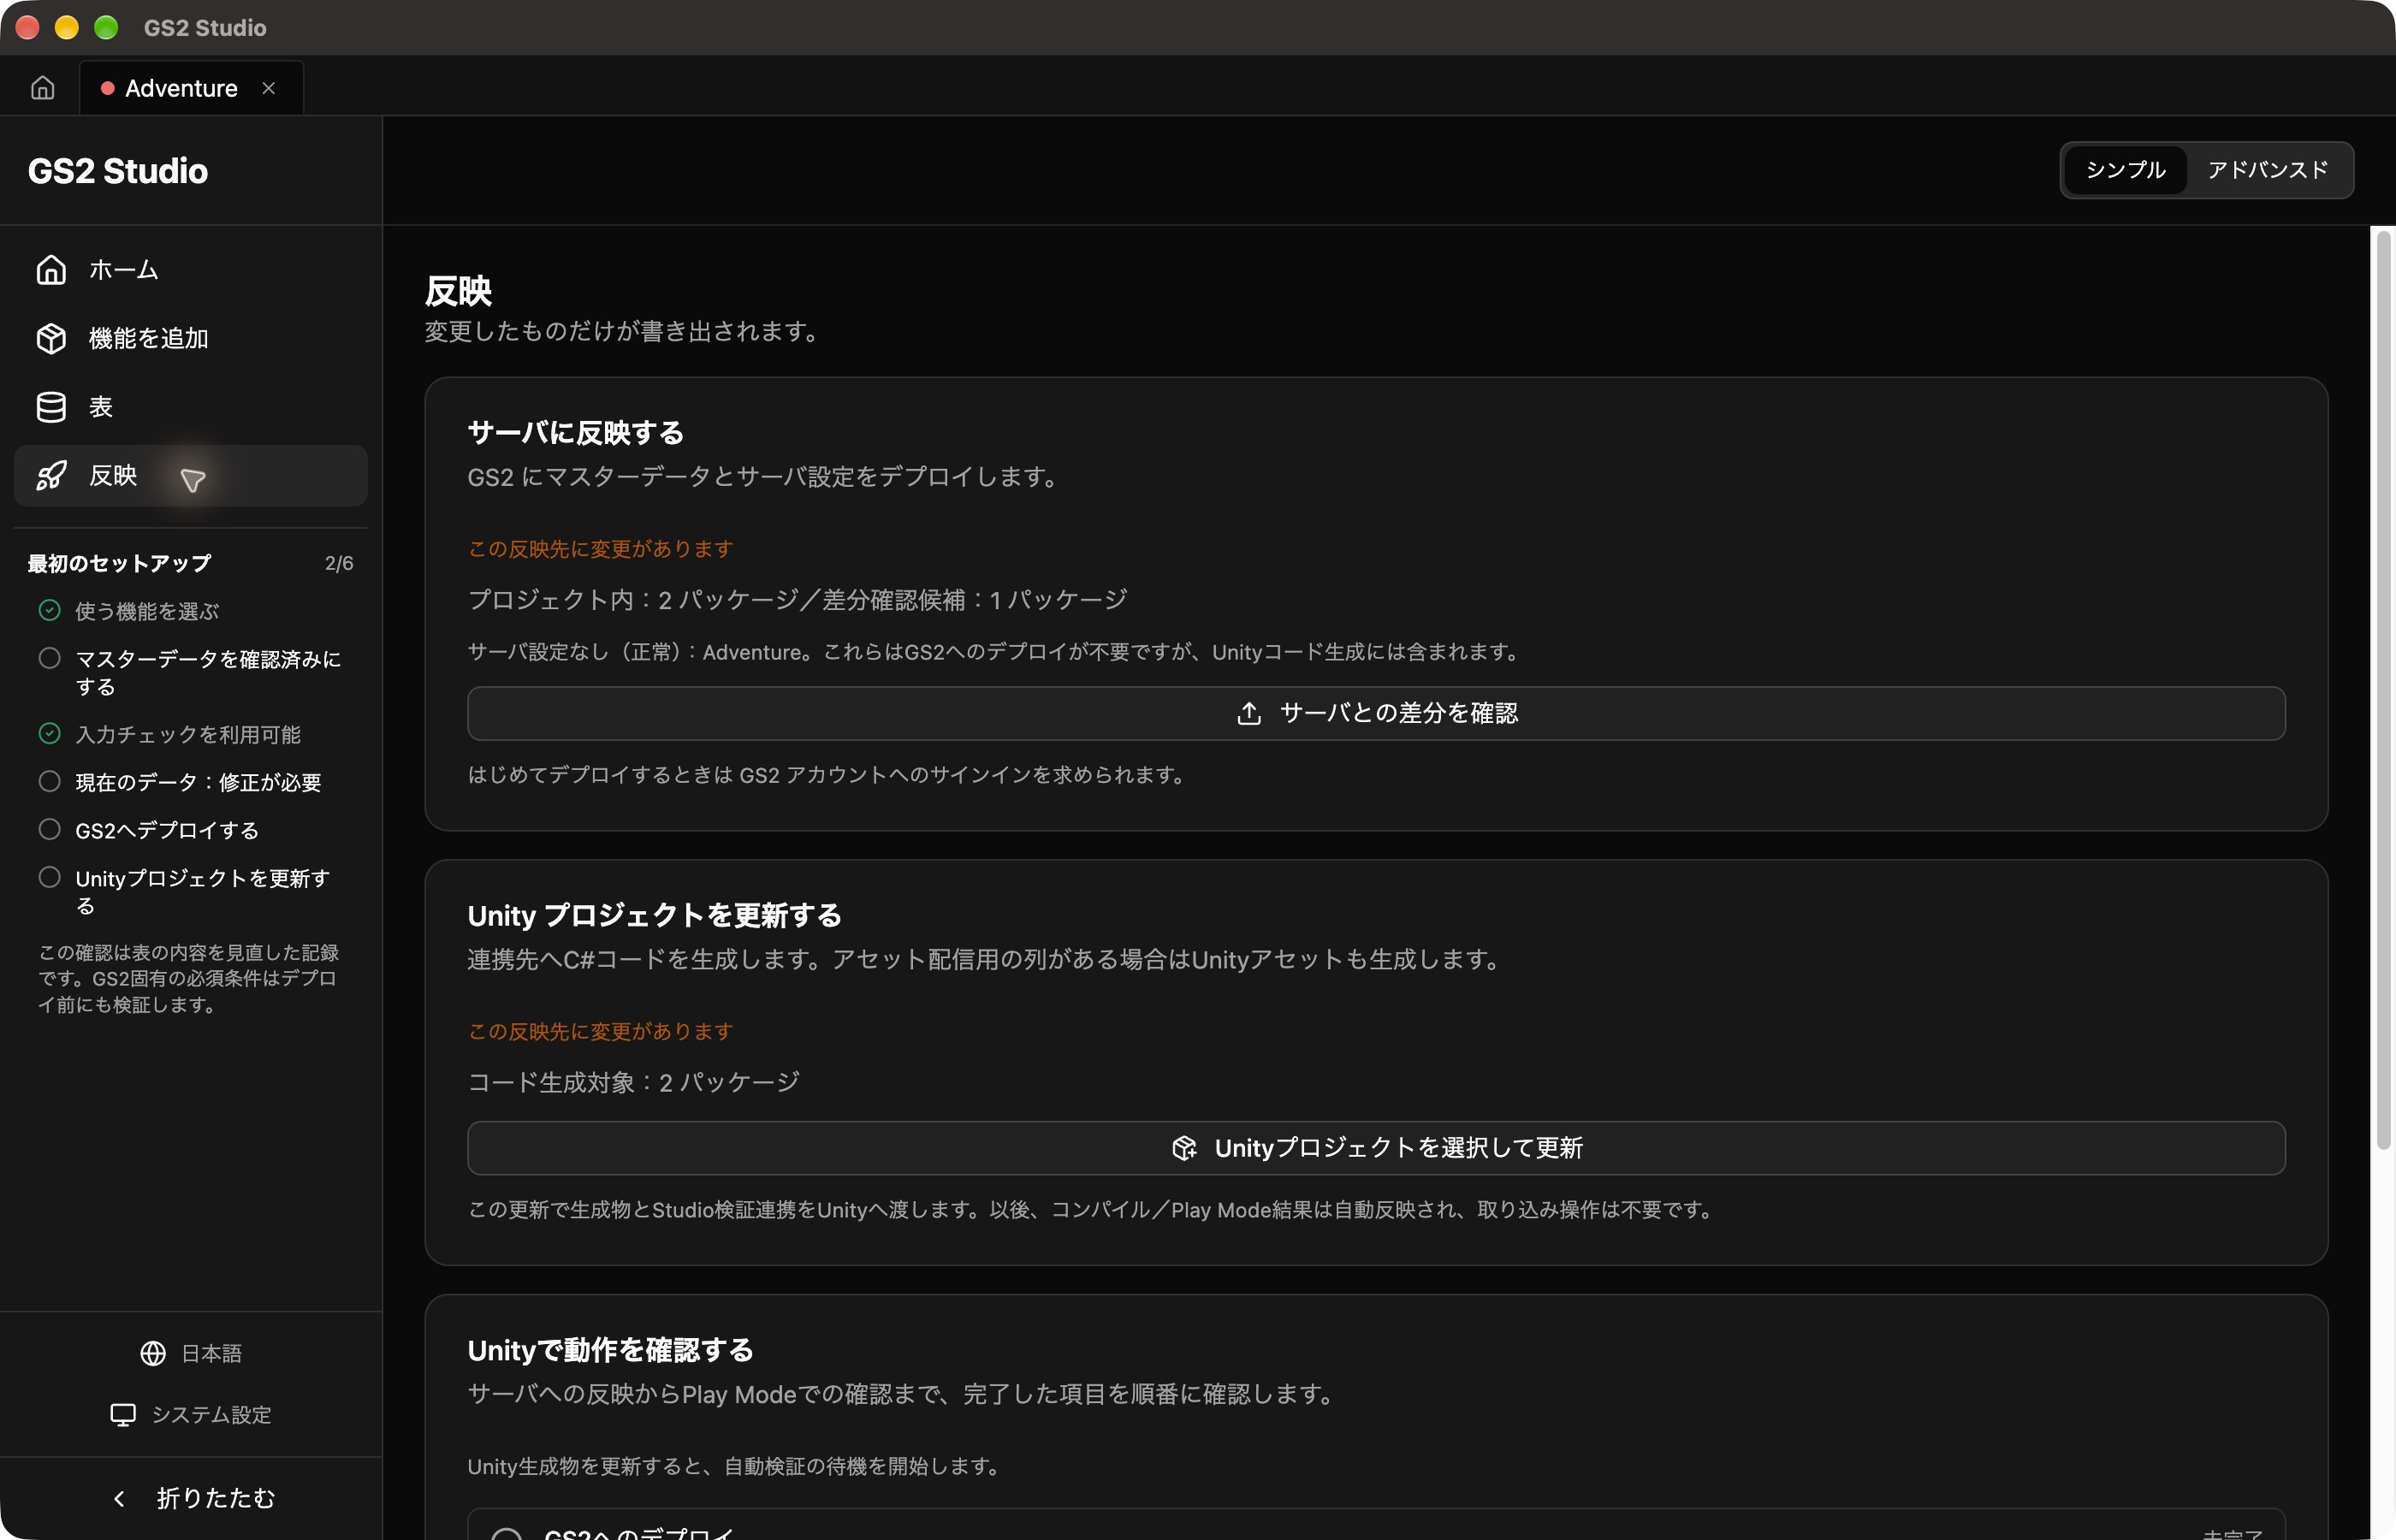 **GS2 Login** 이 표시되면 준비 단계에서 등록한 개발자 계정의 이메일 주소와 비밀번호로 로그인합니다.
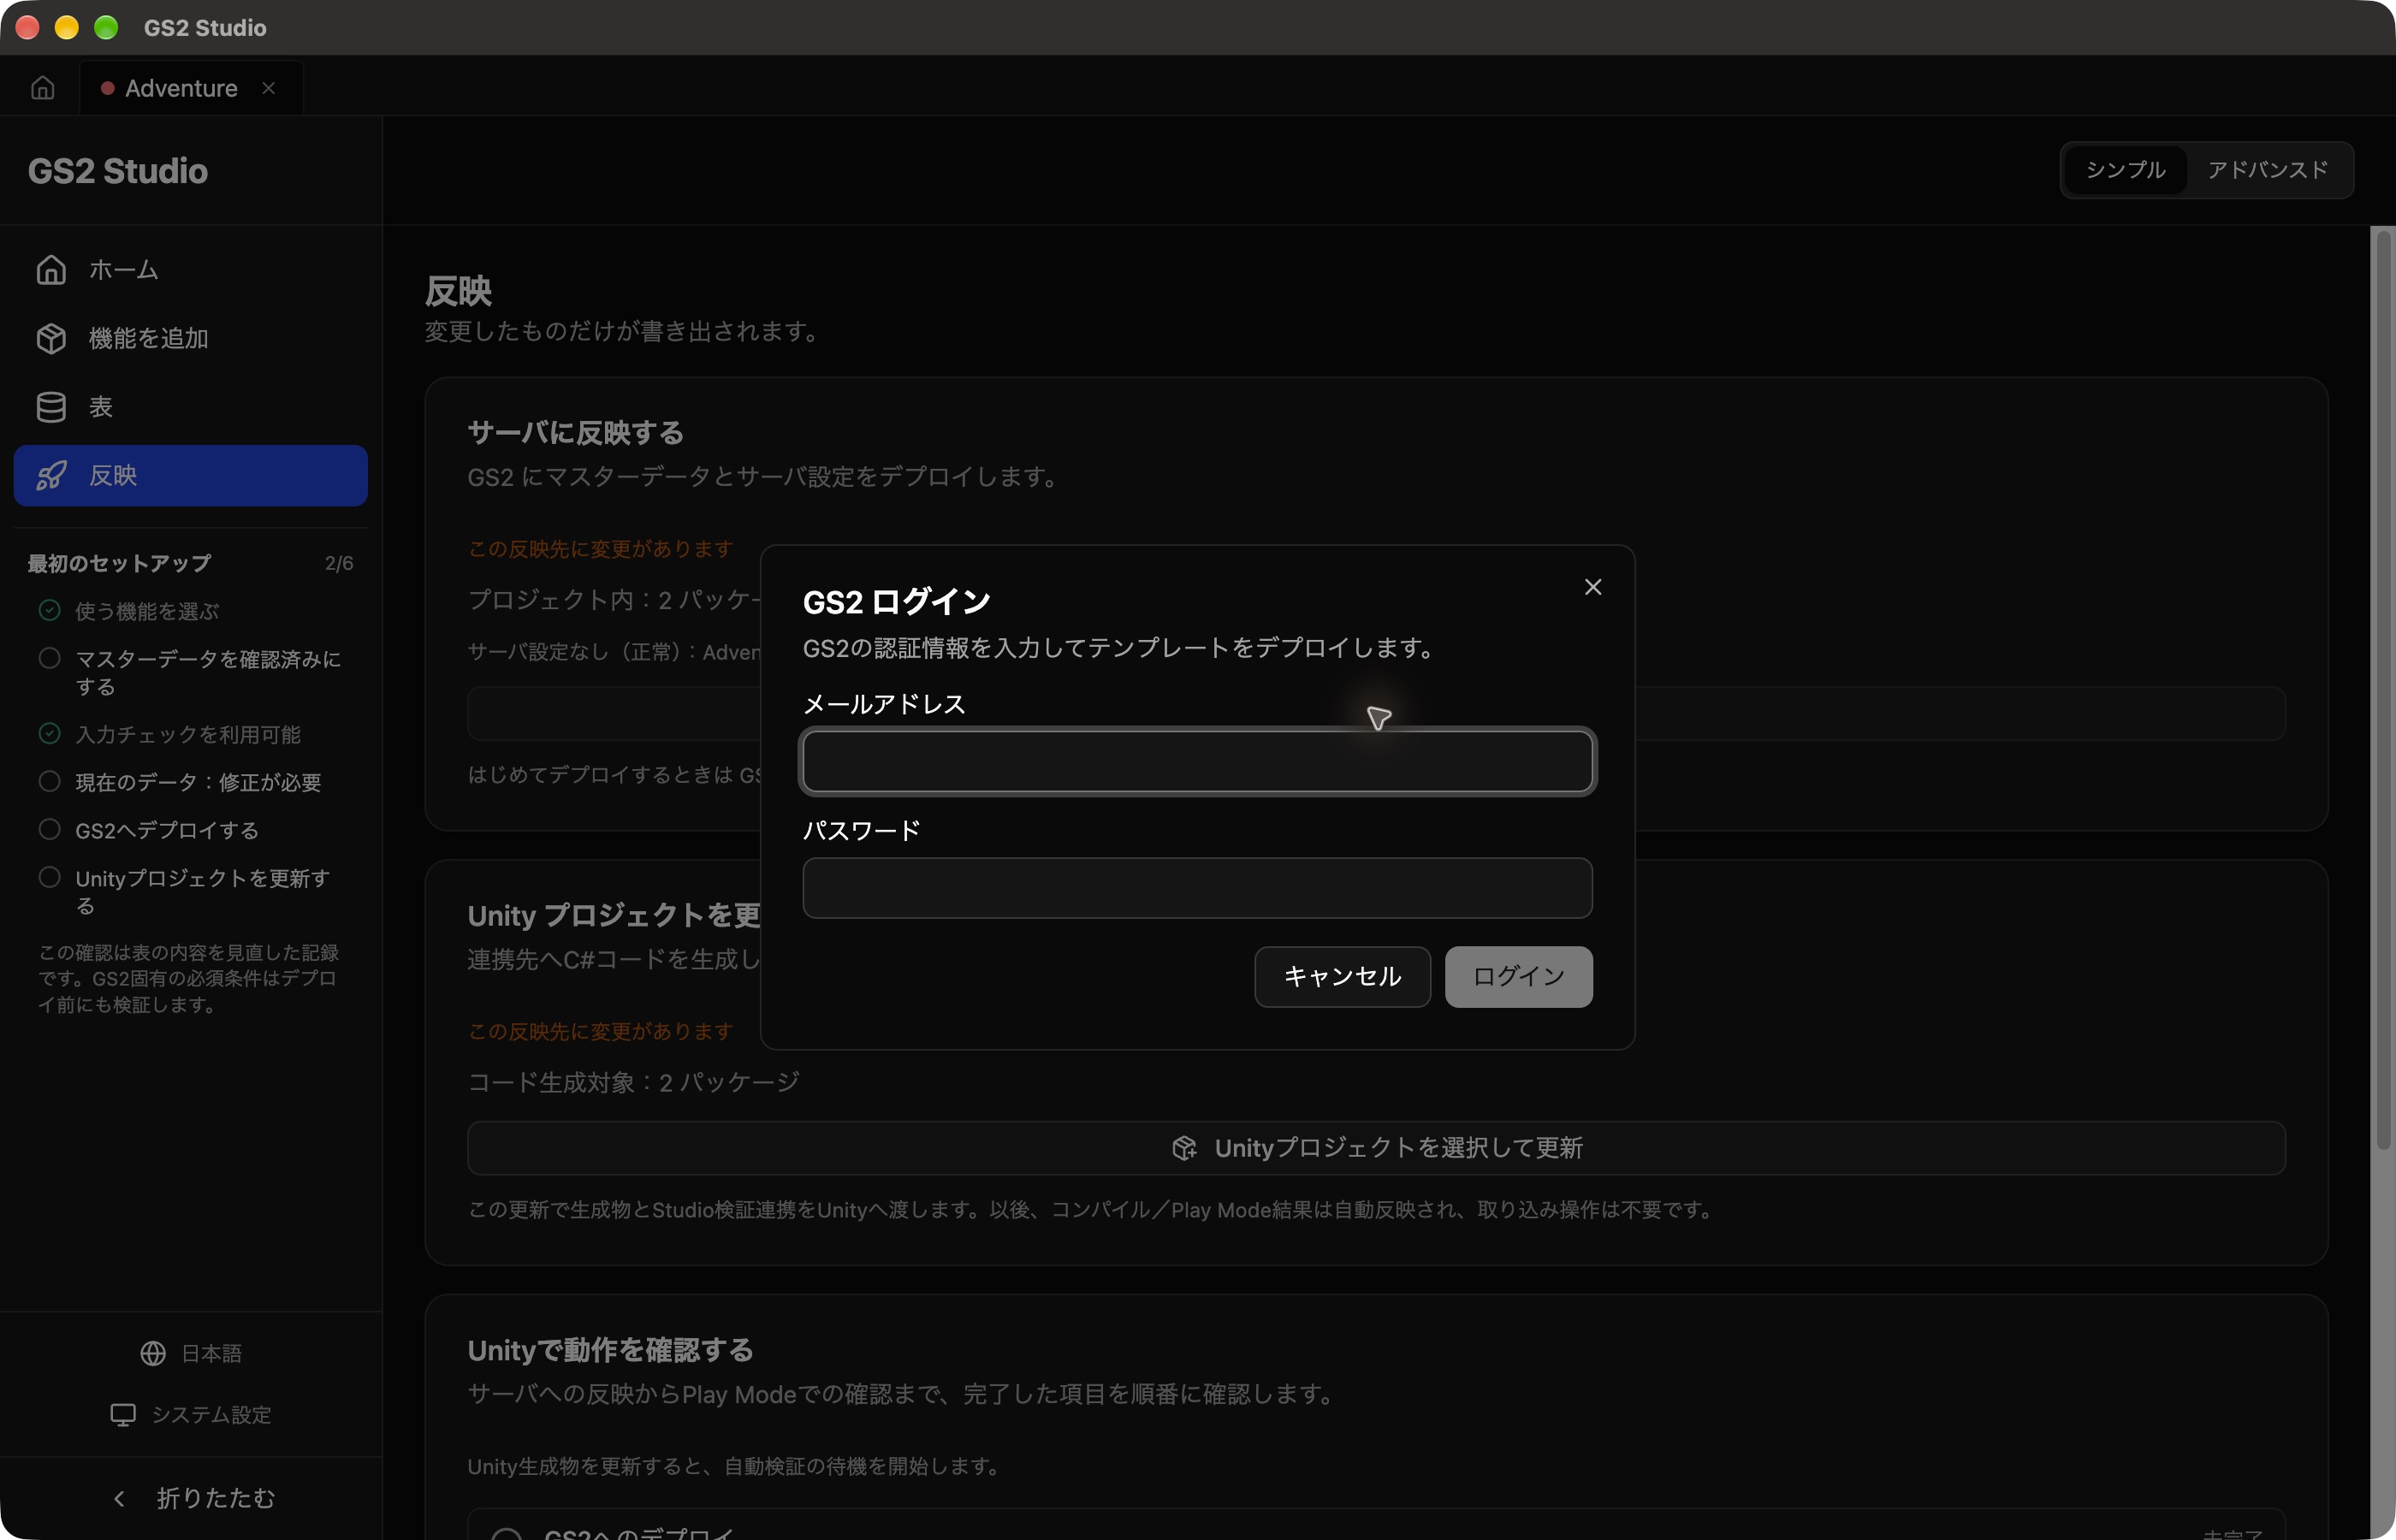 로그인한 뒤 배포 대상과 변경 내용을 확인합니다.
1. **Select GS2 Project** 에서 학습용 `adventure` 프로젝트와 **Tokyo (ap-northeast-1)** 를 선택하고 **Select** 를 누릅니다.
2. **Review changes to GS2** 에서 계정 이전 설정 패키지인 `foundation-core-identity`의 변경 내용을 확인합니다. 새 프로젝트에서는 `Account`라는 네임스페이스가 만들어집니다. 스택 이름은 Studio가 지정한 이름을 사용합니다.
3. **Deploy 1 package** 를 누르고 처리가 끝날 때까지 기다립니다.
4. **Publish** 로 돌아와 **Deploy to the server** 영역에 **Up to date** 가 표시되는지 확인합니다.
이제 플레이어 계정을 저장할 `Account` 네임스페이스가 준비되었습니다.
**SDK (Unity)**
### 콘솔에서 Account 설정 만들기
SDK 과정에서는 템플릿으로 `adventure-account`라는 네임스페이스를 만듭니다.
1. 관리 콘솔에서 학습용 프로젝트의 **Tokyo 리전** 을 엽니다.
2. **Deploy → Stack list → Create stack** 을 선택합니다.
3. 아래 링크에서 템플릿을 다운로드합니다. 스택 이름을 `adventure-login`으로 설정하고 **Template data** 에서 다운로드한 `01-account.yaml`을 선택합니다.
4. **Create** 를 누르고 실행 상태가 **Create complete** 가 될 때까지 기다립니다.
```yaml
GS2TemplateFormatVersion: "2019-05-01"
Description: Adventure tutorial - player accounts
Resources:
AccountNamespace:
Type: GS2::Account::Namespace
Properties:
Name: adventure-account
Outputs:
AccountNamespaceName: !GetAttr AccountNamespace.Item.Name
```
템플릿 다운로드
## 2. Unity에 로그인 기능 추가하기
**Studio**
### Unity에 SDK와 생성 코드 넣기
Unity에서 계정 이전 설정을 사용할 수 있도록 필요한 파일을 Unity 프로젝트로 내보냅니다. 이 작업으로 GS2와 통신하는 SDK, 로그인 컴포넌트가 포함된 GS2-Bind, 선택한 기능을 호출하는 C# 코드가 준비됩니다.
Studio의 `Adventure` 프로젝트와 준비 단계에서 만든 Unity 프로젝트를 열어 둡니다. Unity의 재생을 중지하고 `Adventure` 씬을 저장합니다.
#### 1. 파일을 내보낼 Unity 프로젝트 선택하기
왼쪽에서 **Publish** 를 누릅니다. **Update the Unity project** 영역에서 **Select and update Unity project** 를 누릅니다.
폴더 선택 화면이 열립니다. **`Assets`, `Packages`, `ProjectSettings`가 들어 있는 폴더** 를 선택합니다. Unity 프로젝트 이름이 `AdventureUnity`라면 아래 예시의 `AdventureUnity`를 선택합니다.
```text
AdventureUnity/ ← 이 폴더 선택
├── Assets/
├── Packages/
└── ProjectSettings/
```
`Assets` 폴더나 Studio 설계 데이터를 저장한 폴더를 선택하면 Unity 프로젝트를 업데이트할 수 없습니다.
폴더를 선택하면 업데이트 확인 화면이 열립니다. **Destination** 이 자신의 Unity 프로젝트인지 확인하고 **Update** 를 누릅니다. 스크린샷의 경로는 촬영용 예시입니다.
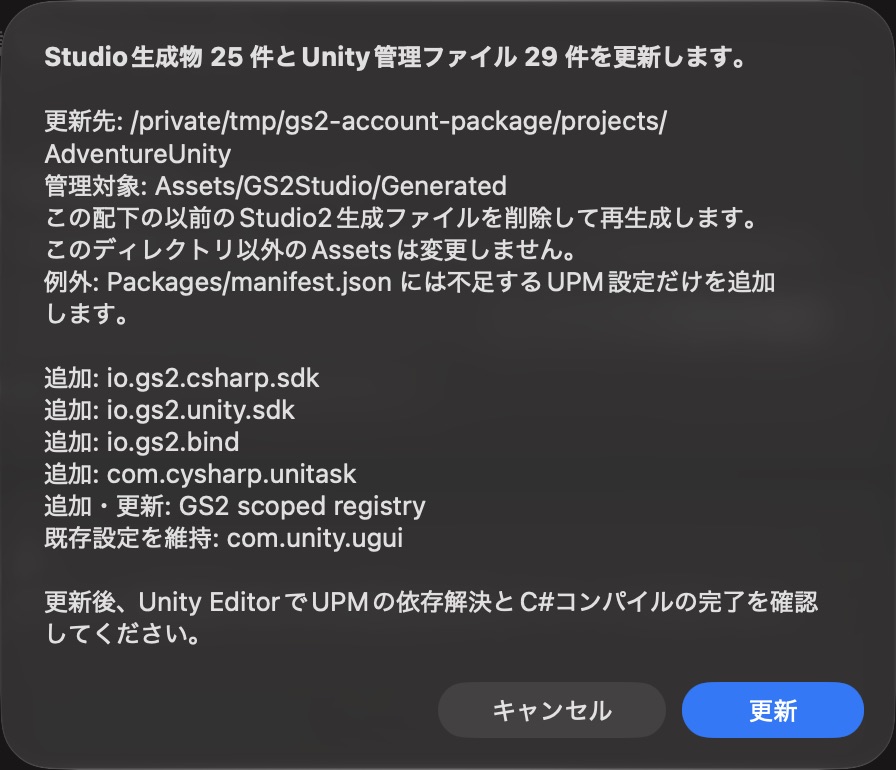 이 작업은 C# 코드를 `Assets/GS2Studio/Generated`에 내보내고 Unity의 패키지 설정에 SDK와 GS2-Bind를 추가합니다. `Generated` 안의 파일은 업데이트할 때 다시 만들어지므로 직접 작성하는 스크립트는 그 밖에 둡니다.
#### 2. Studio에서 내보내기 완료 확인하기
업데이트가 끝나면 **Update the Unity project** 영역에서 다음 내용을 확인합니다.
- 상태가 **Up to date** 로 표시됩니다.
- 아래쪽 **Unity project** 에 선택한 폴더가 표시됩니다.
- **Generated output** 에 `Assets/GS2Studio/Generated`가 표시됩니다.
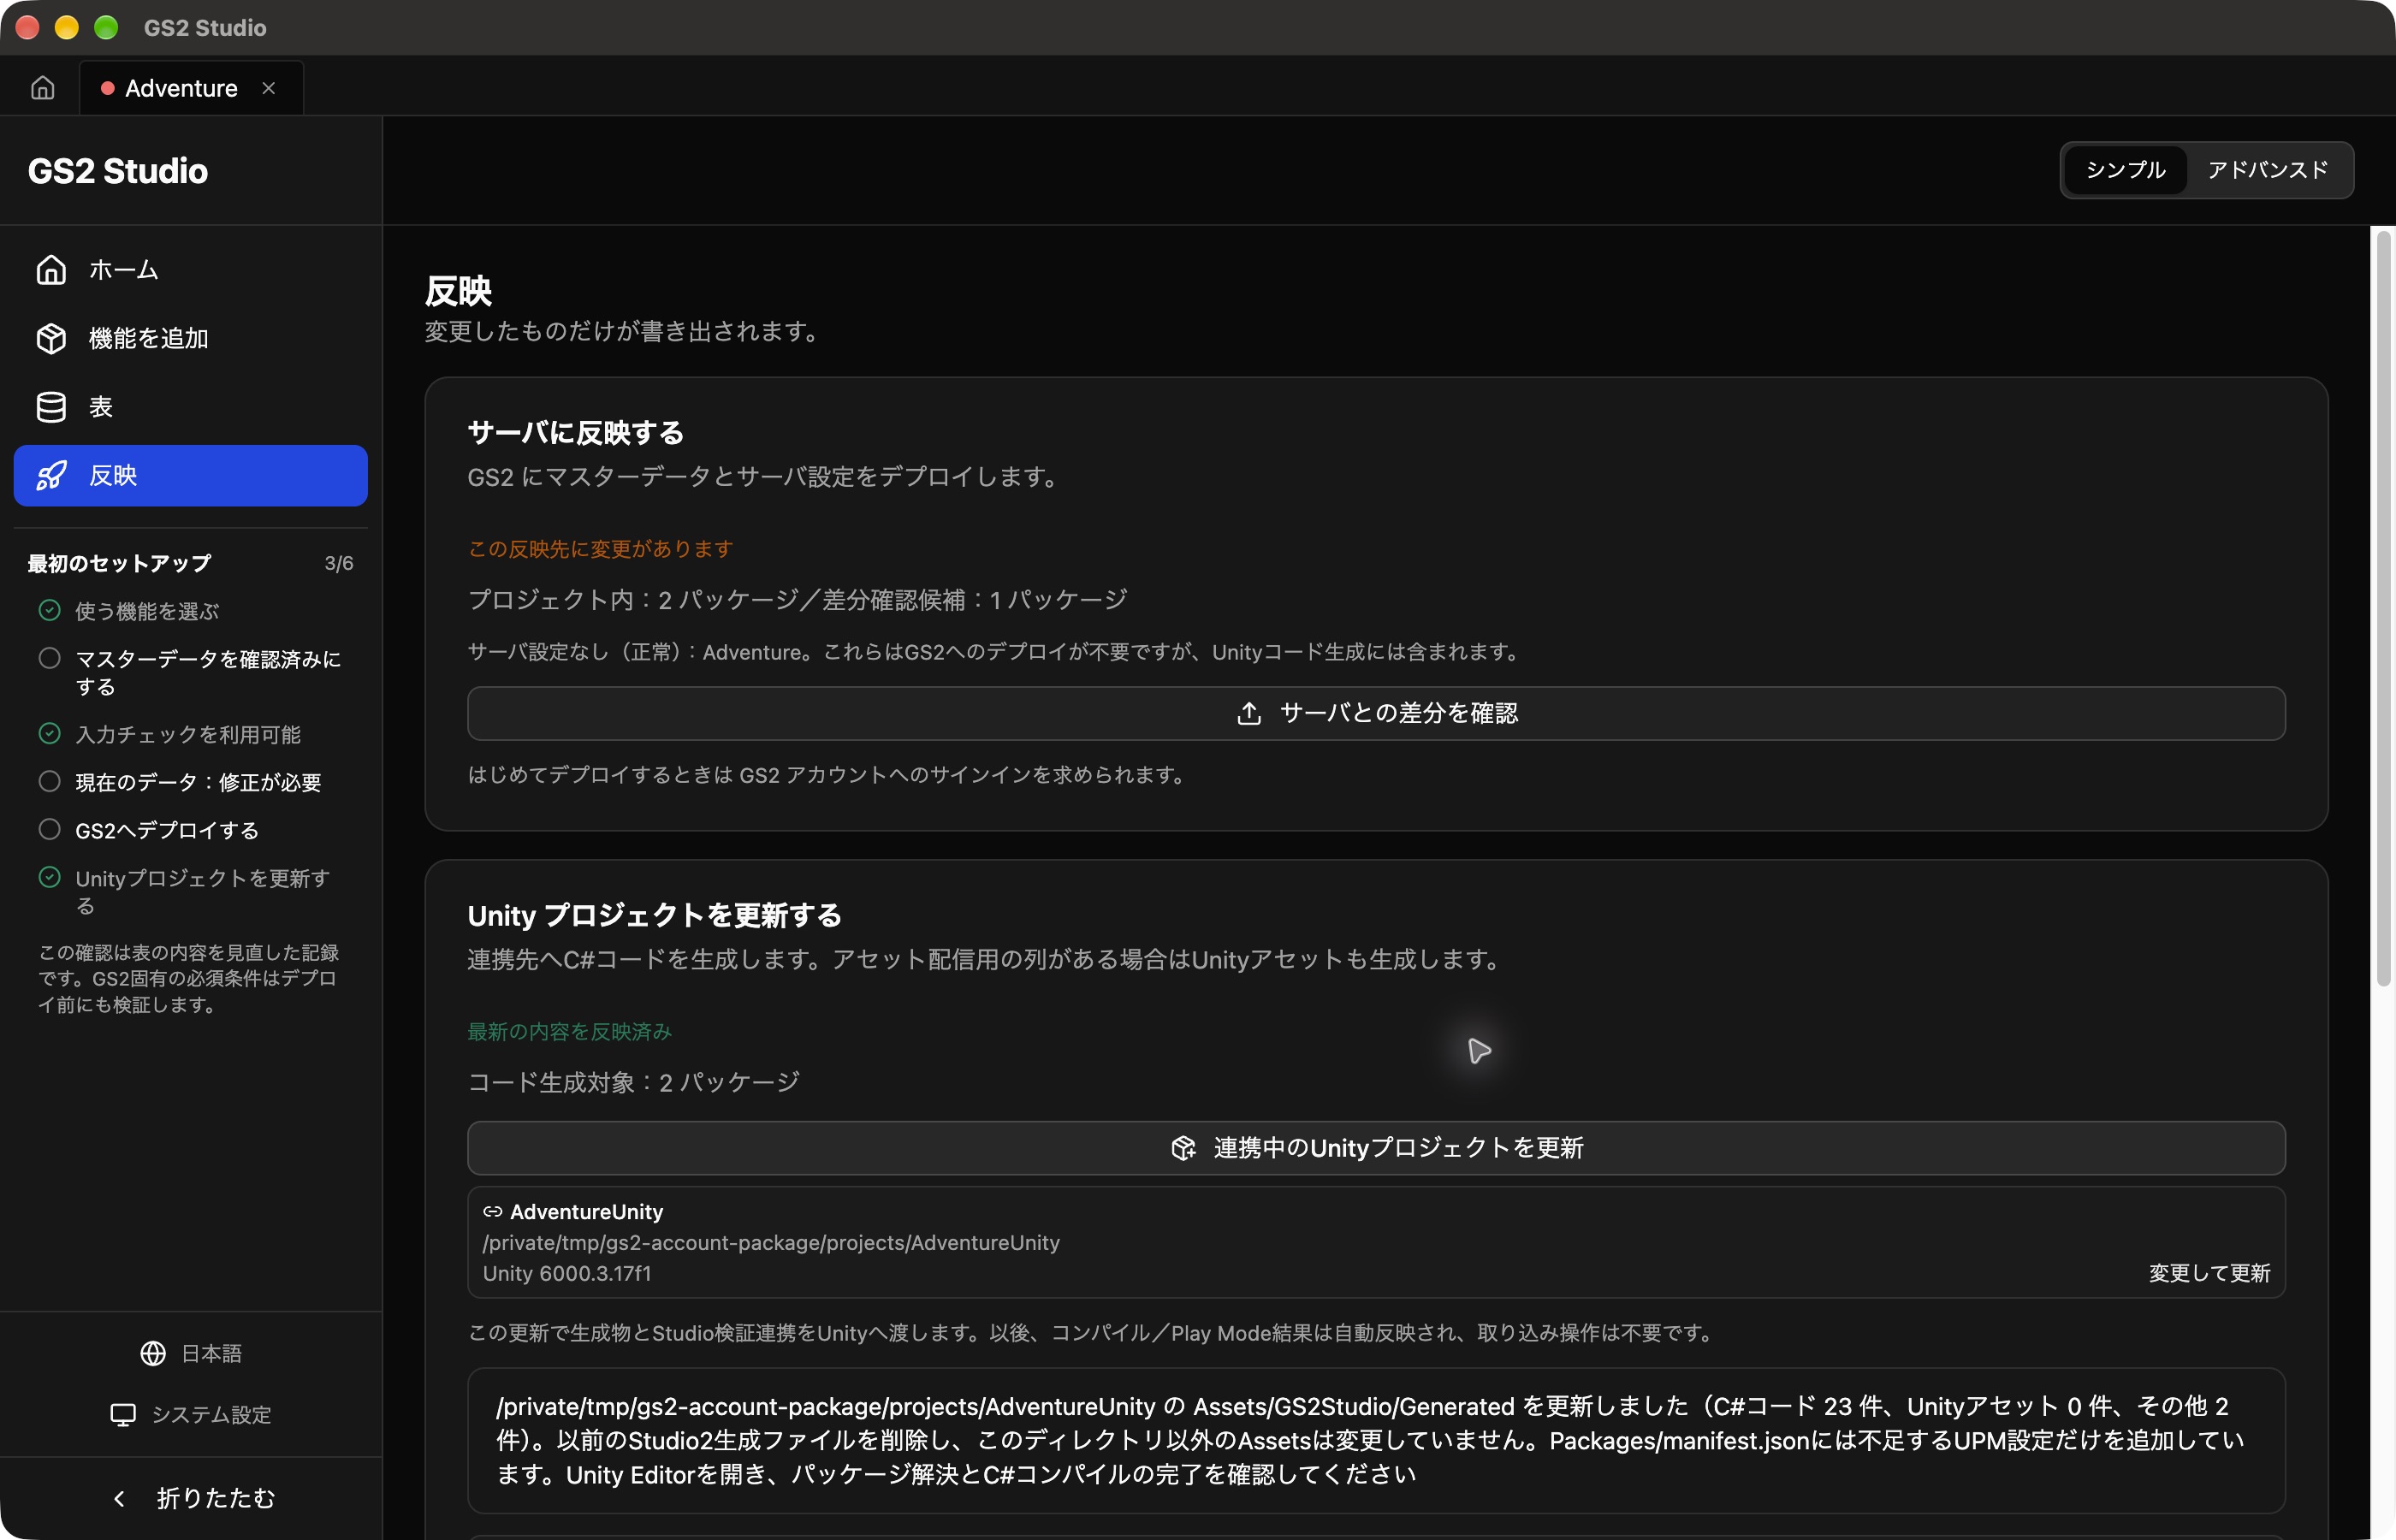 한 번 연결하면 버튼이 **Update linked Unity project** 로 바뀝니다. 다음부터는 이 버튼으로 내보냅니다. 대상을 바꾸려면 표시된 폴더 오른쪽의 **Change and update** 에서 다시 선택합니다.
#### 3. Unity에서 파일이 들어왔는지 확인하기
1. Unity Editor로 돌아갑니다. 필요한 패키지 다운로드와 C# 코드 컴파일이 끝날 때까지 기다립니다.
2. **Project** 창의 **Assets → GS2Studio → Generated** 에 C# 파일이 있는지 확인합니다. Project 창이 보이지 않으면 **Window → General → Project** 로 엽니다.
3. **Window → Package Manager** 를 열고 설치된 패키지 목록에서 `GS2`를 검색합니다. `io.gs2.bind`, `io.gs2.csharp.sdk`, `io.gs2.unity.sdk`가 모두 있는지 확인합니다. 각 패키지를 선택하면 상세 정보에서 패키지 ID를 볼 수 있습니다.
4. **Window → General → Console** 을 열어 빨간색 컴파일 오류가 없는지 확인합니다.
패키지 다운로드가 실패하면 Package Manager의 오류와 네트워크 연결을 확인합니다. C# 오류는 Console의 빨간 항목을 선택하면 자세히 볼 수 있습니다.
### 연결 설정 만들기
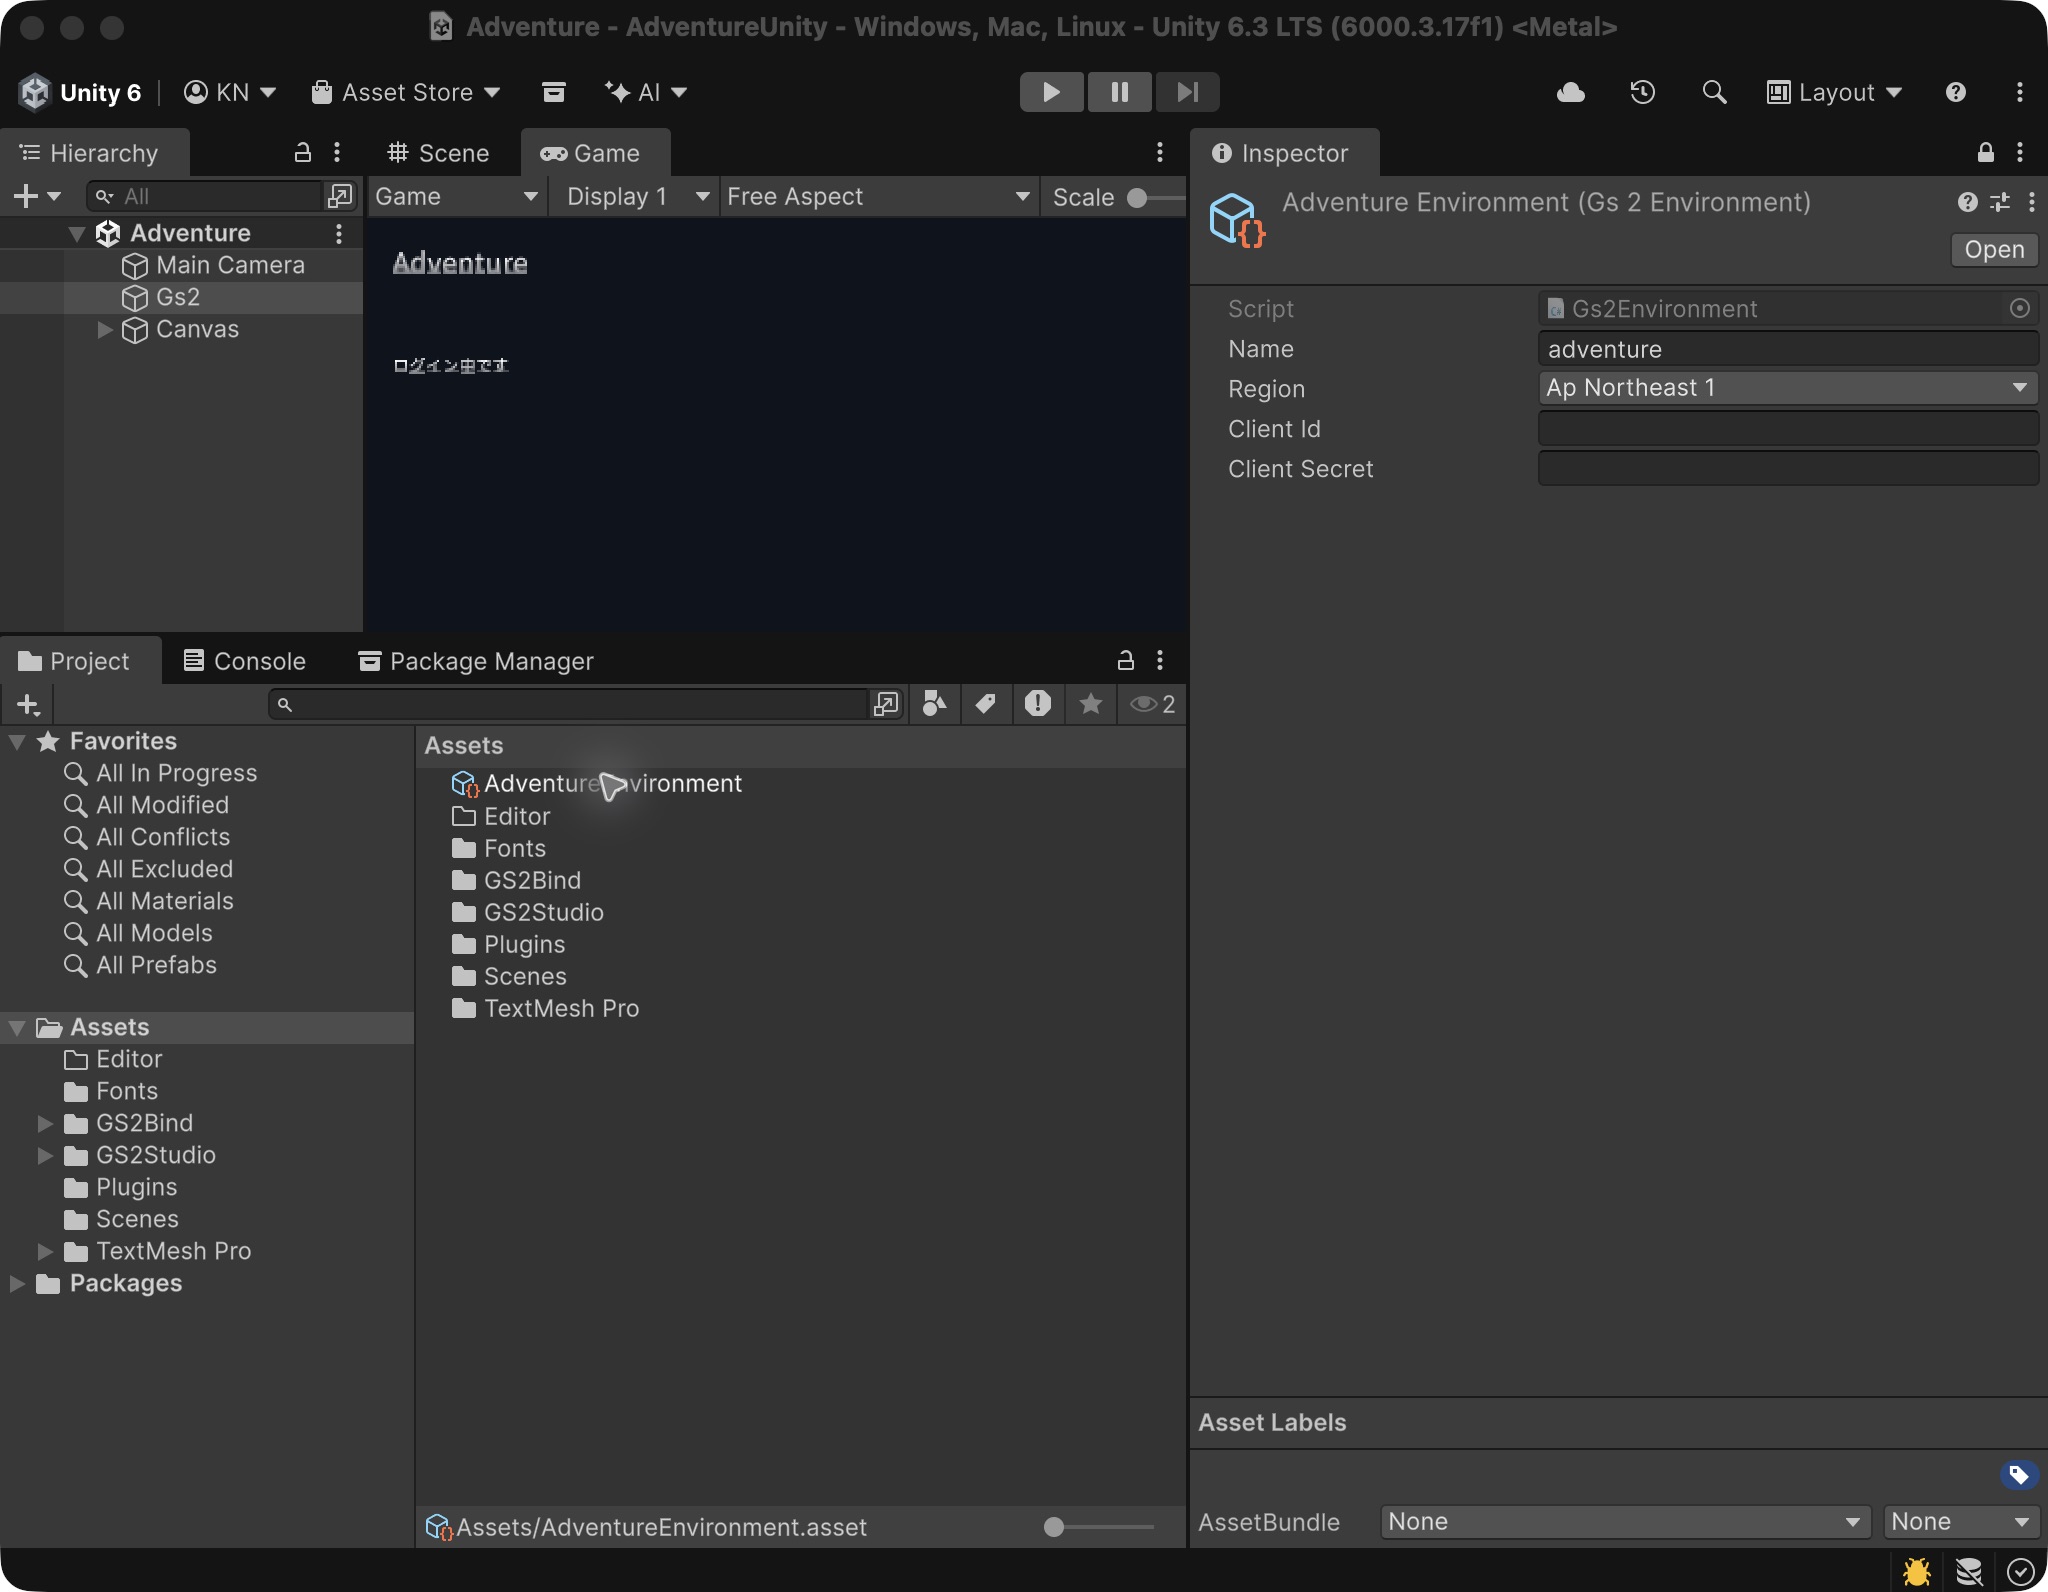
Unity의 Project 창에서 마우스 오른쪽 버튼을 누르고 **Create → Game Server Services → Core → Environment** 를 선택합니다. 에셋 이름을 `AdventureEnvironment`로 정하고 Inspector를 다음과 같이 설정합니다.
| 항목 | 입력할 값 |
| --- | --- |
| Name | `adventure` |
| Region | `ApNortheast1` |
| Client Id | `Default`의 `ApplicationClientId` |
| Client Secret | `Default`의 `ApplicationClientSecret` |
스크린샷에서는 인증 정보를 비워 두었습니다. 자신의 프로젝트에서는 위 표의 값을 입력합니다.
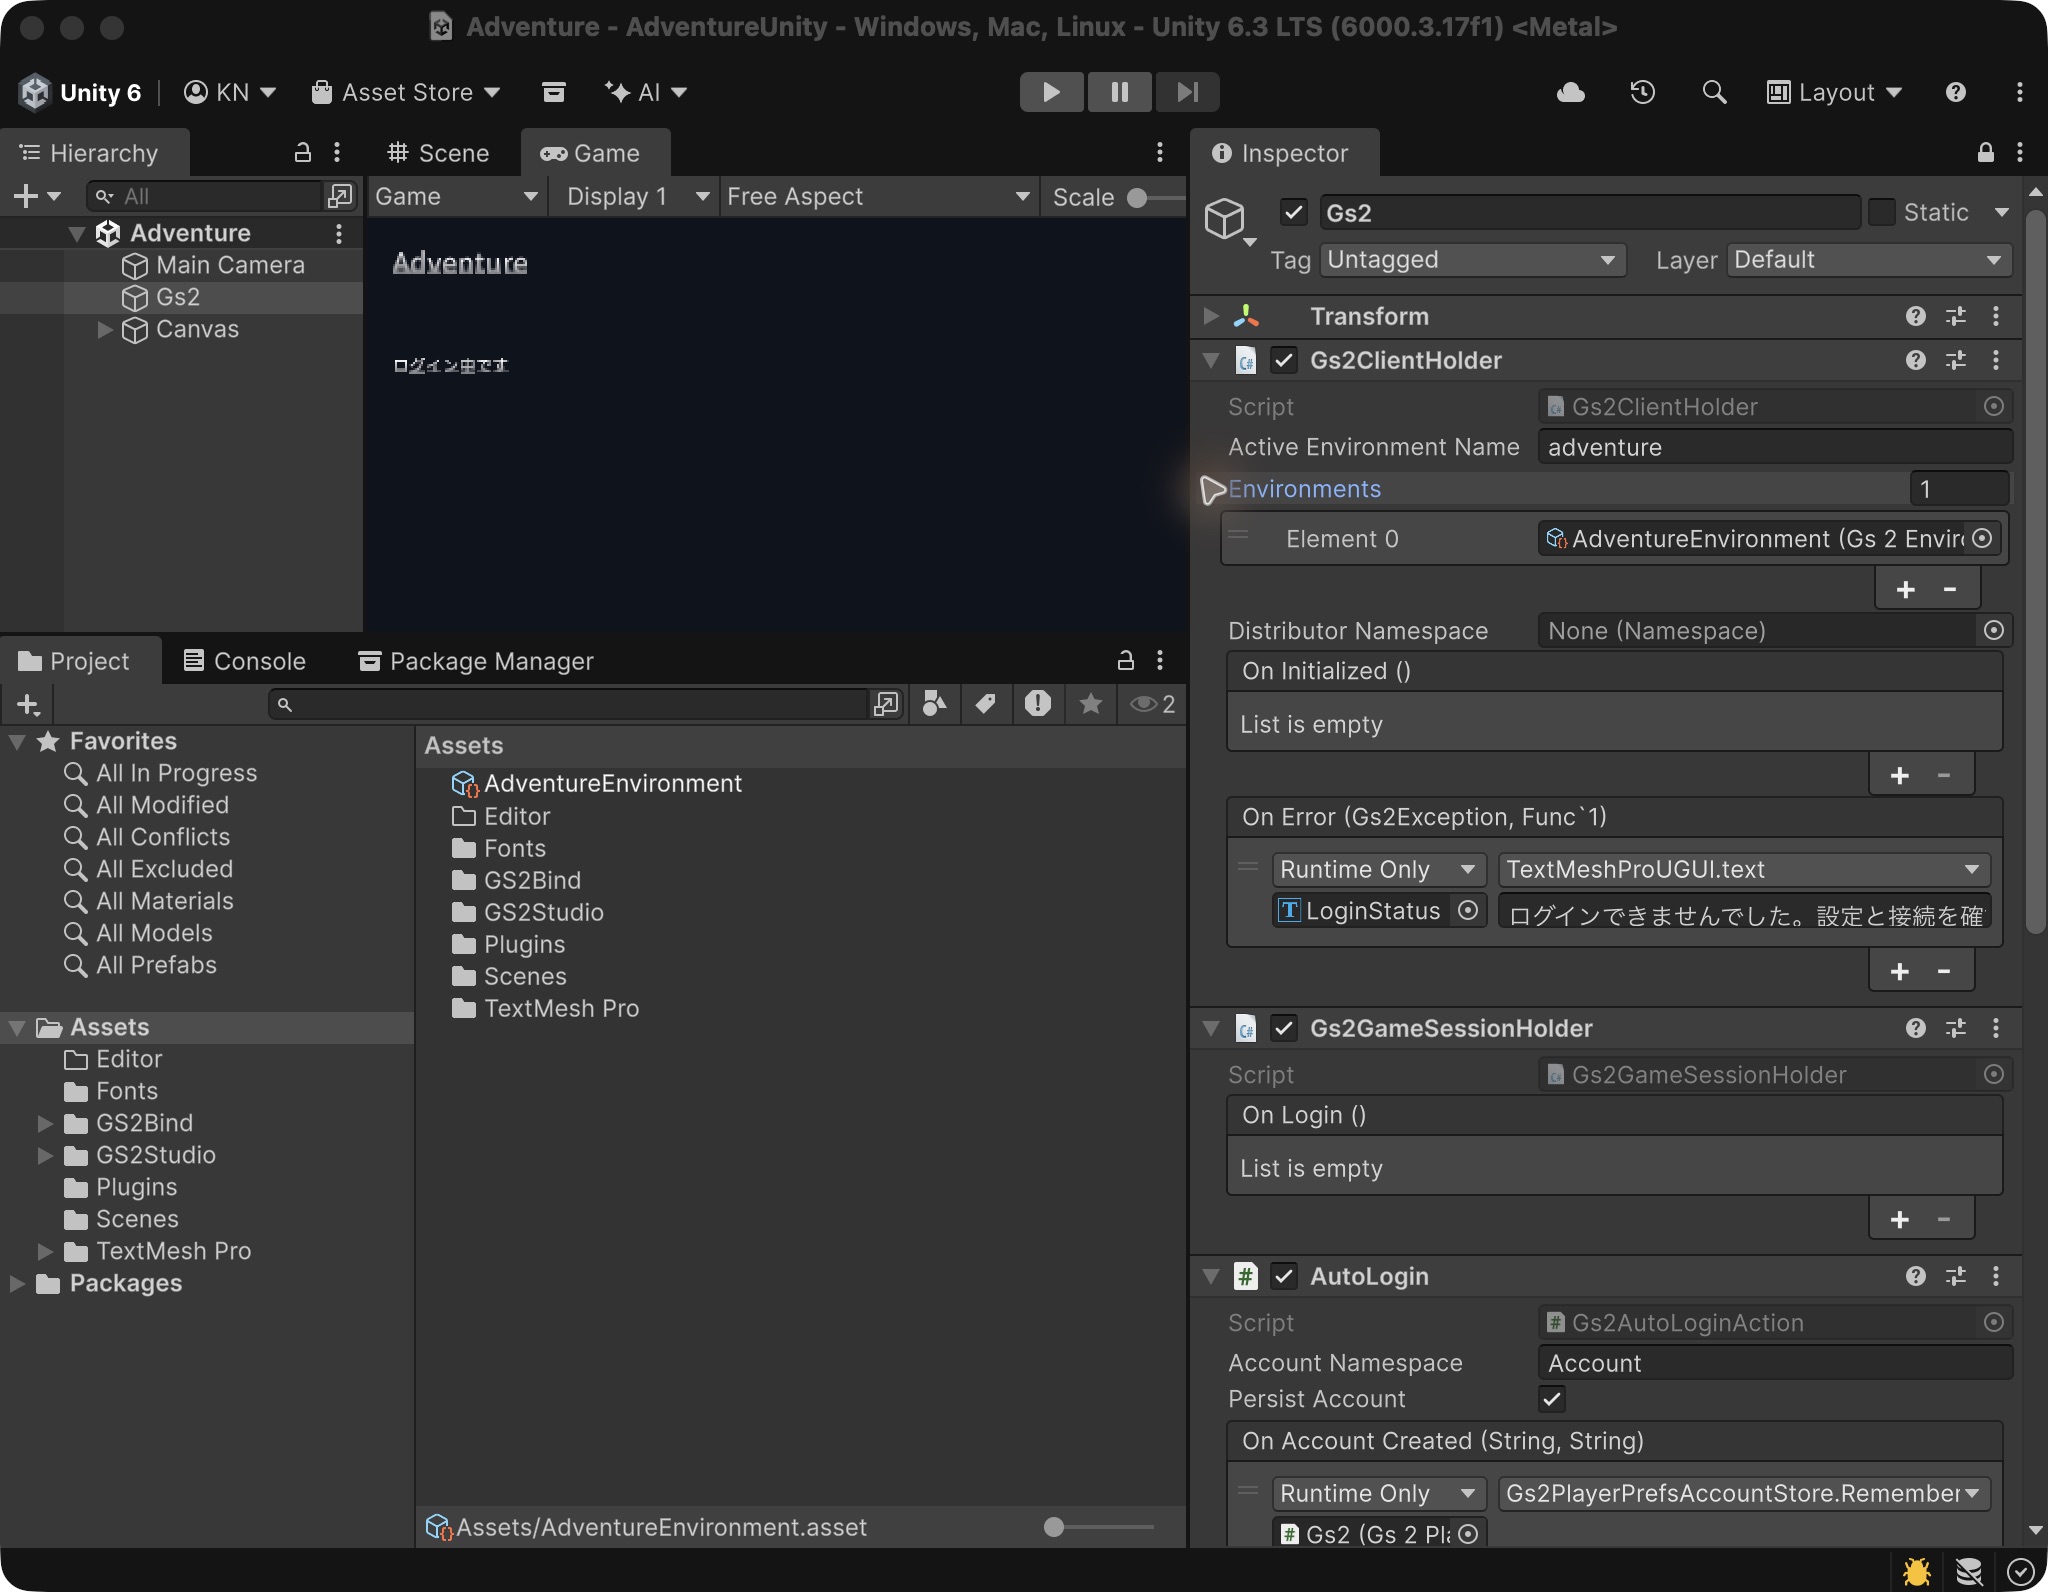
 씬에서 **GameObject → Create Empty** 를 선택하고 이름을 `Gs2`로 지정합니다. Inspector의 **Add Component** 에서 다음 컴포넌트를 추가합니다.
| 컴포넌트 | 설정 |
| --- | --- |
| `GS2/Core/Gs2ClientHolder` | Environments에 `AdventureEnvironment`를 하나 추가하고 Active Environment Name을 `adventure`로 설정 |
| `GS2/Core/Gs2GameSessionHolder` | 기본 설정으로 사용 |
| `GS2/Account/AutoLogin` | Account Namespace는 `Account`, Persist Account는 켜기 |
| `GS2/Account/PlayerPrefs Account Store` | Key Prefix를 `adventure.main`으로 설정 |
| `GS2 Studio/Runtime/Gs2HolderRuntimeContextProvider` | Client Holder와 Session Holder에 위에서 추가한 컴포넌트 할당 |
`Environment`의 **Name** 과 Client Holder의 **Active Environment Name** 을 같게 설정합니다. 에셋 파일 이름만 바꾸어서는 이 값이 설정되지 않습니다.
 ### 계정 저장과 복원 이벤트 연결하기
AutoLogin의 이벤트에서 **+** 를 누르고 같은 `Gs2` 오브젝트를 할당합니다. 함수를 선택할 때는 인수를 받는 **Dynamic** 항목을 선택합니다.
| AutoLogin 이벤트 | 연결할 함수 |
| --- | --- |
| On Account Created | `Gs2PlayerPrefsAccountStore.Remember` (Dynamic의 string, string) |
| On Restore Account | `Gs2PlayerPrefsAccountStore.Restore` (Dynamic의 Gs2AutoLoginAction) |
Persist Account를 켜는 것과 함께 두 이벤트도 연결해야 합니다. 이 연결로 처음 발급된 계정 정보를 저장하고 다음 재생 때 불러옵니다.
### 플레이어 ID 표시하기
Unity 텍스트와 **Player ID Label** 을 연결하여 로그인한 플레이어의 ID를 표시합니다.
#### 1. 표시할 텍스트 만들기
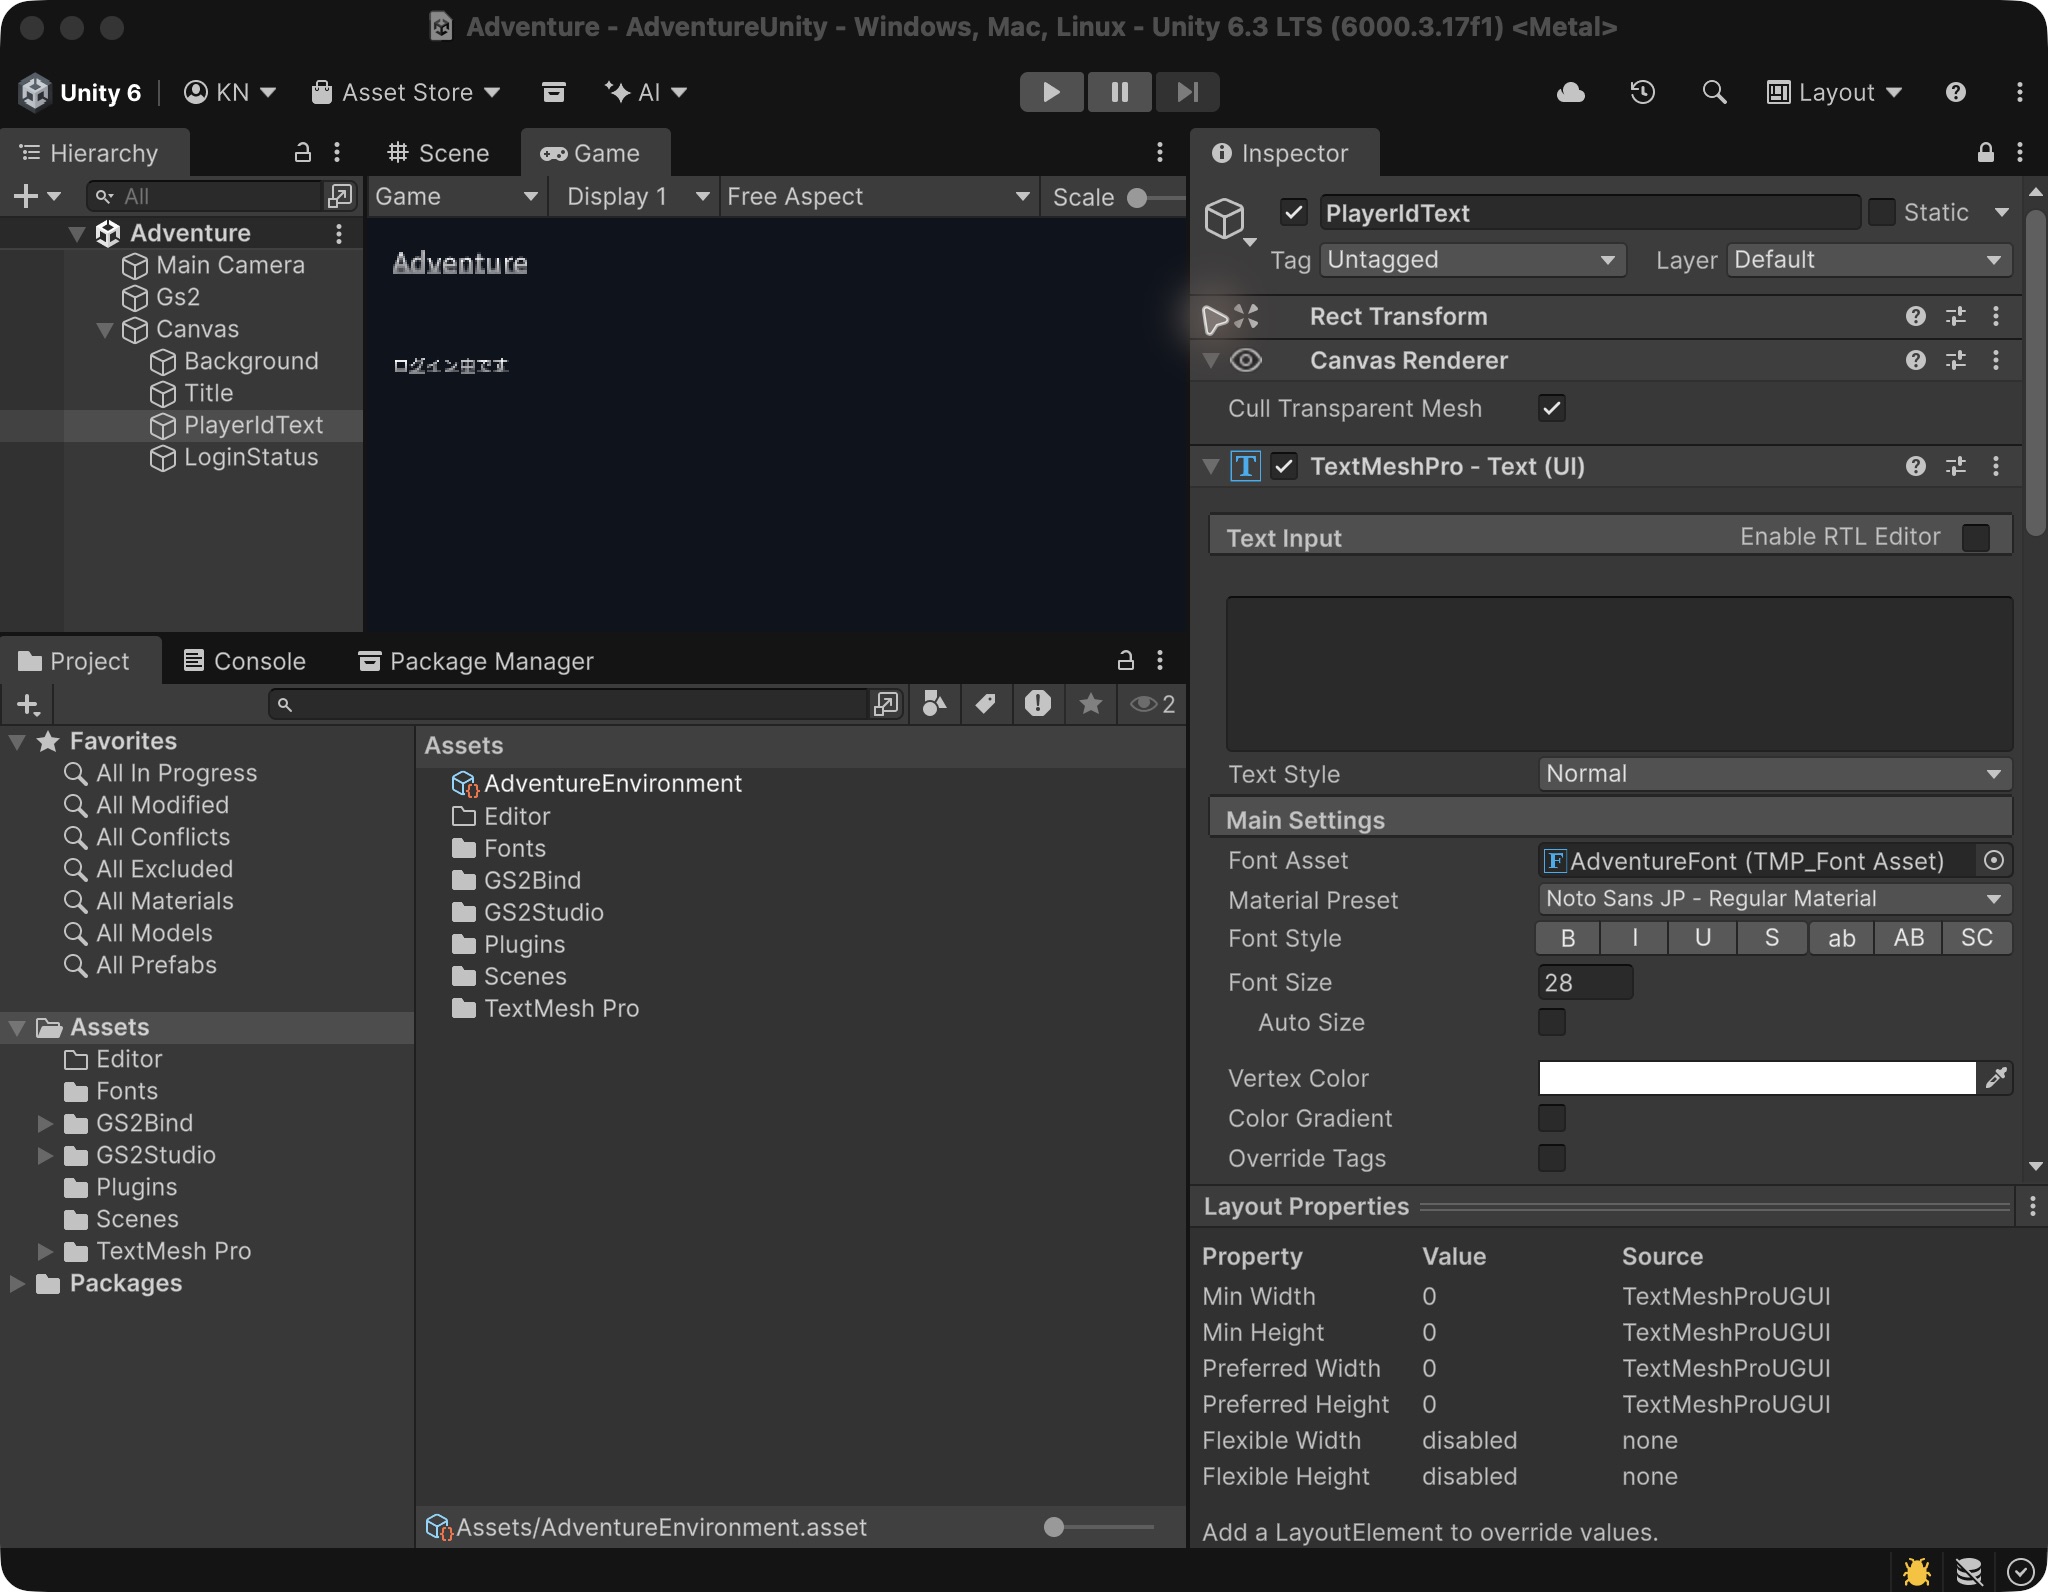
1. **GameObject → UI (Canvas) → Text - TextMeshPro** 를 선택하고 이름을 `PlayerIdText`로 지정합니다. Canvas가 없으면 함께 만들어집니다.
2. **TMP Importer** 가 열리면 **Import TMP Essentials** 를 누릅니다.
3. 한글을 표시하려면 Noto Sans KR 폰트 파일(새 탭)을 열고 **Download raw file** 로 다운로드합니다. Unity의 Project 창에 `Assets/Fonts` 폴더를 만들고 `NotoSansKR-Regular.otf`를 끌어 넣습니다.
4. 추가한 폰트를 선택하고 **Assets → Create → TextMeshPro → Font Asset → SDF** 를 선택합니다. 만들어진 Font Asset 이름을 `AdventureFont`로 바꾸고 Inspector의 **Atlas Population Mode** 를 **Dynamic** 으로 설정합니다.
5. Hierarchy에서 `PlayerIdText`를 선택하고 TextMeshPro의 **Font Asset** 에 `AdventureFont`를 할당합니다.
6. Rect Transform에서 화면 위쪽에 보이도록 위치와 가로 폭을 조정합니다. 긴 플레이어 ID도 읽을 수 있도록 폭을 넉넉히 잡습니다.
7. TextMeshPro의 **Text Input** 을 비웁니다. 로그인 후 컴포넌트가 표시할 문자열을 전달합니다.
 #### 2. Player ID Label 연결하기
`PlayerIdText`를 선택한 상태에서 Inspector의 **Add Component → GS2 → Core → Player ID Label** 을 선택합니다.
| 항목 | 설정 |
| --- | --- |
| Session Holder | Hierarchy의 `Gs2`를 끌어다 할당 |
| Format | `플레이어 ID: {userId}` |
**On Update** 의 **+** 를 누르고 `PlayerIdText` 자신을 할당합니다. 함수 목록에서 **TextMeshProUGUI → Dynamic string → text** 를 선택합니다. 고정 문자열을 입력하는 항목이 아니라 전달받은 문자열을 표시하는 **Dynamic string** 을 사용합니다.
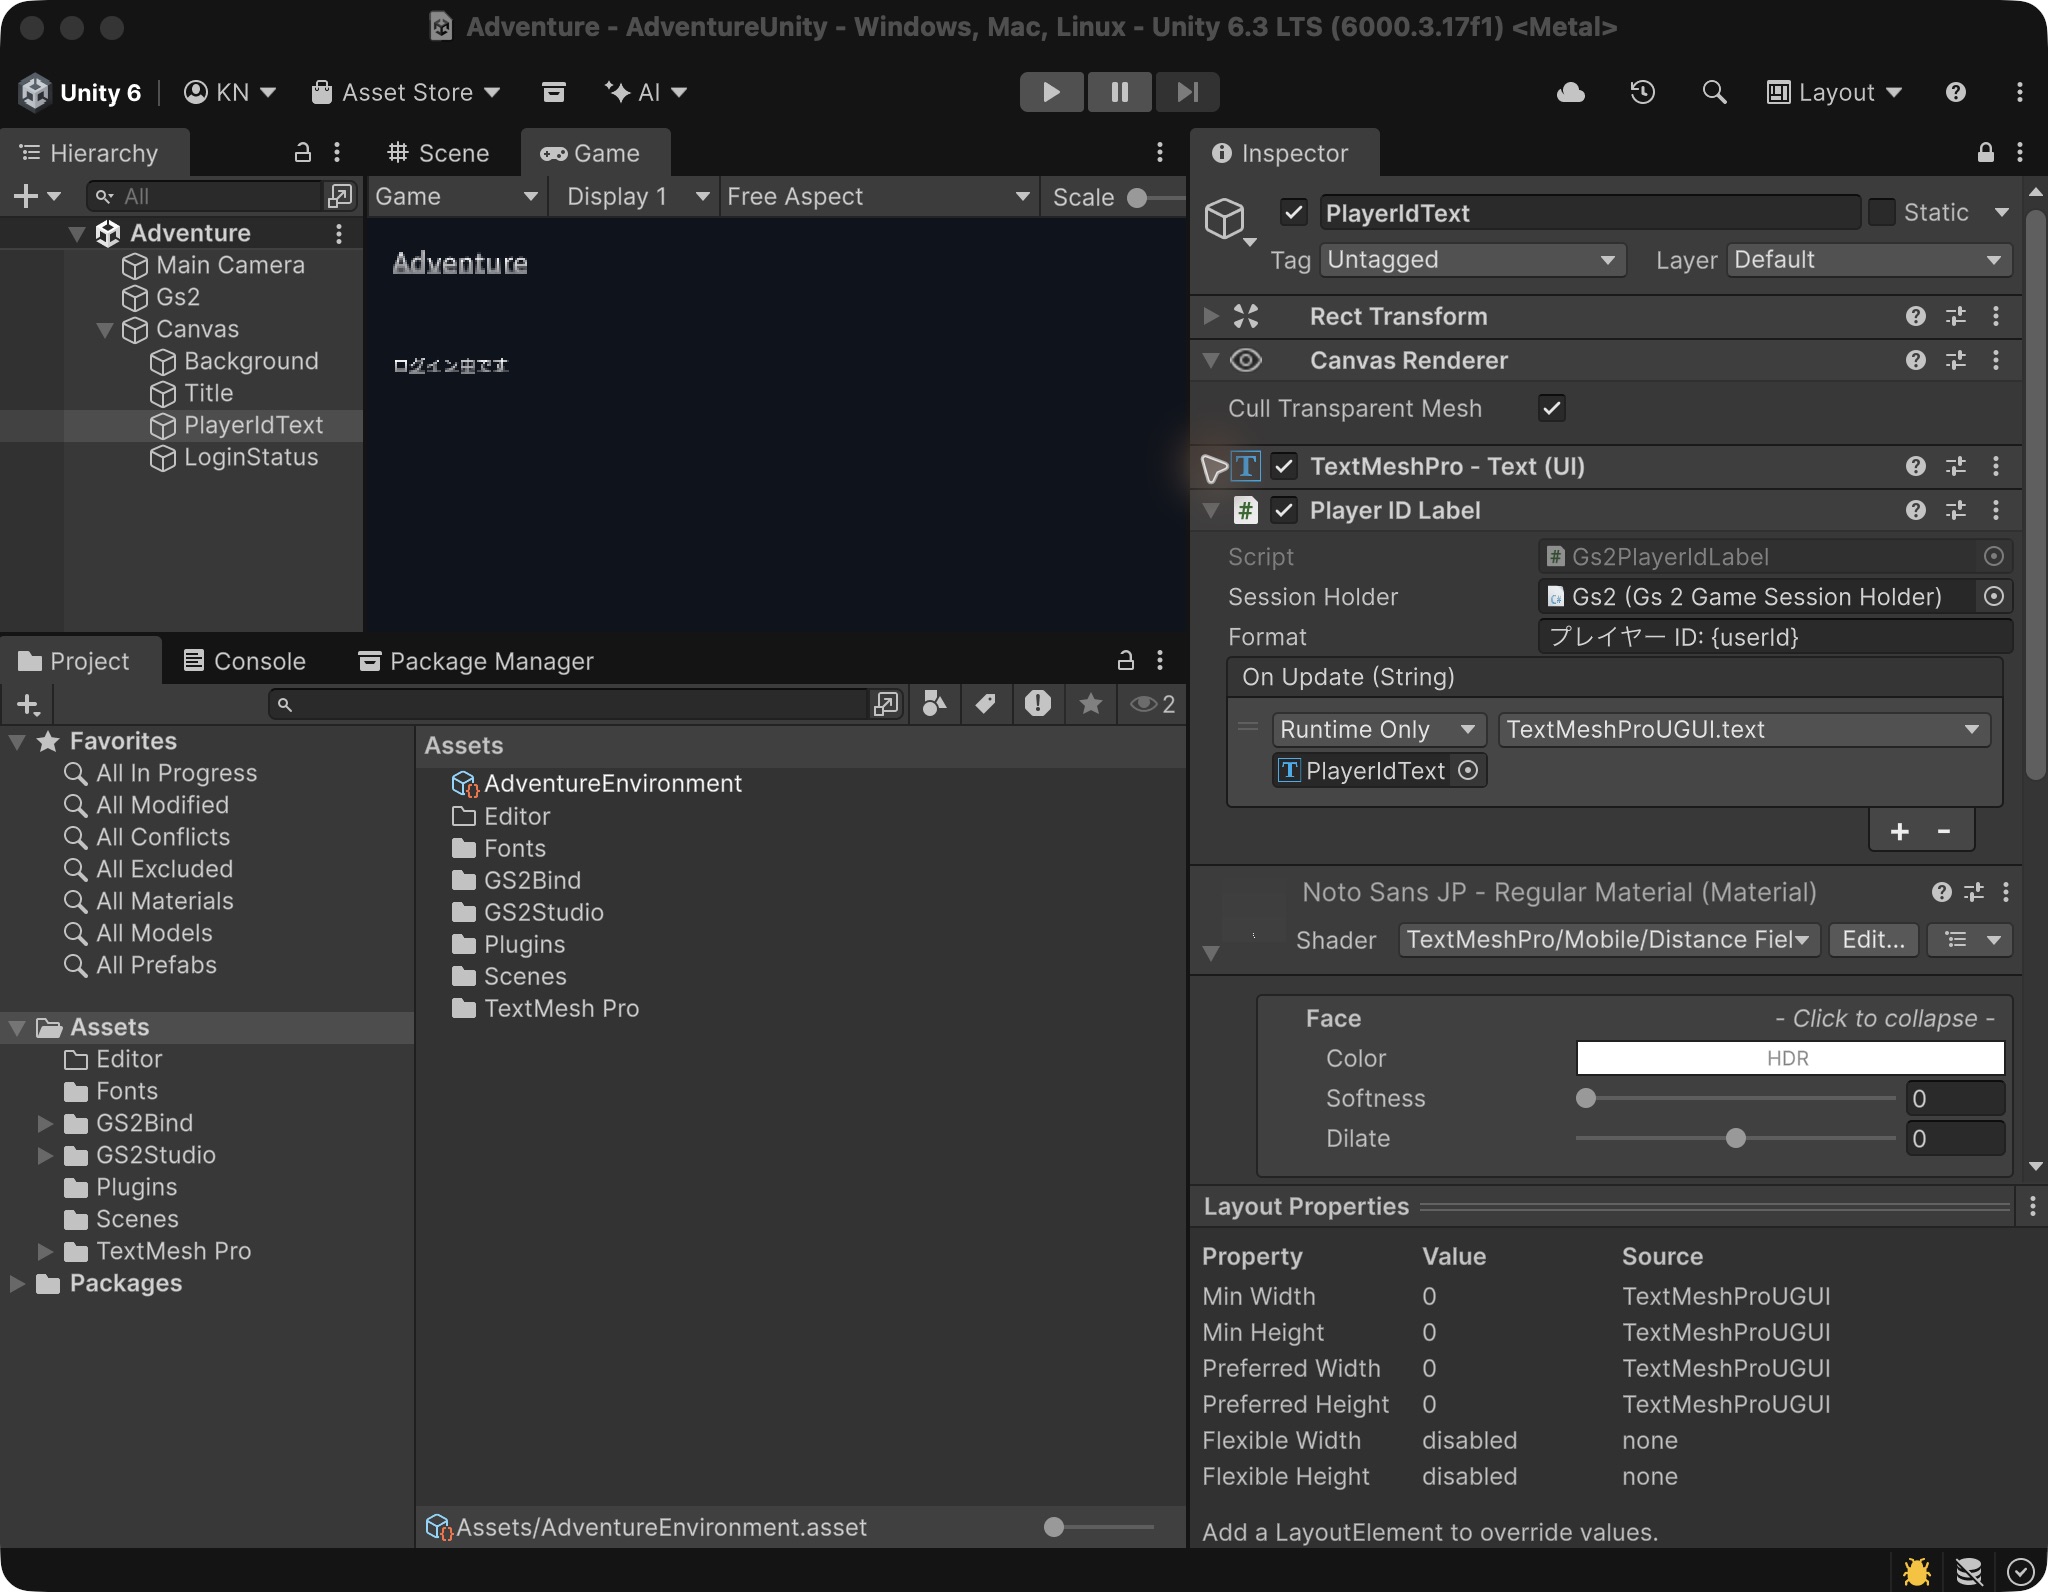 이제 로그인에 성공하면 ID가 표시됩니다. 저장된 계정으로 다시 로그인하거나 로그인 후 이 텍스트를 활성화해도 현재 ID로 갱신됩니다.
### 로그인 상태와 오류 표시하기
플레이어 ID와 별도로 로그인 상태를 보여 줄 텍스트도 만듭니다.
1. Canvas 아래에 **Text - TextMeshPro** 를 하나 더 만들고 `LoginStatus`로 이름을 정합니다. `PlayerIdText` 아래에 배치합니다.
2. **Font Asset** 에 `AdventureFont`를 할당하고 **Text Input** 에 `로그인 중입니다`를 입력합니다.
3. `Gs2`의 AutoLogin에서 **On Auto Login Complete** 의 **+** 를 누르고 `LoginStatus`를 할당합니다. 고정 문자열을 지정하는 **TextMeshProUGUI → text** 항목을 선택하고 입력란은 비워 둡니다. 로그인에 성공하면 상태 메시지만 사라집니다.
4. Client Holder와 AutoLogin 각각의 **On Error** 에 `LoginStatus`를 할당합니다. 고정 문자열을 지정하는 **TextMeshProUGUI → text** 항목을 선택하고 `로그인하지 못했습니다. 설정과 연결을 확인해 주세요`를 입력합니다. 여기서는 **Dynamic** 항목을 사용하지 않습니다.
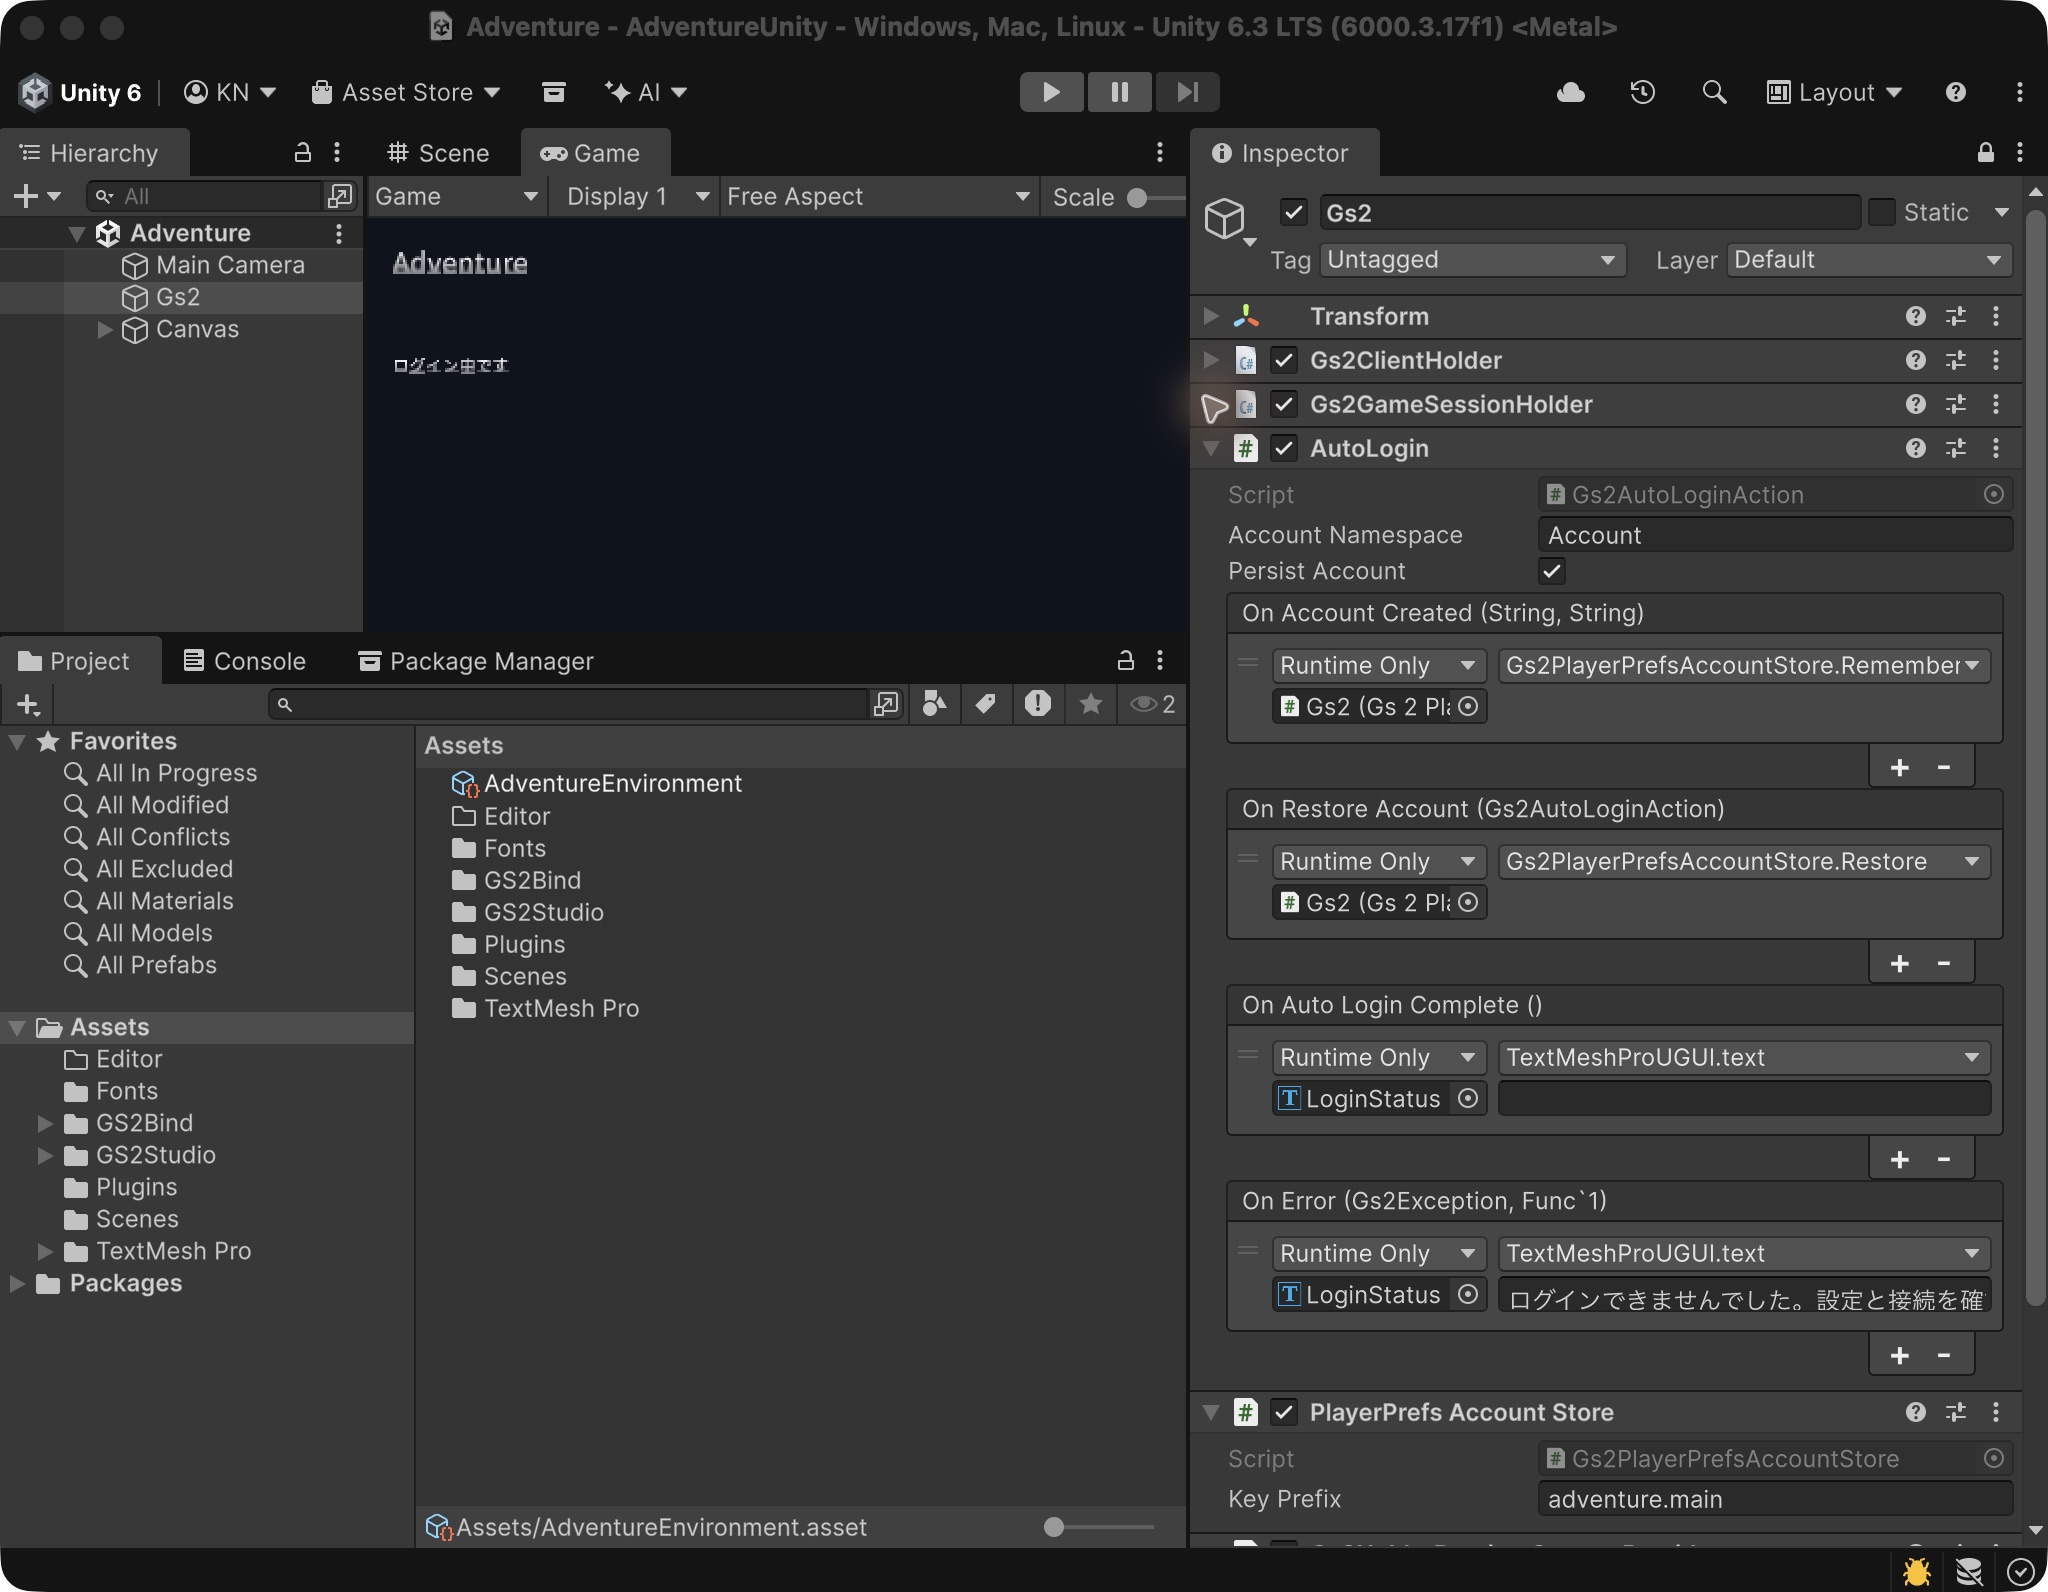 씬을 저장한 뒤 재생합니다. 로그인 중 메시지가 사라지고 플레이어 ID가 표시되면 성공입니다.
**SDK (Unity)**
### 로그인 스크립트 추가하기
SDK의 비동기 처리는 UniTask로 기다립니다. `await` 다음 줄은 통신이 끝난 후 실행되고 오류는 `catch`에서 처리합니다.
1. `Assets/AdventureLogin.cs`를 만들고 아래 코드를 붙여 넣습니다.
2. 씬에 빈 GameObject를 만들고 이름을 `Adventure`로 지정합니다.
3. `AdventureLogin`을 추가하고 Inspector의 Client Id와 Client Secret에 `Default`의 아웃풋을 입력합니다.
4. Account Namespace는 `adventure-account`, Account Slot은 `main`으로 설정합니다.
5. 재생하면 왼쪽 위에 **로그인** 버튼이 나타납니다. 눌러서 플레이어 ID가 표시되는지 확인합니다.
```csharp
using Cysharp.Threading.Tasks;
using Gs2.Core.Model;
using Gs2.Unity.Core;
using Gs2.Unity.Util;
using UnityEngine;
public sealed class AdventureLogin : MonoBehaviour
{
[SerializeField] private string clientId = "YOUR_CLIENT_ID";
[SerializeField] private string clientSecret = "YOUR_CLIENT_SECRET";
[SerializeField] private string accountNamespace = "adventure-account";
[SerializeField] private string accountSlot = "main";
public Gs2Domain Gs2 { get; private set; }
public GameSession Session { get; private set; }
private bool busy;
private string message = "로그인하세요";
private string SaveKey => $"adventure.{clientId}.{accountNamespace}.{accountSlot}";
private void OnGUI()
{
GUILayout.BeginArea(new Rect(20, 20, 650, 170), GUI.skin.box);
GUILayout.Label(message);
GUI.enabled = !busy && Session == null;
GUILayout.Label("저장 슬롯(main / practice 등)");
accountSlot = GUILayout.TextField(accountSlot);
if (GUILayout.Button("로그인")) Login().Forget();
GUI.enabled = true;
GUILayout.EndArea();
}
private async UniTask Login()
{
busy = true;
message = "로그인 중";
try
{
if (Gs2 == null)
{
Gs2 = await Gs2Client.CreateAsync(
new BasicGs2Credential(clientId, clientSecret), Region.ApNortheast1);
}
var userId = PlayerPrefs.GetString(SaveKey + ".userId", "");
var password = PlayerPrefs.GetString(SaveKey + ".password", "");
if (string.IsNullOrEmpty(userId) != string.IsNullOrEmpty(password))
{
message = "저장된 계정 정보가 불완전합니다. 저장 슬롯을 확인하세요";
return;
}
if (string.IsNullOrEmpty(userId))
{
var create = await Gs2.Account.Namespace(accountNamespace).CreateAsync();
var model = await create.ModelAsync();
userId = model.UserId;
password = model.Password;
PlayerPrefs.SetString(SaveKey + ".userId", userId);
PlayerPrefs.SetString(SaveKey + ".password", password);
PlayerPrefs.Save();
}
var login = await Gs2.LoginAsync(
new Gs2AccountAuthenticator(new AccountSetting
{
accountNamespaceName = accountNamespace,
keyId = "grn:gs2:{region}:{ownerId}:key:default:key:default"
}), userId, password);
Session = login;
message = "로그인했습니다. 플레이어 ID: " + Session.AccessToken.UserId;
}
catch (System.Exception error) { message = "연결하지 못했습니다: " + error.GetType().Name; }
finally { busy = false; }
}
}
```
AdventureLogin.cs 다운로드
`AccountSetting.keyId`의 `{region}`과 `{ownerId}`는 GS2가 해석하는 기본 키 지정 방식입니다. 코드에서 그대로 사용합니다. 키의 네임스페이스 이름과 키 이름은 모두 `default`입니다.
새 계정의 정보는 로그인 전에 저장합니다. 로그인 통신이 실패해도 다음에 버튼을 누르면 같은 계정으로 다시 시도할 수 있습니다. 저장된 정보로 로그인하지 못한 경우에도 다른 계정을 임의로 만들지 않습니다.
이 튜토리얼에서는 기기 내 저장에 `PlayerPrefs`를 사용합니다. 암호화되지 않는 저장 공간이므로 게임을 공개할 때는 적절한 저장 방법을 선택하세요. 플레이어 비밀번호와 Client Secret을 화면, 로그, 공개 저장소에 노출하지 않습니다.
## 3. 같은 계정으로 다시 로그인하기
재생을 멈췄다가 다시 재생하고 로그인해 봅시다. 플레이어 ID가 이전과 같다면 저장한 계정으로 로그인한 것입니다.
| 조작 | 기대하는 결과 |
| --- | --- |
| 처음 로그인 | 플레이어 ID가 표시됨 |
| Unity 재생을 중지한 뒤 다시 재생하고 로그인 | 같은 ID가 표시됨 |
| 재생 중지 후 네트워크를 끊고 다시 재생하여 로그인 | 오류 메시지가 표시됨 |
| 네트워크 복구 후 재생을 중지하고 다시 재생하여 로그인 | 저장된 계정으로 로그인됨 |
Studio에서는 재생을 시작하면 자동 로그인합니다. SDK에서는 화면의 로그인 버튼을 누릅니다. 재생을 멈춰도 저장된 정보는 남습니다.
## 연습: 두 번째 플레이어 만들기
Studio에서는 재생을 중지하고 PlayerPrefs Account Store의 **Key Prefix** 를 `adventure.practice`로 바꾼 뒤 다시 재생합니다. SDK에서도 재생을 중지하고 `AdventureLogin`의 Inspector에서 **Account Slot** 을 `practice`로 바꾼 뒤 재생하고 로그인합니다. 원래와 다른 플레이어 ID가 나왔나요?
연습이 끝나면 재생을 중지합니다. Studio의 Key Prefix를 **`adventure.main`**, SDK의 Account Slot을 **`main`** 으로 되돌린 뒤 재생하고 로그인합니다. 처음 플레이어 ID로 돌아오는지 확인합니다.
[다음: 퀘스트를 등록하고 목록에 표시하기]()