3. Start a quest and receive rewards
Let’s make Forest exploration playable. Click Start to begin and Complete to return with 10 coins. Every clear gives the same reward; this chapter does not add a first-clear bonus.
Configure clear rewards in GS2
Set the reward amount in the GS2 quest settings. With a normal clear reward of 10 free coins, GS2 adds the coins when Unity reports a clear. Unity updates the display when the balance changes.
Coins are stored in a GS2-Money2 wallet. A wallet is identified by its slot number; this game uses 0. Add the Money2 settings in this chapter and use the same wallet throughout the following chapters.
Completing a quest and depositing coins should be processed together. A sequence of operations like this is a transaction. Once a deposit is configured as a normal clear reward, Unity only needs to report the clear.
In the settings, operations that grant something, such as adding coins, are called acquire actions. Add a coin acquire action to the normal clear rewards below.
Steps
Configure currency and rewards
Under Add features, add Currency.
In Quest (Quest), double-click the Completion rewards cell for
forest. Click Add item on the right, then open the new Not set entry.Under Action, search for
DepositByUserIdand select themoney2action that adds to the wallet balance. Leave Target resource at None and enter the values below.
| Field | Value |
|---|---|
| namespaceName | Currency |
| userId | #{userId} |
| slot | 0 |
#{userId} refers to the player who cleared the quest. Enter it exactly as shown, without replacing it with an actual player ID.
- Click Add for depositTransactions and open the new DepositTransaction. Leave
priceat0andcurrencyat No value, and setcountto10. This deposits 10 free coins.
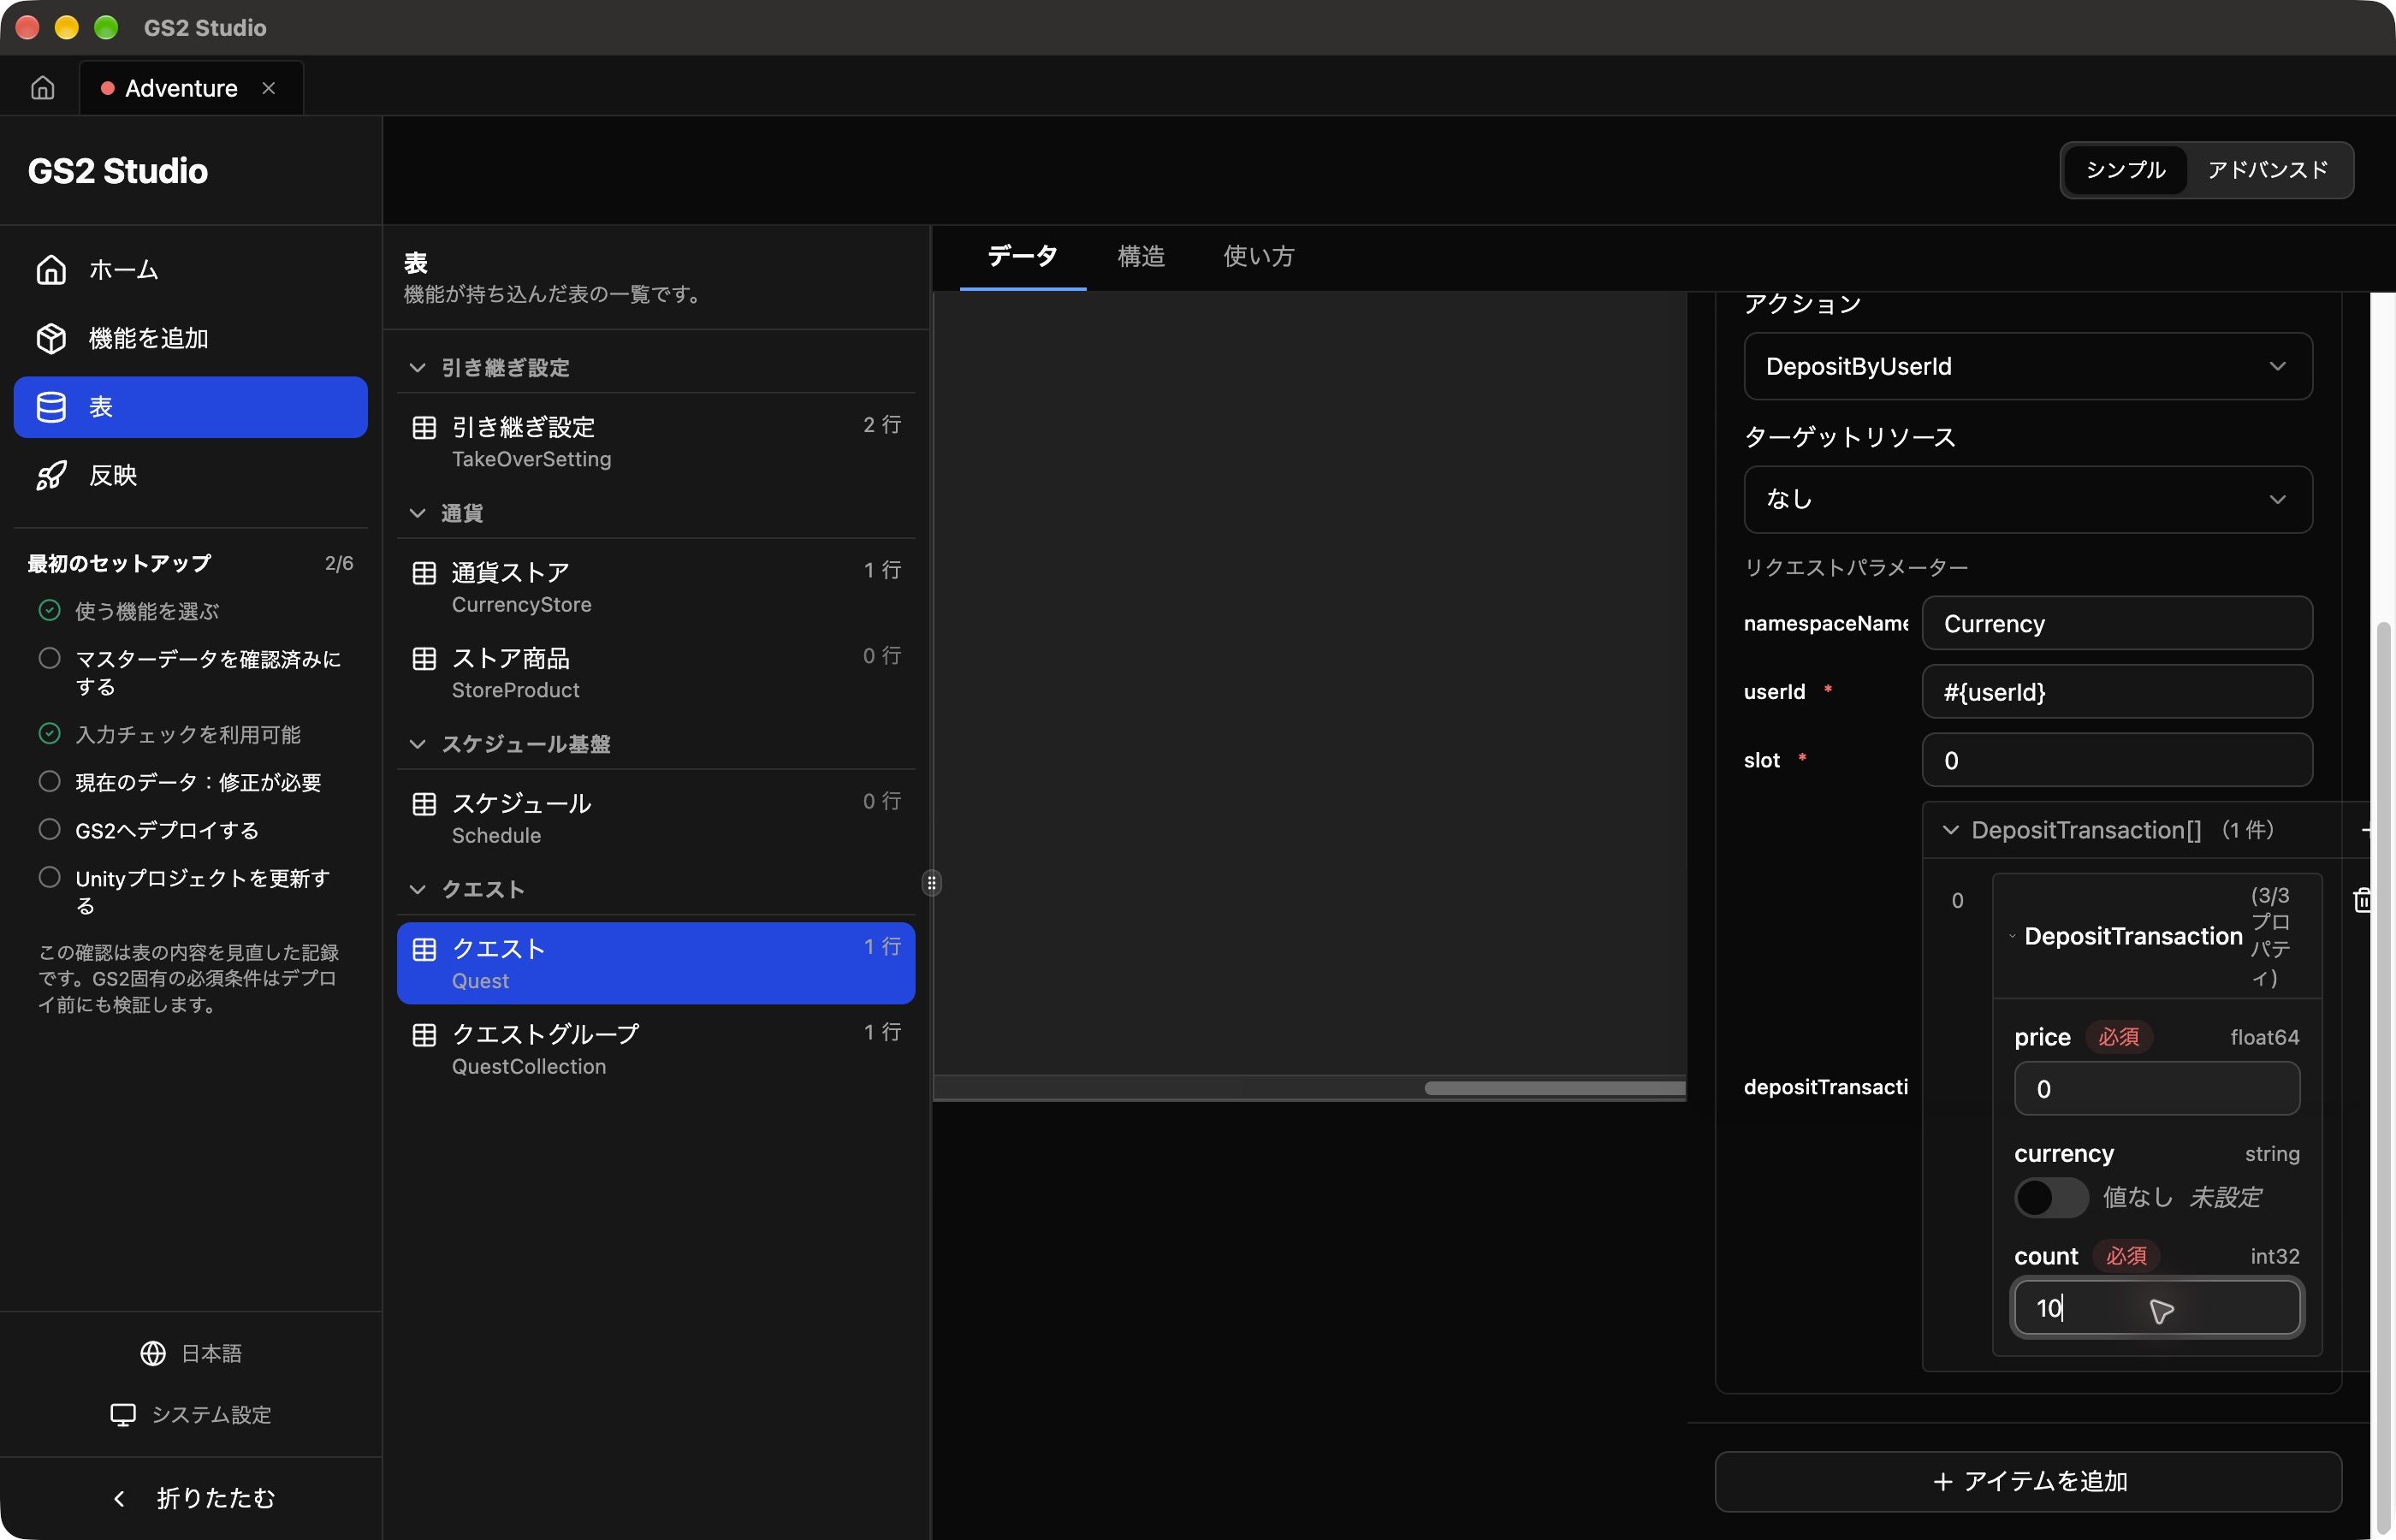
Keep first-clear rewards and failure actions empty. From Publish, deploy to GS2 and update the Unity project.
Connect Start, Complete, and the coin display
Add ProgressHandler and WalletHandler to the Gs2 object in Unity. Set Wallet Handler’s Slot to 0. Replace AdventureStudioView.cs with this chapter’s version and assign the new handlers to Progress and Wallet. Keep the existing QuestListHandler assigned to Quests.
Quest operations are grouped in DrawQuestButtons() below. The Start button calls quest.Start(), and Complete calls progress.Binder.Complete(). Run() prevents repeated clicks while an operation is running and displays errors.
Balance and loading-state display are in separate methods. Download the complete script below and replace the existing file.
private void DrawQuestButtons()
{
    var canOperate = !busy && !unresolved && progress.HasValue;

    GUI.enabled = canOperate && !progress.Model.InProgress;
    foreach (var quest in quests.Binders)
    {
        GUILayout.Label(quest.DisplayName);
        if (GUILayout.Button("Start: " + quest.DisplayName))
        {
            Run(() => quest.Start());
        }
    }

    GUI.enabled = canOperate && progress.Model.InProgress;
    if (GUILayout.Button("Complete"))
    {
        Run(() => progress.Binder.Complete());
    }
    GUI.enabled = true;
}
Download AdventureStudioView.cs for this chapter
In your own game, call this completion operation when the player defeats an enemy or reaches the goal. The code above connects it to Complete with Run(() => progress.Binder.Complete()). GS2 grants the reward, so you do not need separate code to add coins.
Update the settings
Download the chapter 3 template. Open Deploy → adventure-game → Update stack and select it under Template data. This complete template includes the previous chapter’s resources. Review and apply the changes, then wait for Update complete.
Configure depositTransactions in the normal clear rewards to deposit 10 free coins.
action: Gs2Money2:DepositByUserId
request: |-
  {
    "namespaceName": "adventure-coin",
    "userId": "#{userId}",
    "slot": 0,
    "depositTransactions": [
      { "price": 0, "currency": "", "count": 10 }
    ]
  }
Pass request as a JSON string, written beneath YAML’s |- marker.
Start the quest with StartAsync() and report a clear with EndAsync(). Await WaitAsync(all: true) on each returned transaction to wait for server processing. Cache change notifications update the progress and balance display.
Update the Unity code
Put these two files in Assets, replacing files with the same names.
- AdventurePlay.cs: quest controls and display
- AdventurePlayer.cs: subscribing to and unsubscribing from display data
Keep the existing AdventurePlay component and its Login assignment. AdventurePlayer is created in code.
Update the display when data changes
AdventurePlayer uses SubscribeWithInitialCallAsync() to receive the initial value and later changes. For example, each wallet update replaces the model used to display the coin balance.
var balance = Gs2.Money2.Namespace("adventure-coin").Me(Session).Wallet(0);
var subscription = await balance.SubscribeWithInitialCallAsync(value => Wallet = value);
The drawing code reads player.Wallet.Summary.Free. Progress updates in the same way, so there is no need to reload after starting or completing a quest.
Use the return value to unsubscribe. The downloadable code calls Unsubscribe() when Play Mode ends and the object is destroyed.
balance.Unsubscribe(subscription);Start and complete a quest
The buttons call the start and complete operations through RunWrite(), which prevents repeated clicks and shows errors. awaitingResult records that the request response has arrived, distinguishing later errors from rejection of the request itself.
The relevant part of the script is shown below. You do not need to add this excerpt as another class.
private async UniTask BeginQuest(string questName)
{
    var transaction = await player.Gs2.Quest.Namespace("adventure-quest").Me(player.Session)
        .StartAsync("main", questName, force: false, speculativeExecute: false);
    awaitingResult = true;
    if (transaction != null) await transaction.WaitAsync(all: true);
}

private async UniTask CompleteQuest()
{
    var transaction = await player.Gs2.Quest.Namespace("adventure-quest").Me(player.Session)
        .Progress().EndAsync(isComplete: true, speculativeExecute: false);
    awaitingResult = true;
    if (transaction != null) await transaction.WaitAsync(all: true);
}
In your own game, call CompleteQuest() when the player defeats an enemy or reaches the goal. The sample’s Complete button calls RunWrite(CompleteQuest).Forget(). Use RunWrite() when calling from your win condition too, to keep repeated-click prevention and error display. GS2 grants the rewards, so no separate coin-adding code is needed.
Disable Start and Complete while processing. Do not send another copy of the operation before its response arrives. Change the screen on success, and show the reason on error.
Try a quest
Note the coin balance before starting. After deployment, reward changes can take up to five minutes to take effect. If you still receive the previous amount, wait a little and check with a newly started quest.
| Action | Expected result |
|---|---|
| Start a quest | The active quest is displayed. |
| Complete the quest | The quest ends and the coin balance increases by 10. |
| Start and complete the same quest again | The balance increases by another 10. |
| Try to complete a quest without starting one | No coins are added. |
If the connection drops before the result arrives, display Unable to confirm the result without assuming success or failure. Do not immediately resend the clear request.
Practice: change the settings
Change the clear reward to 15 coins and deploy. Then start a new quest, clear it, and check how many coins were added.
Hint
An active quest retains its settings from when it started. Start a new quest to check a changed reward.
Before moving on
Restore the normal clear reward to 10 coins and deploy. With the same account, start and clear Forest exploration again and check that the balance increases by 10.