1. Create an account and log in
Start by making it possible to log in to the game. Display the logged-in player’s ID, and make sure you can return to the same account after stopping Play Mode in Unity.
On the first run, create an account and save its player ID and password. On later runs, log in with those saved credentials. The access token returned after login expires, so log in again each time the app starts.
1. Create a place to store player accounts
GS2 uses namespaces to keep settings and data separate. Create a GS2-Account namespace to store player accounts.
Add Account Transfer
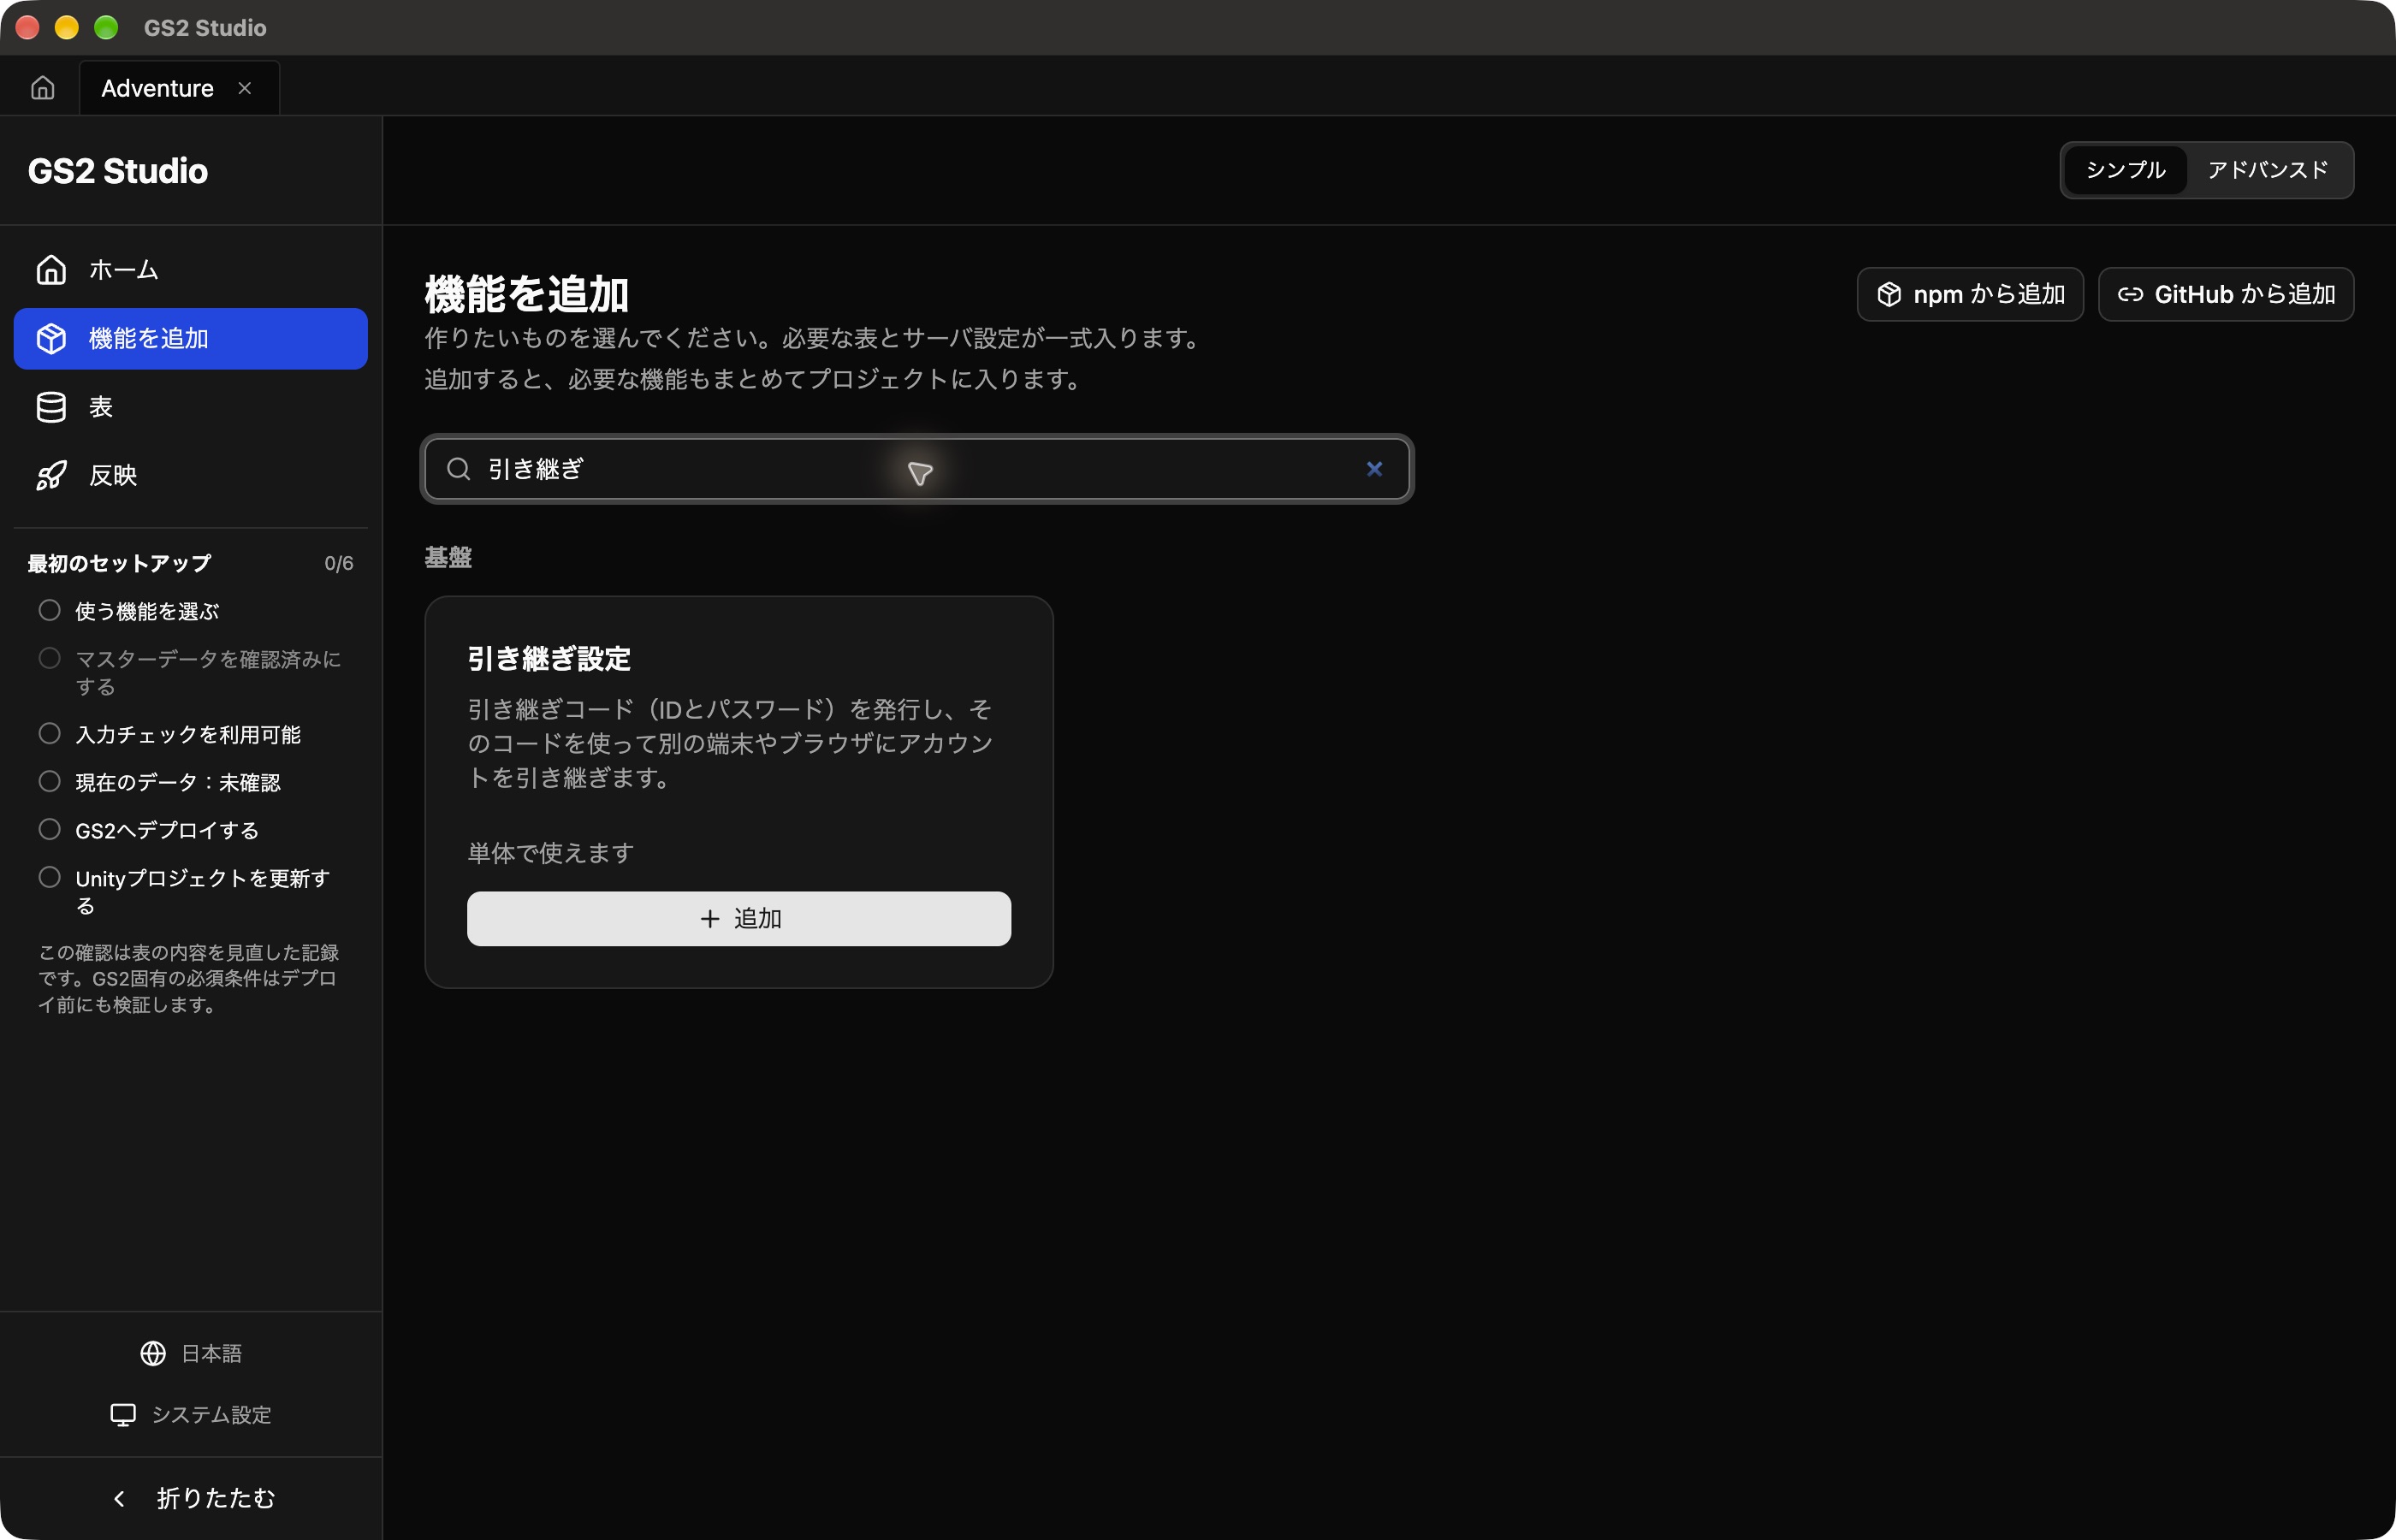
Open your Adventure project in Studio. Click Add features on the left and search for Account Transfer. If you cannot see this menu, select Simple at the top right.
Click Add on the Account Transfer card. This package also includes the Account settings used to store player accounts.
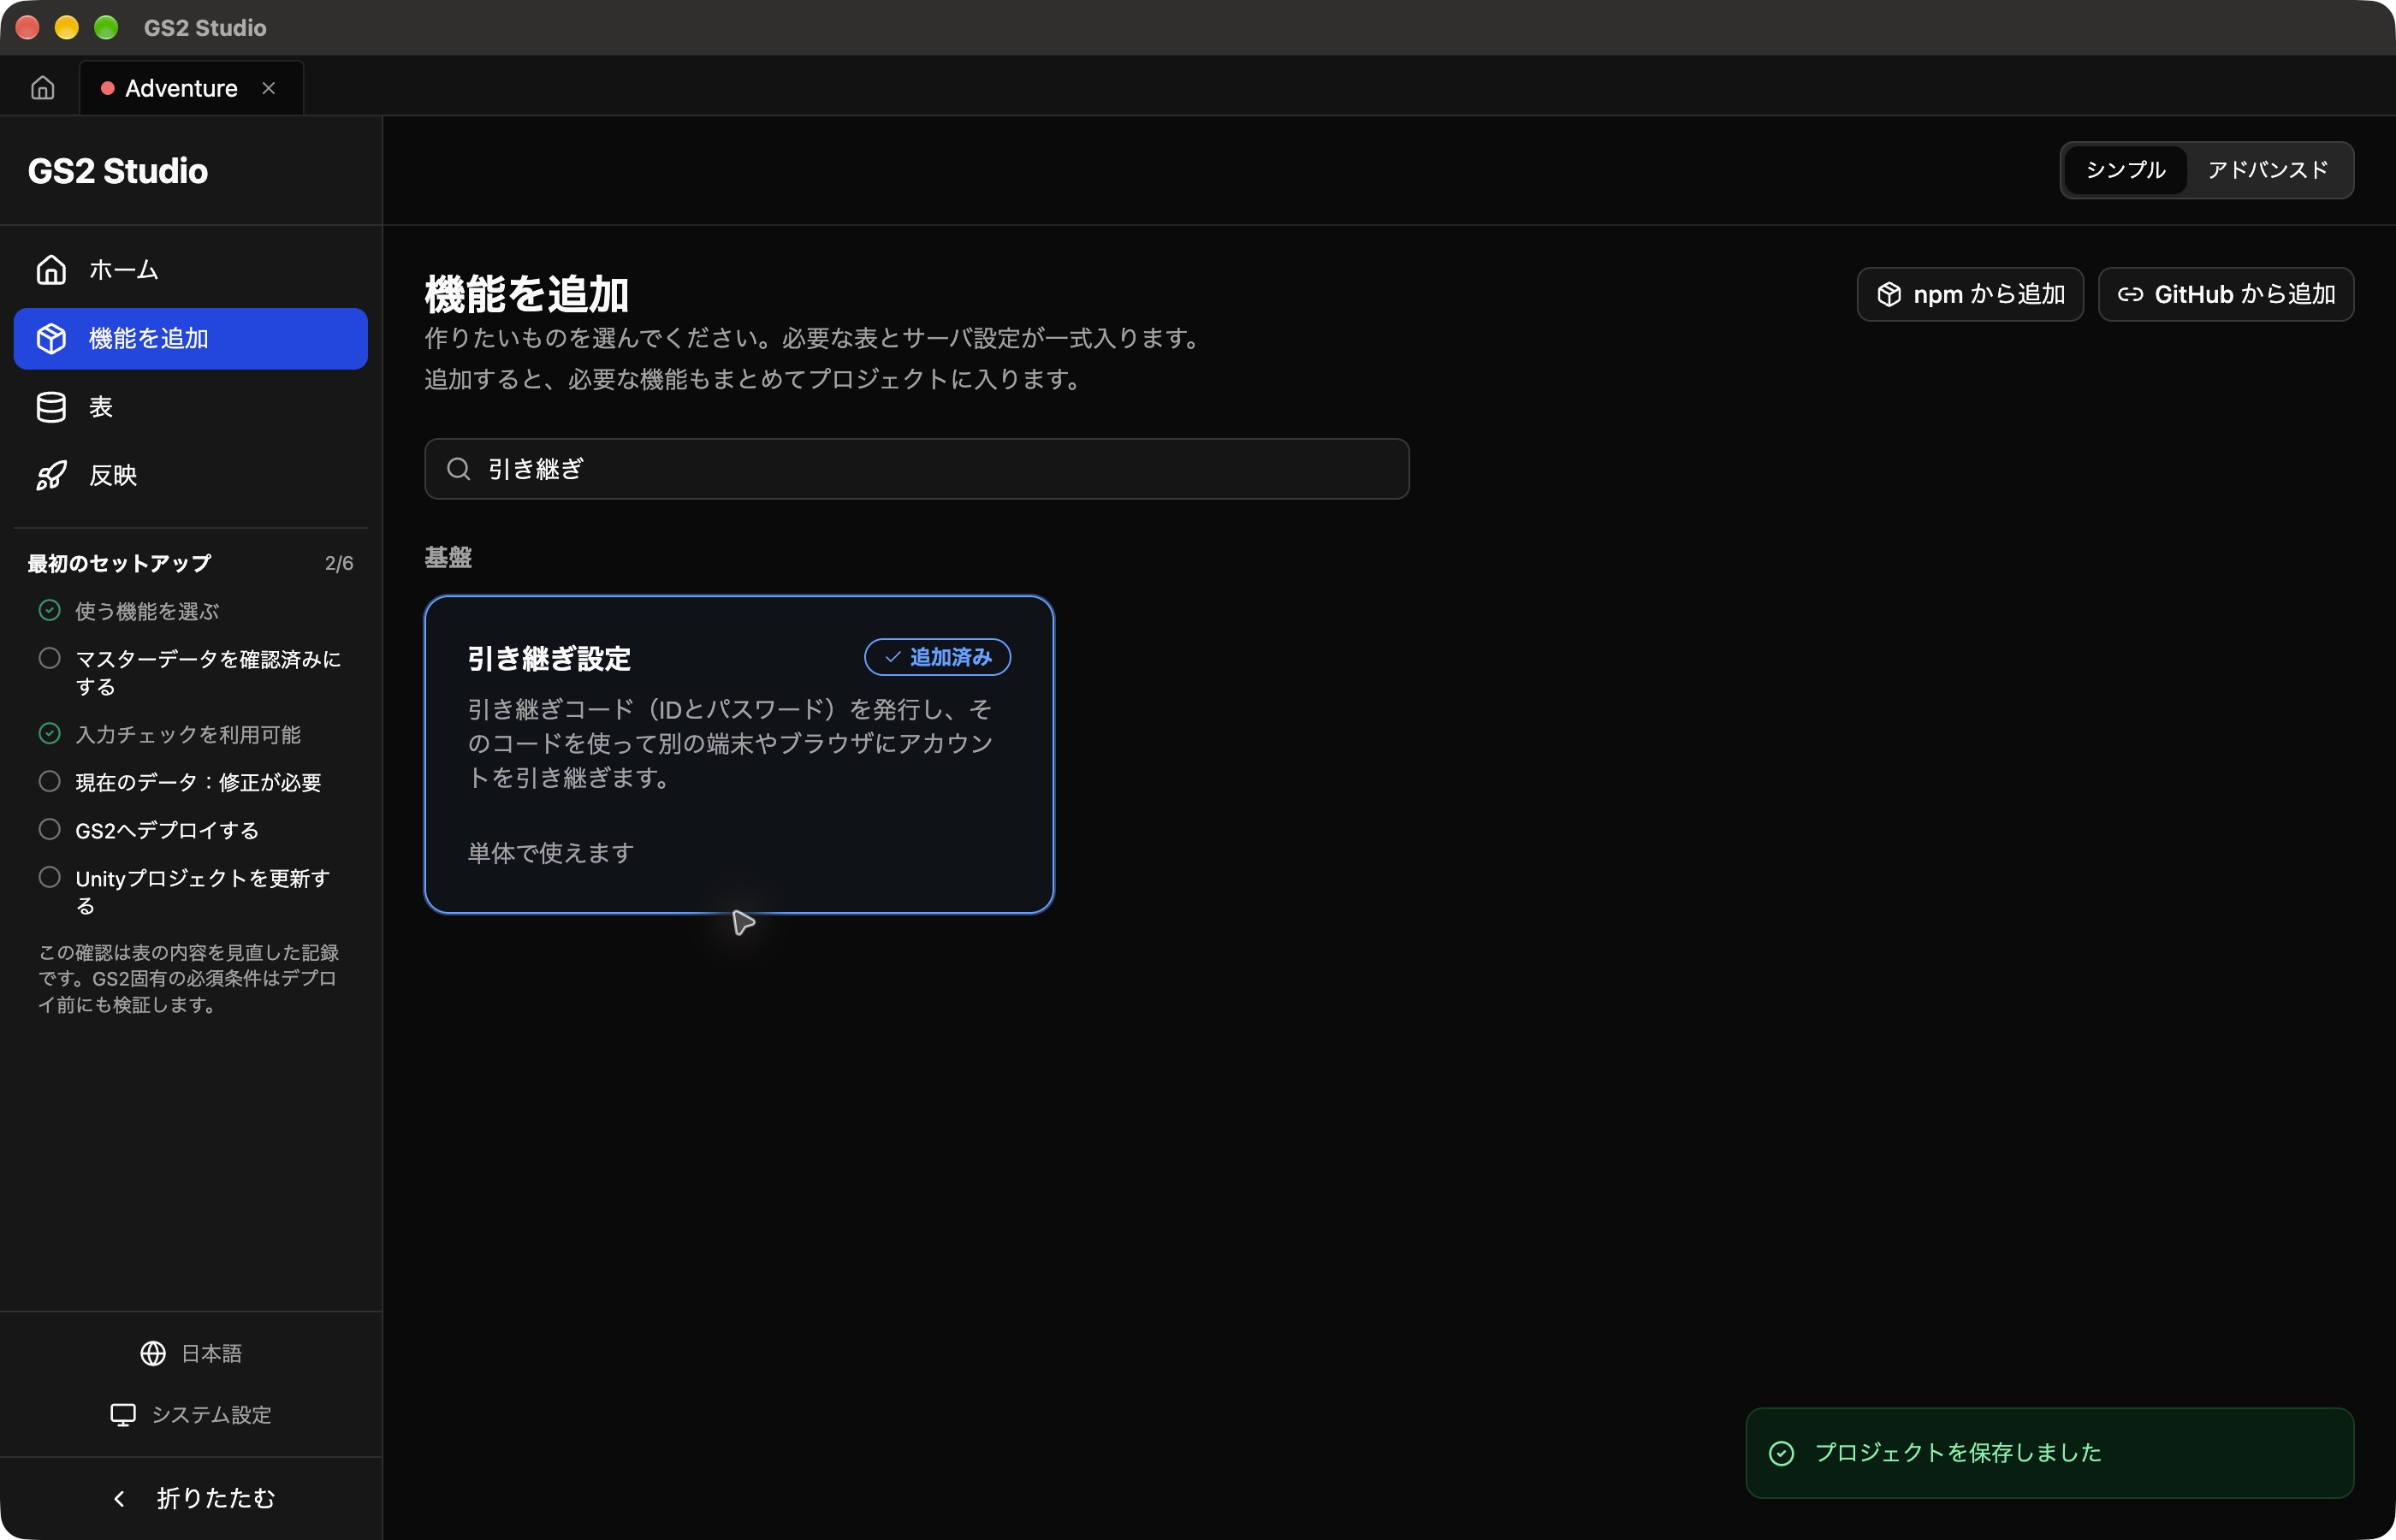
When the card says Added, Studio has finished loading the package.
Deploy to GS2
Send the settings to GS2 so it can store player accounts. This is called deployment.
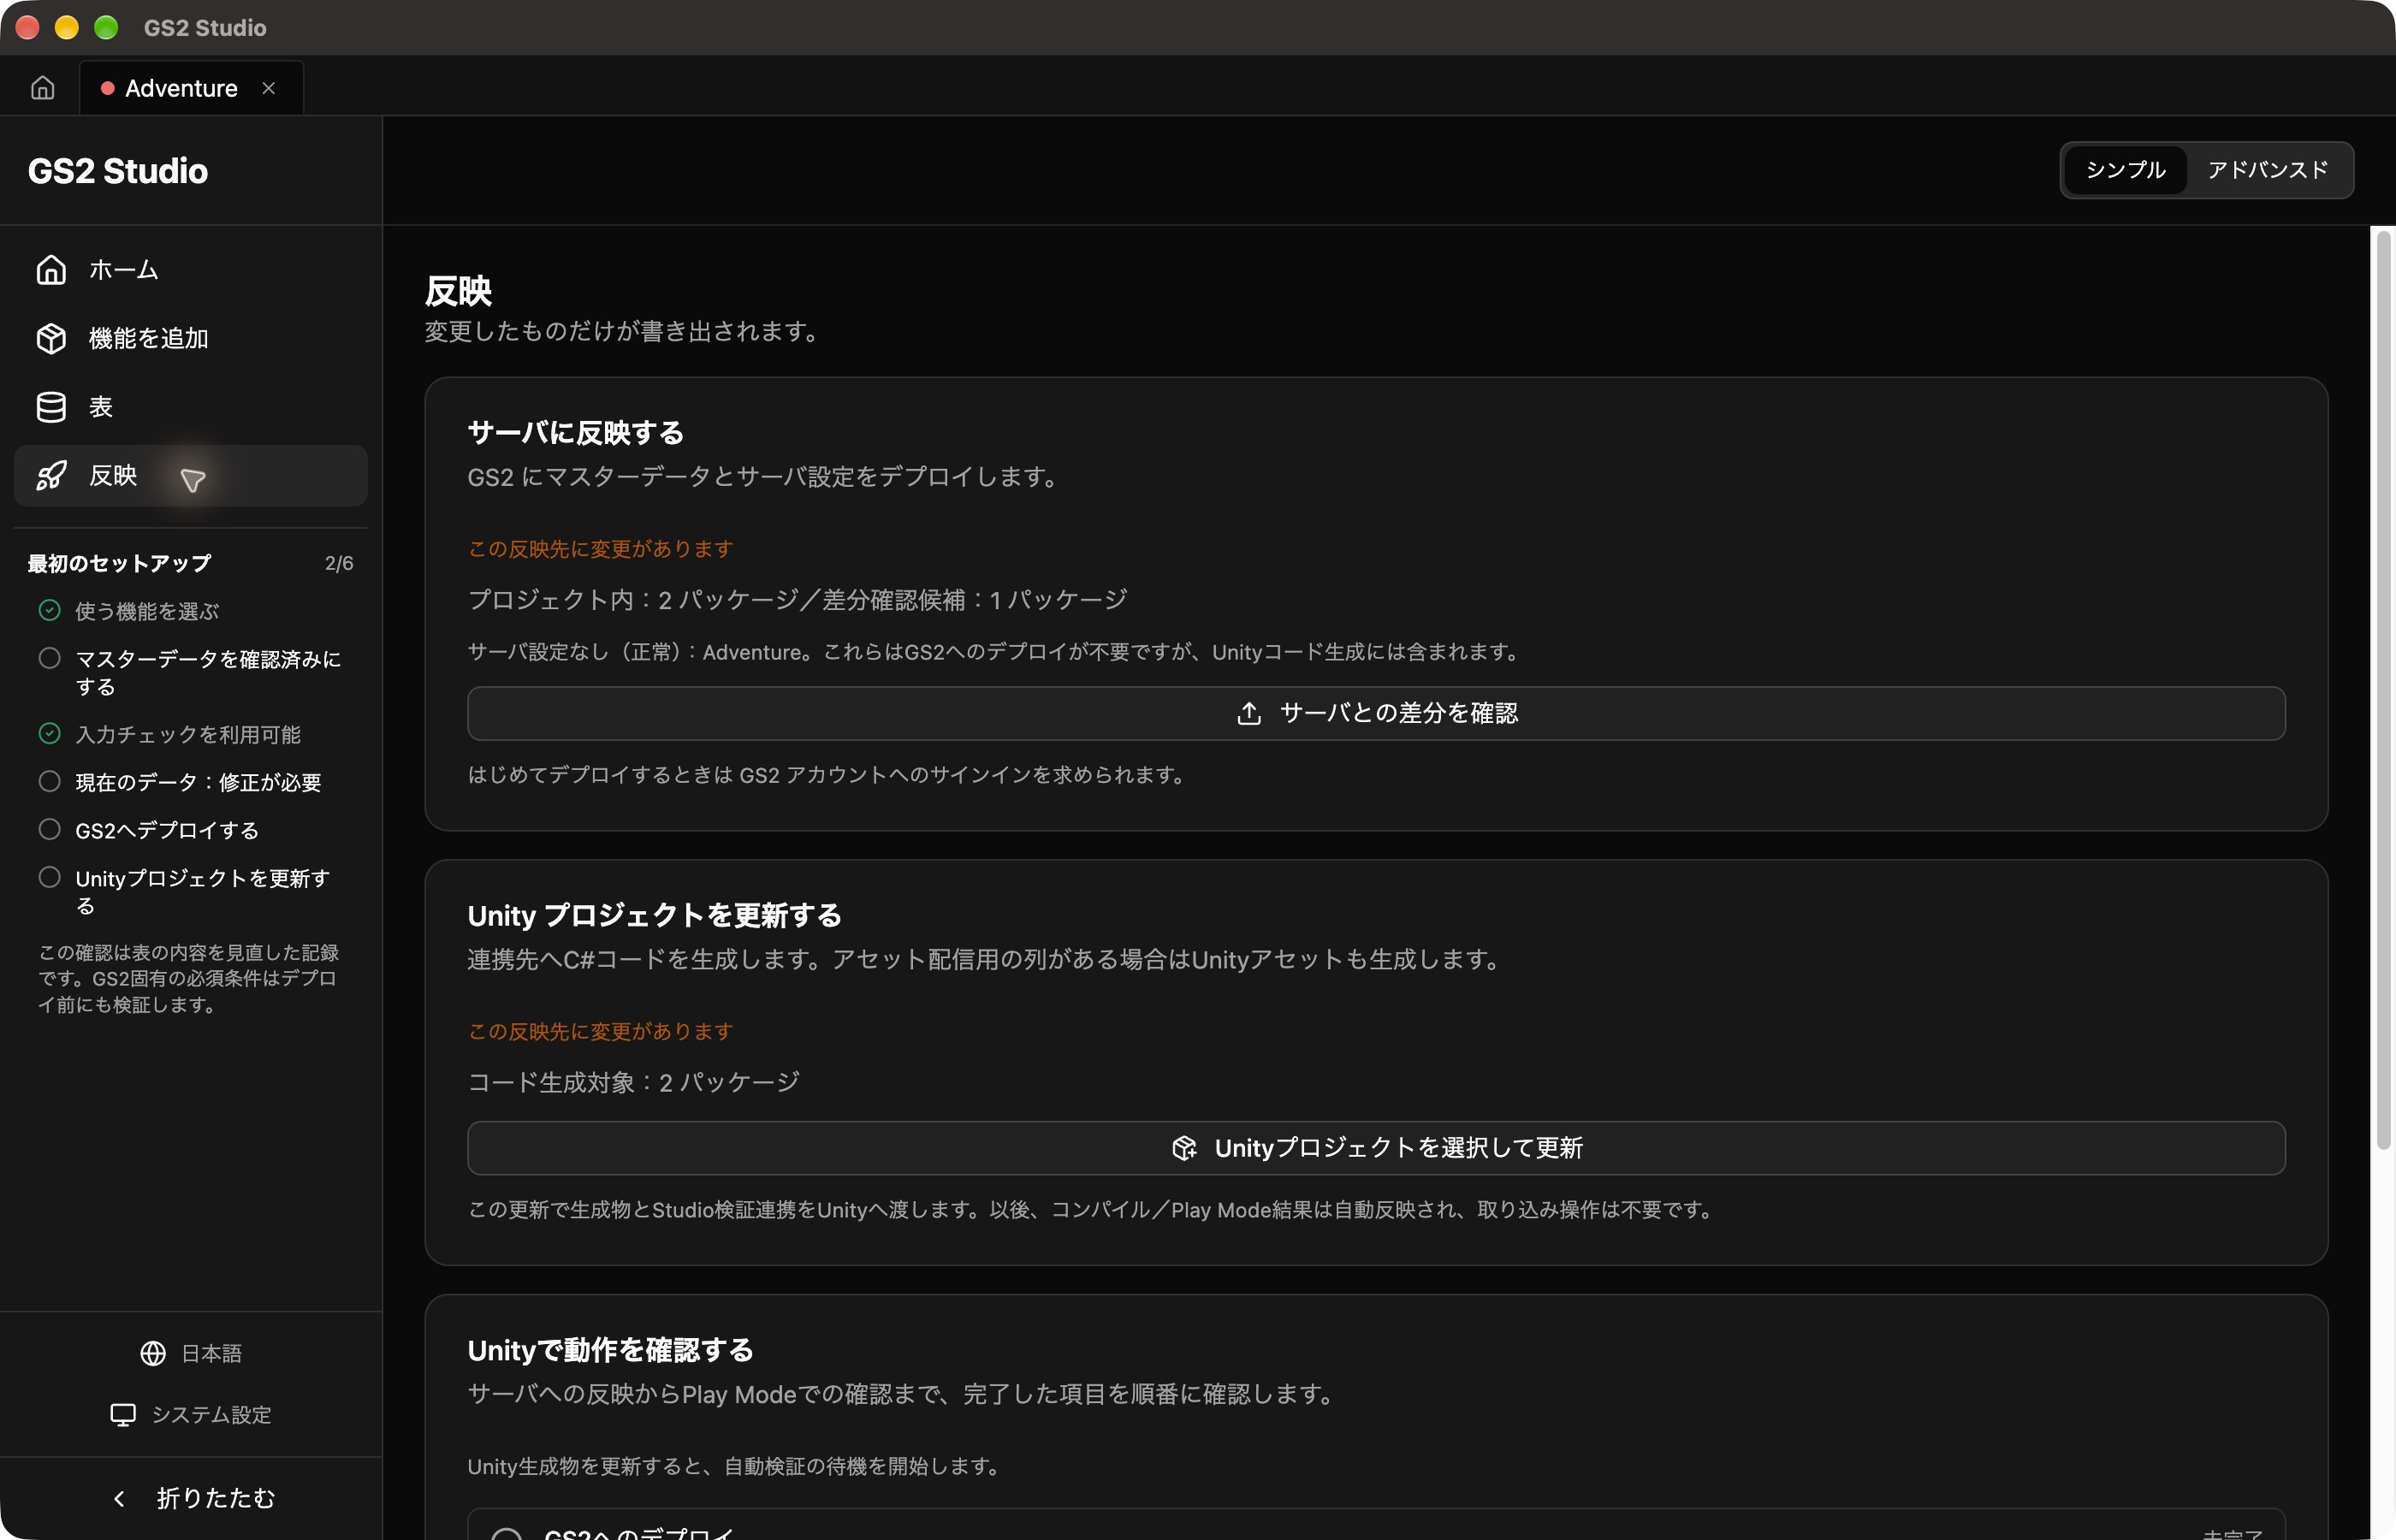
Click Publish on the left, then Calculate server differences in the Deploy to the server panel.
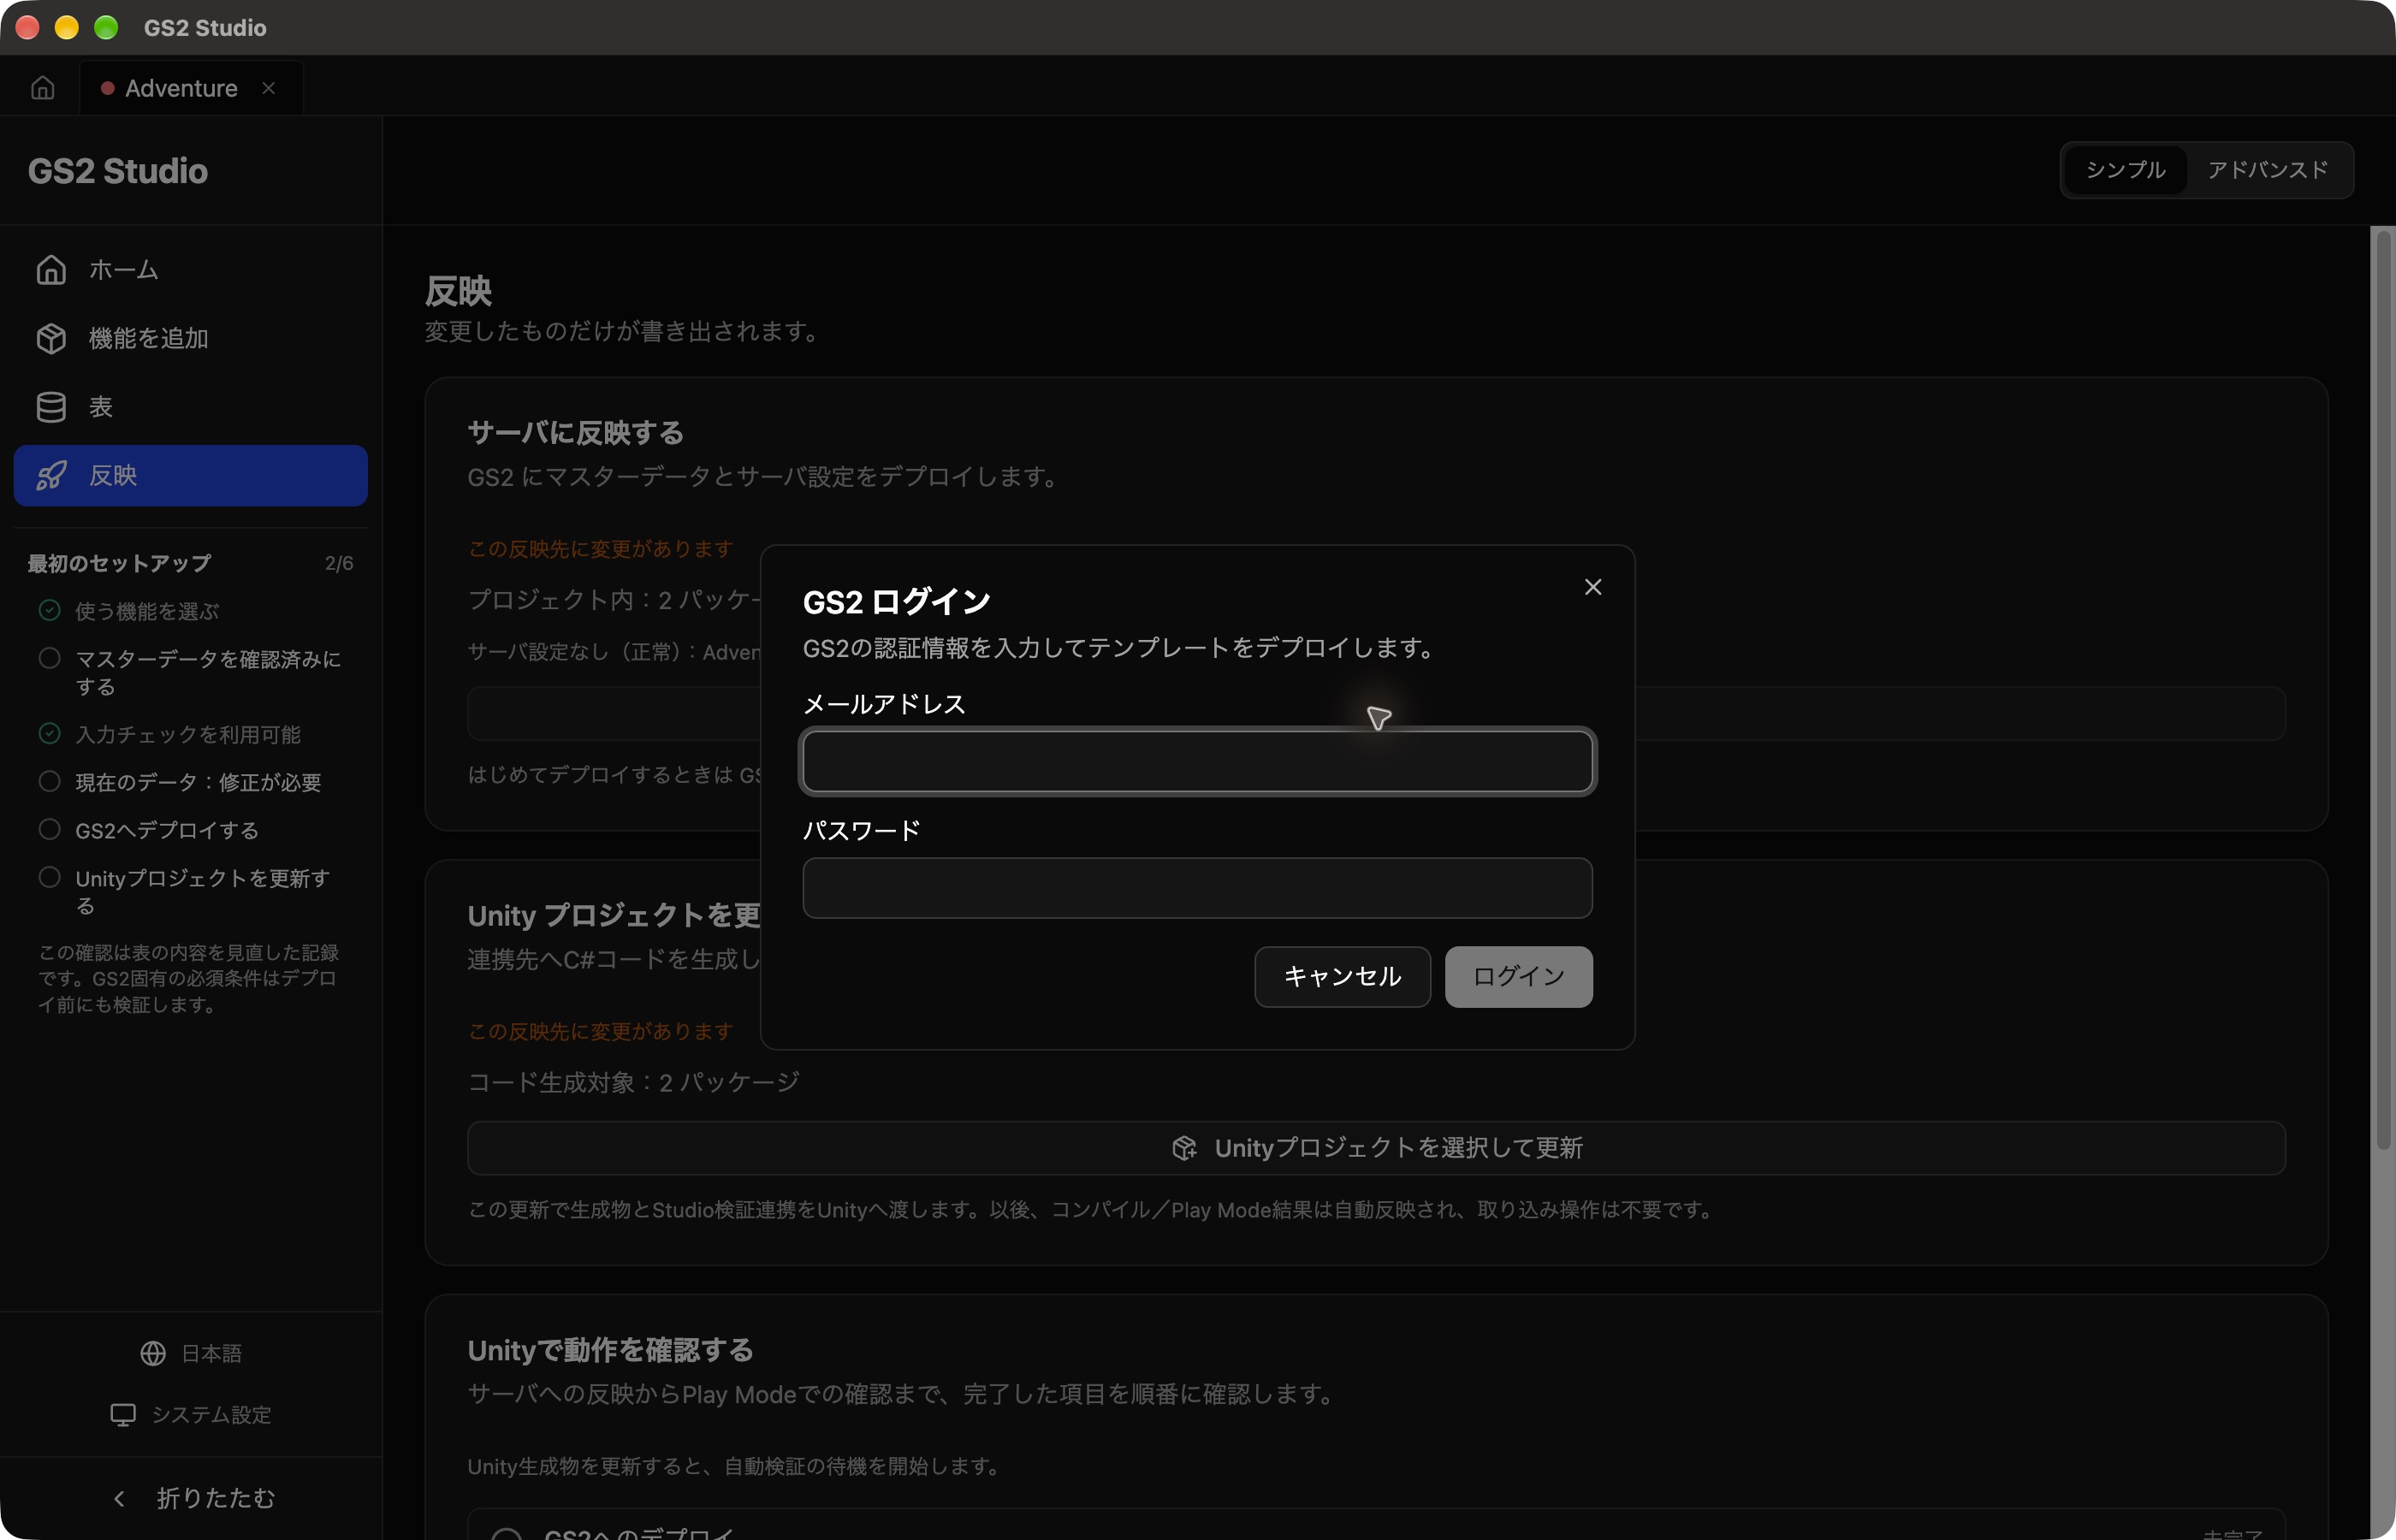
If GS2 Login opens, sign in with the email address and password of the developer account you created during setup.
After signing in, check the deployment destination and changes.
- In Select GS2 Project, select your learning project,
adventure, and Tokyo (ap-northeast-1), then click Select. - In Review changes to GS2, review the changes for the
foundation-core-identitypackage. In a new project, this creates a namespace namedAccount. Use the stack name supplied by Studio. - Click Deploy 1 package and wait for it to finish.
- Return to Publish and check that the Deploy to the server panel says Up to date.
The Account namespace is now ready to store player accounts.
Create Account settings from the console
In the SDK course, use a template to create a namespace named adventure-account.
- In the management console, open the Tokyo region of your learning project.
- Select Deploy → Stack list → Create stack.
- Download the template below. Set the stack name to
adventure-loginand select the downloaded01-account.yamlunder Template data. - Click Create and wait until the execution status is Create complete.
GS2TemplateFormatVersion: "2019-05-01"
Description: Adventure tutorial - player accounts
Resources:
  AccountNamespace:
    Type: GS2::Account::Namespace
    Properties:
      Name: adventure-account
Outputs:
AccountNamespaceName: !GetAttr AccountNamespace.Item.Name2. Add login to Unity
Add the SDK and generated code to Unity
Export the files needed to use Account Transfer from Unity. This adds the SDK for communicating with GS2, GS2-Bind with its login components, and C# code for calling the features you selected.
Keep the Studio Adventure project and the Unity project from the setup page open. Stop Play Mode in Unity and save the Adventure scene.
1. Select the destination Unity project
Click Publish on the left. In the Update the Unity project panel, click Select and update Unity project.
A folder picker opens. Select the folder containing Assets, Packages, and ProjectSettings. If your Unity project is named AdventureUnity, select AdventureUnity in the example below.
AdventureUnity/           ← Select this folder
├── Assets/
├── Packages/
└── ProjectSettings/
Selecting the Assets folder or the folder containing your Studio project will not work; neither is the Unity project root.
After you select the folder, a confirmation screen opens. Check that Destination is your Unity project, then click Update. The destination shown in the screenshot is an example used for these screenshots.
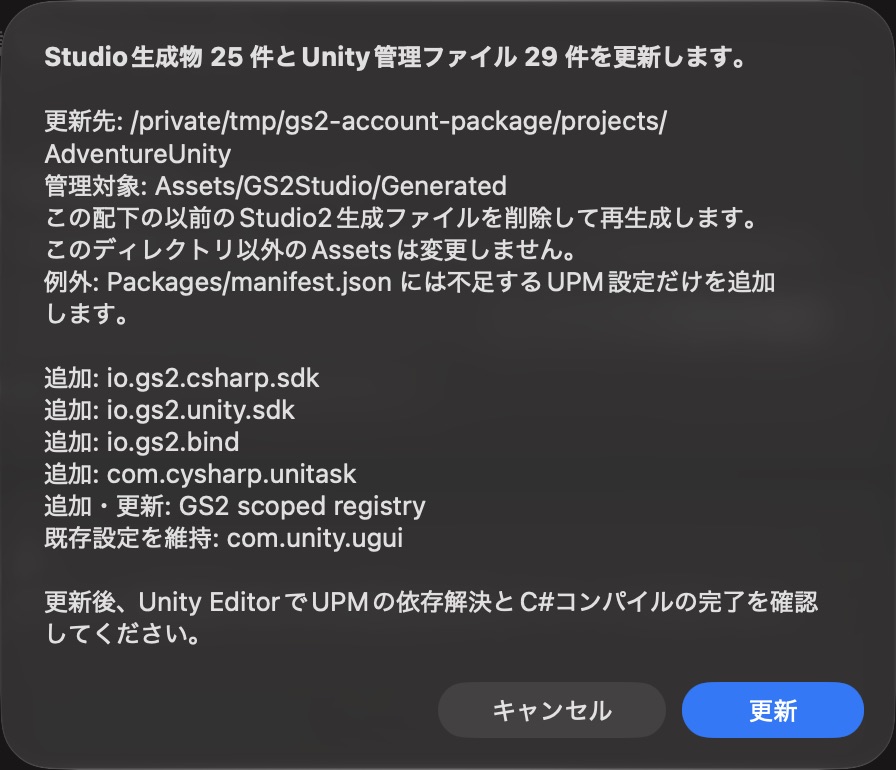
This writes C# code to Assets/GS2Studio/Generated and adds the SDKs and GS2-Bind to Unity’s package settings. The contents of Generated are replaced on each update, so keep your own scripts outside that folder.
2. Check that Studio finished exporting
When the update finishes, check the Update the Unity project panel:
- The status is Up to date.
- Unity project at the bottom shows the folder you selected.
- Generated output is
Assets/GS2Studio/Generated.
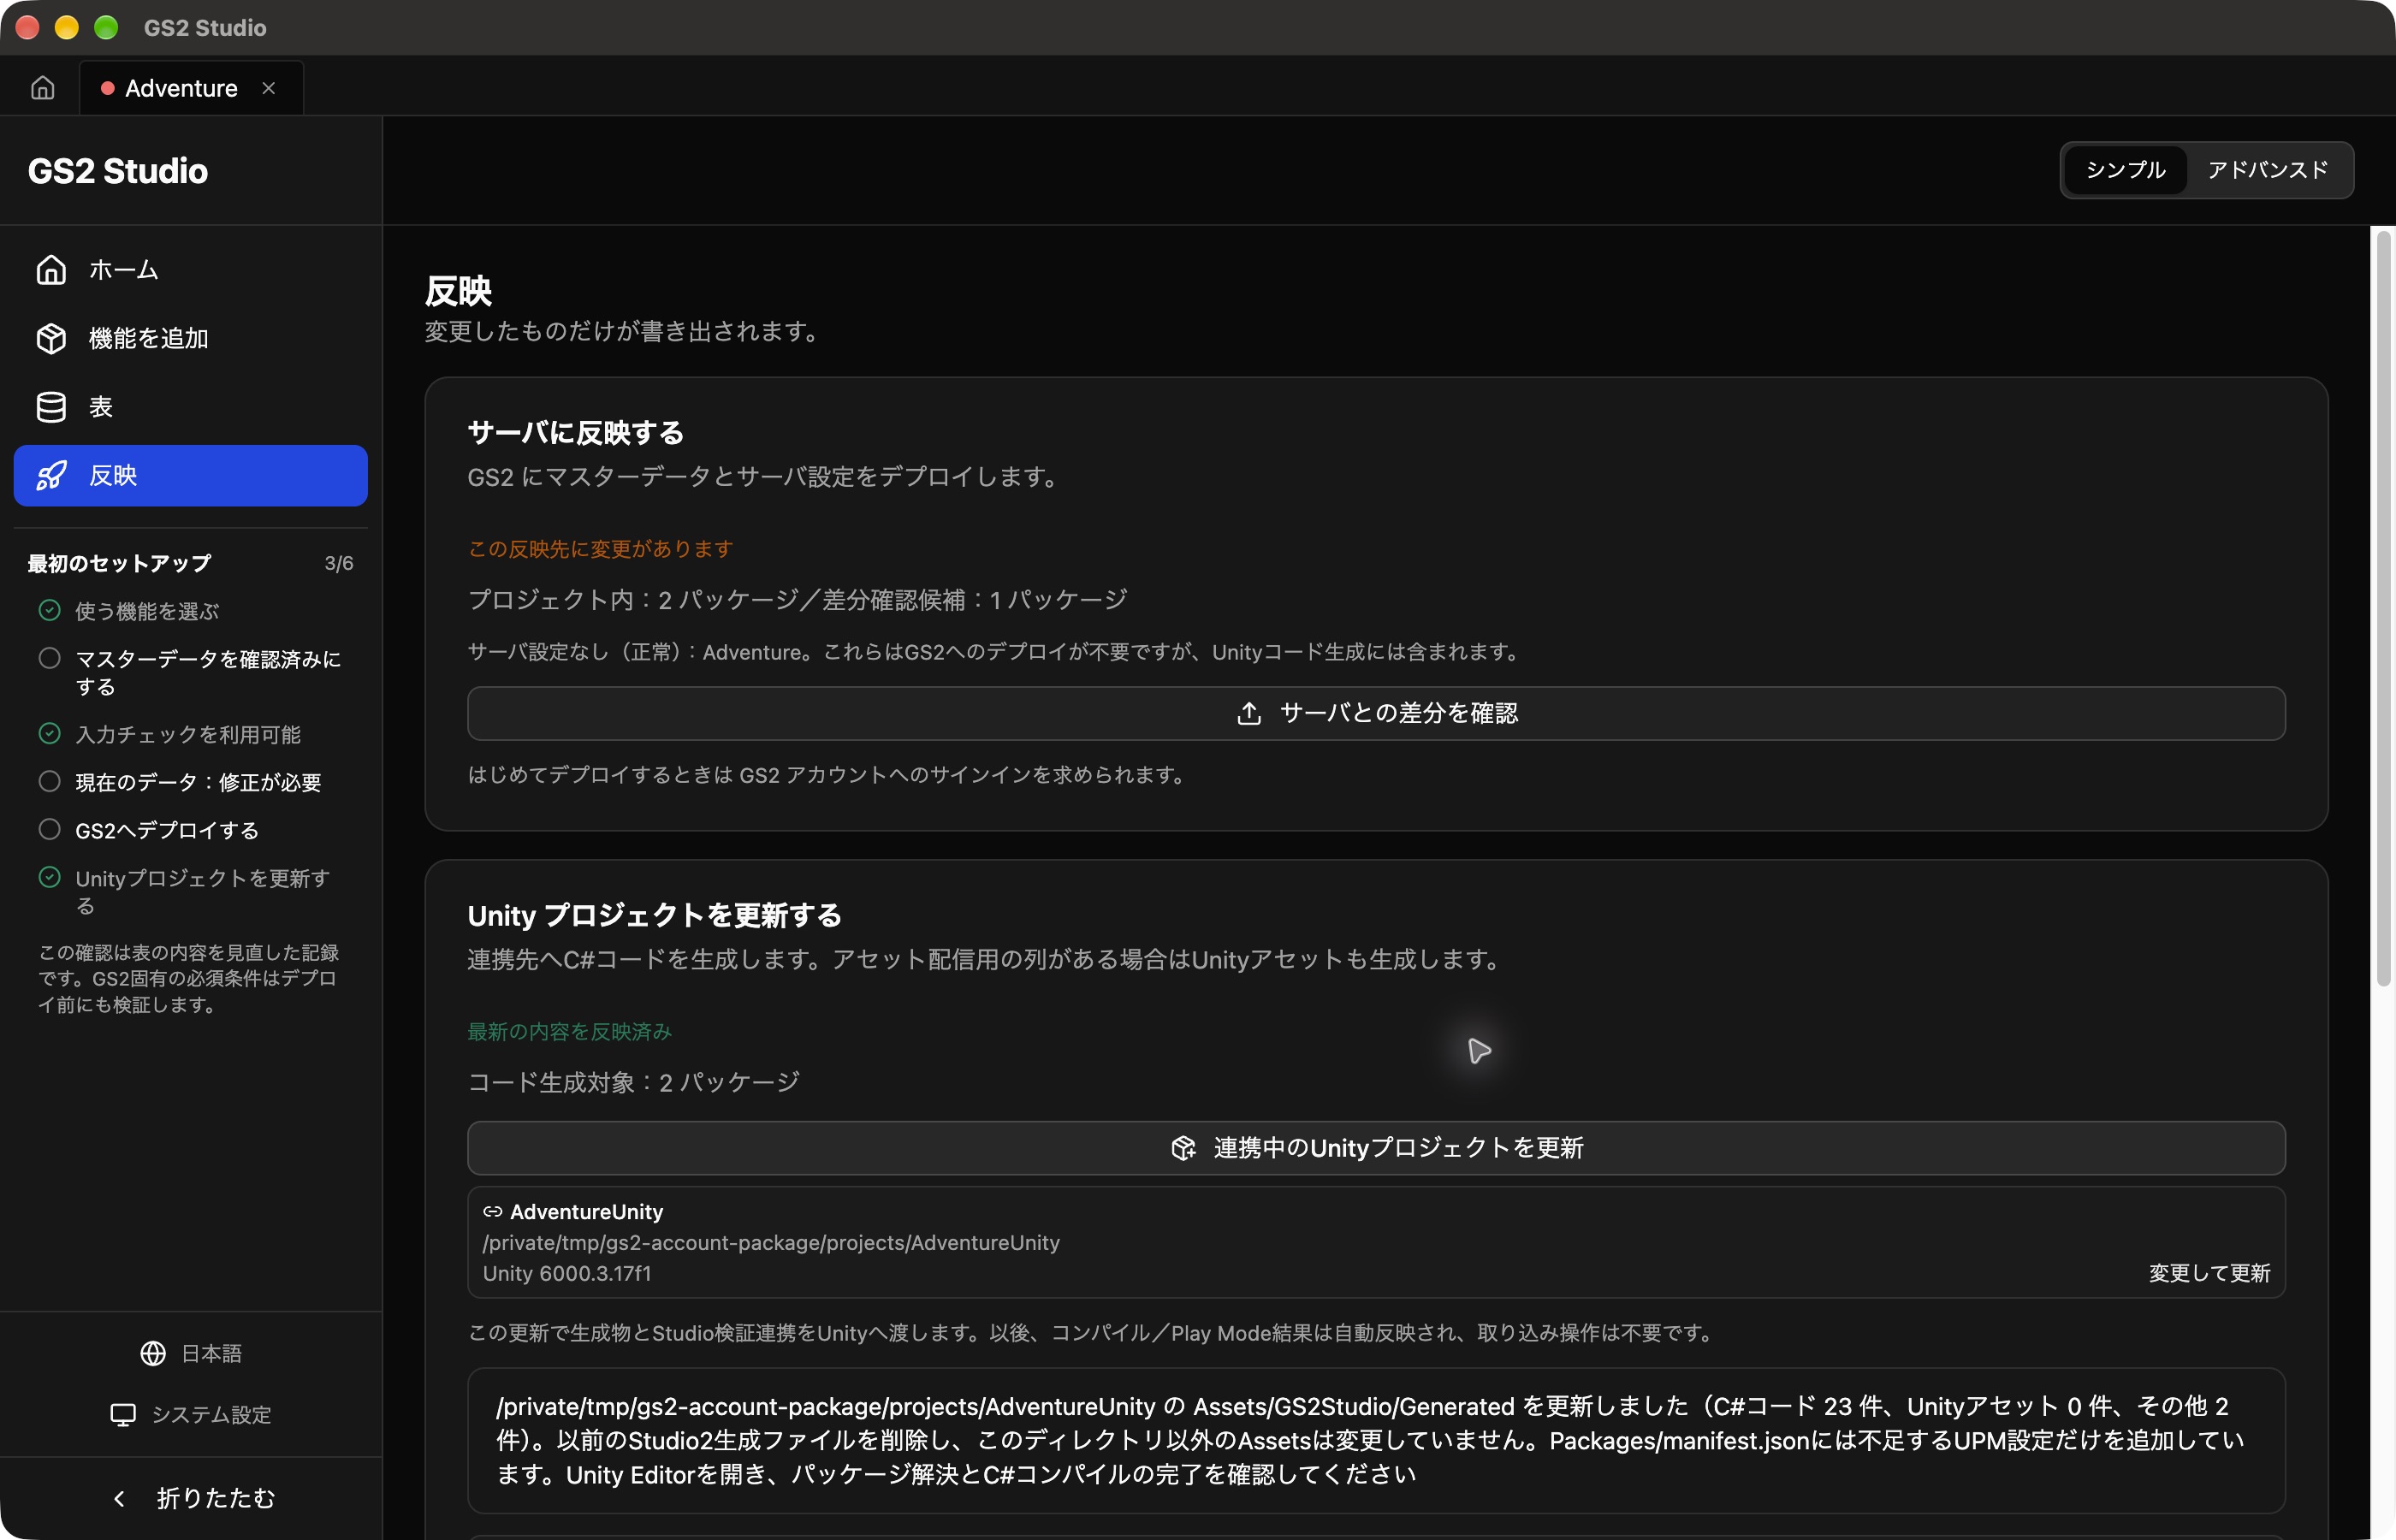
Once linked, the button changes to Update linked Unity project. Use it for later exports. To change the destination, click Change and update to the right of the folder path.
3. Check the imported files in Unity
- Return to Unity Editor. Wait for the required packages to download and the C# code to compile.
- In the Project window, open Assets → GS2Studio → Generated and check for C# files. If the Project window is hidden, open it with Window → General → Project.
- Open Window → Package Manager and search for
GS2in the installed packages. Check forio.gs2.bind,io.gs2.csharp.sdk, andio.gs2.unity.sdk. Select each package to see its ID in the details panel. - Open Window → General → Console and check that there are no red compilation errors.
If a package download fails, check the error in Package Manager and your network connection. For C# errors, select the red entry in the Console to read the details.
Create the connection settings
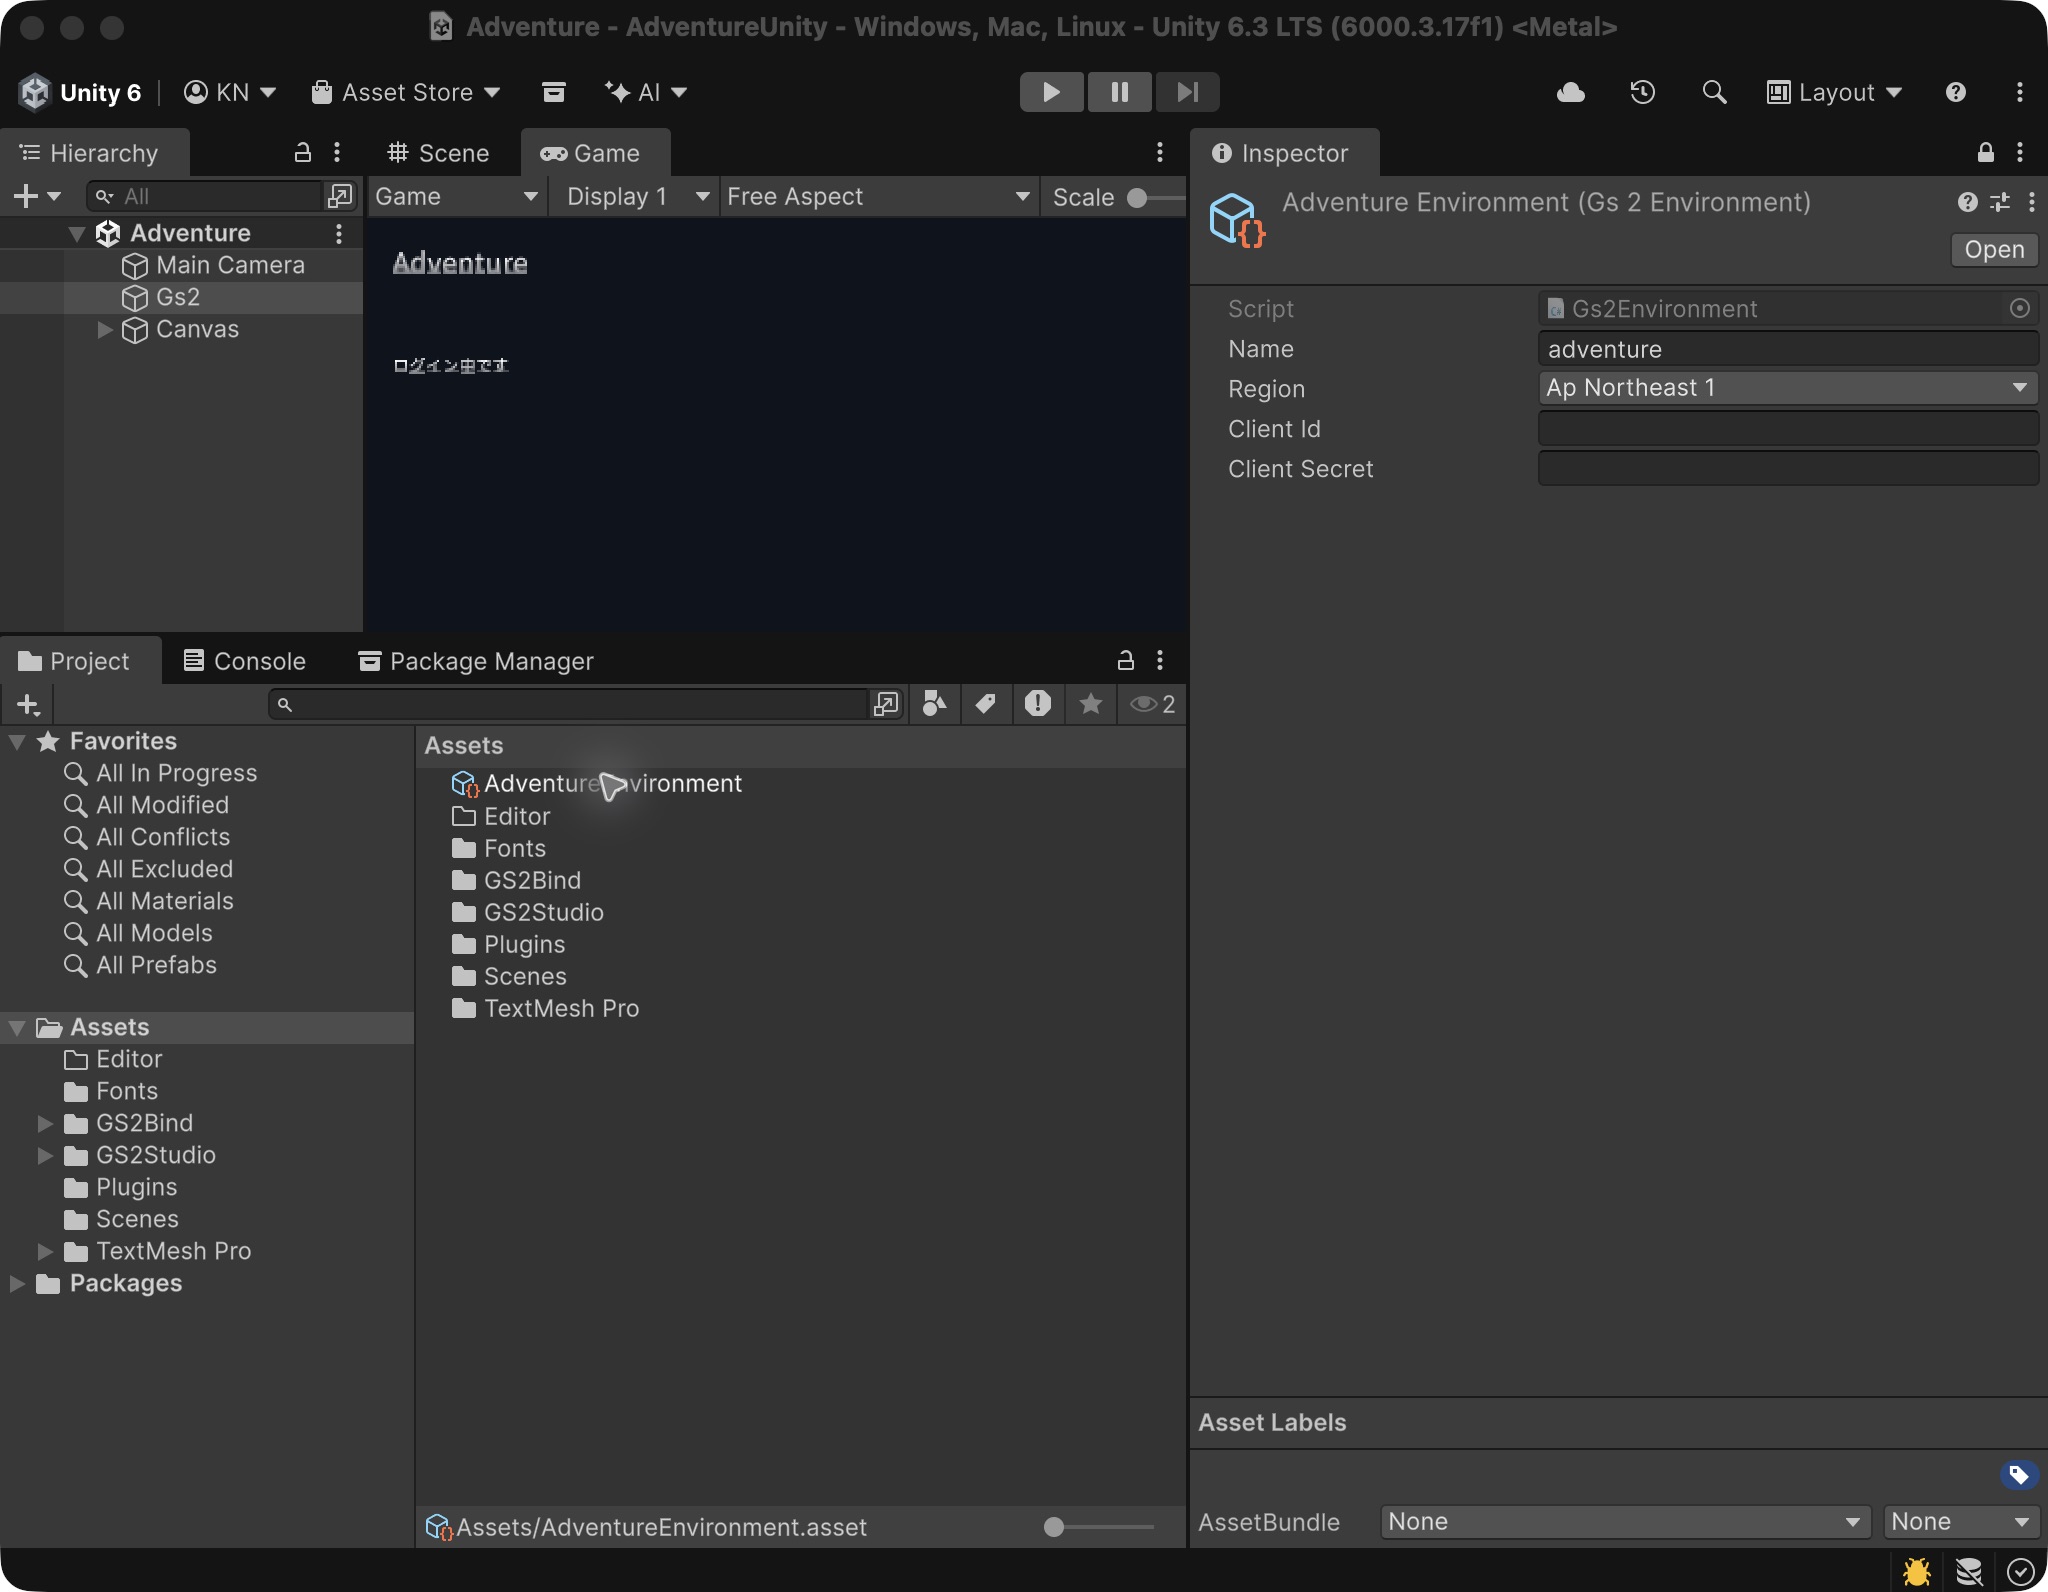
Right-click in Unity’s Project window and select Create → Game Server Services → Core → Environment. Name the asset AdventureEnvironment and configure it in the Inspector as follows.
| Field | Value |
|---|---|
| Name | adventure |
| Region | ApNortheast1 |
| Client Id | ApplicationClientId from Default |
| Client Secret | ApplicationClientSecret from Default |
The credentials are blank in the screenshot. In your project, enter the values listed above.
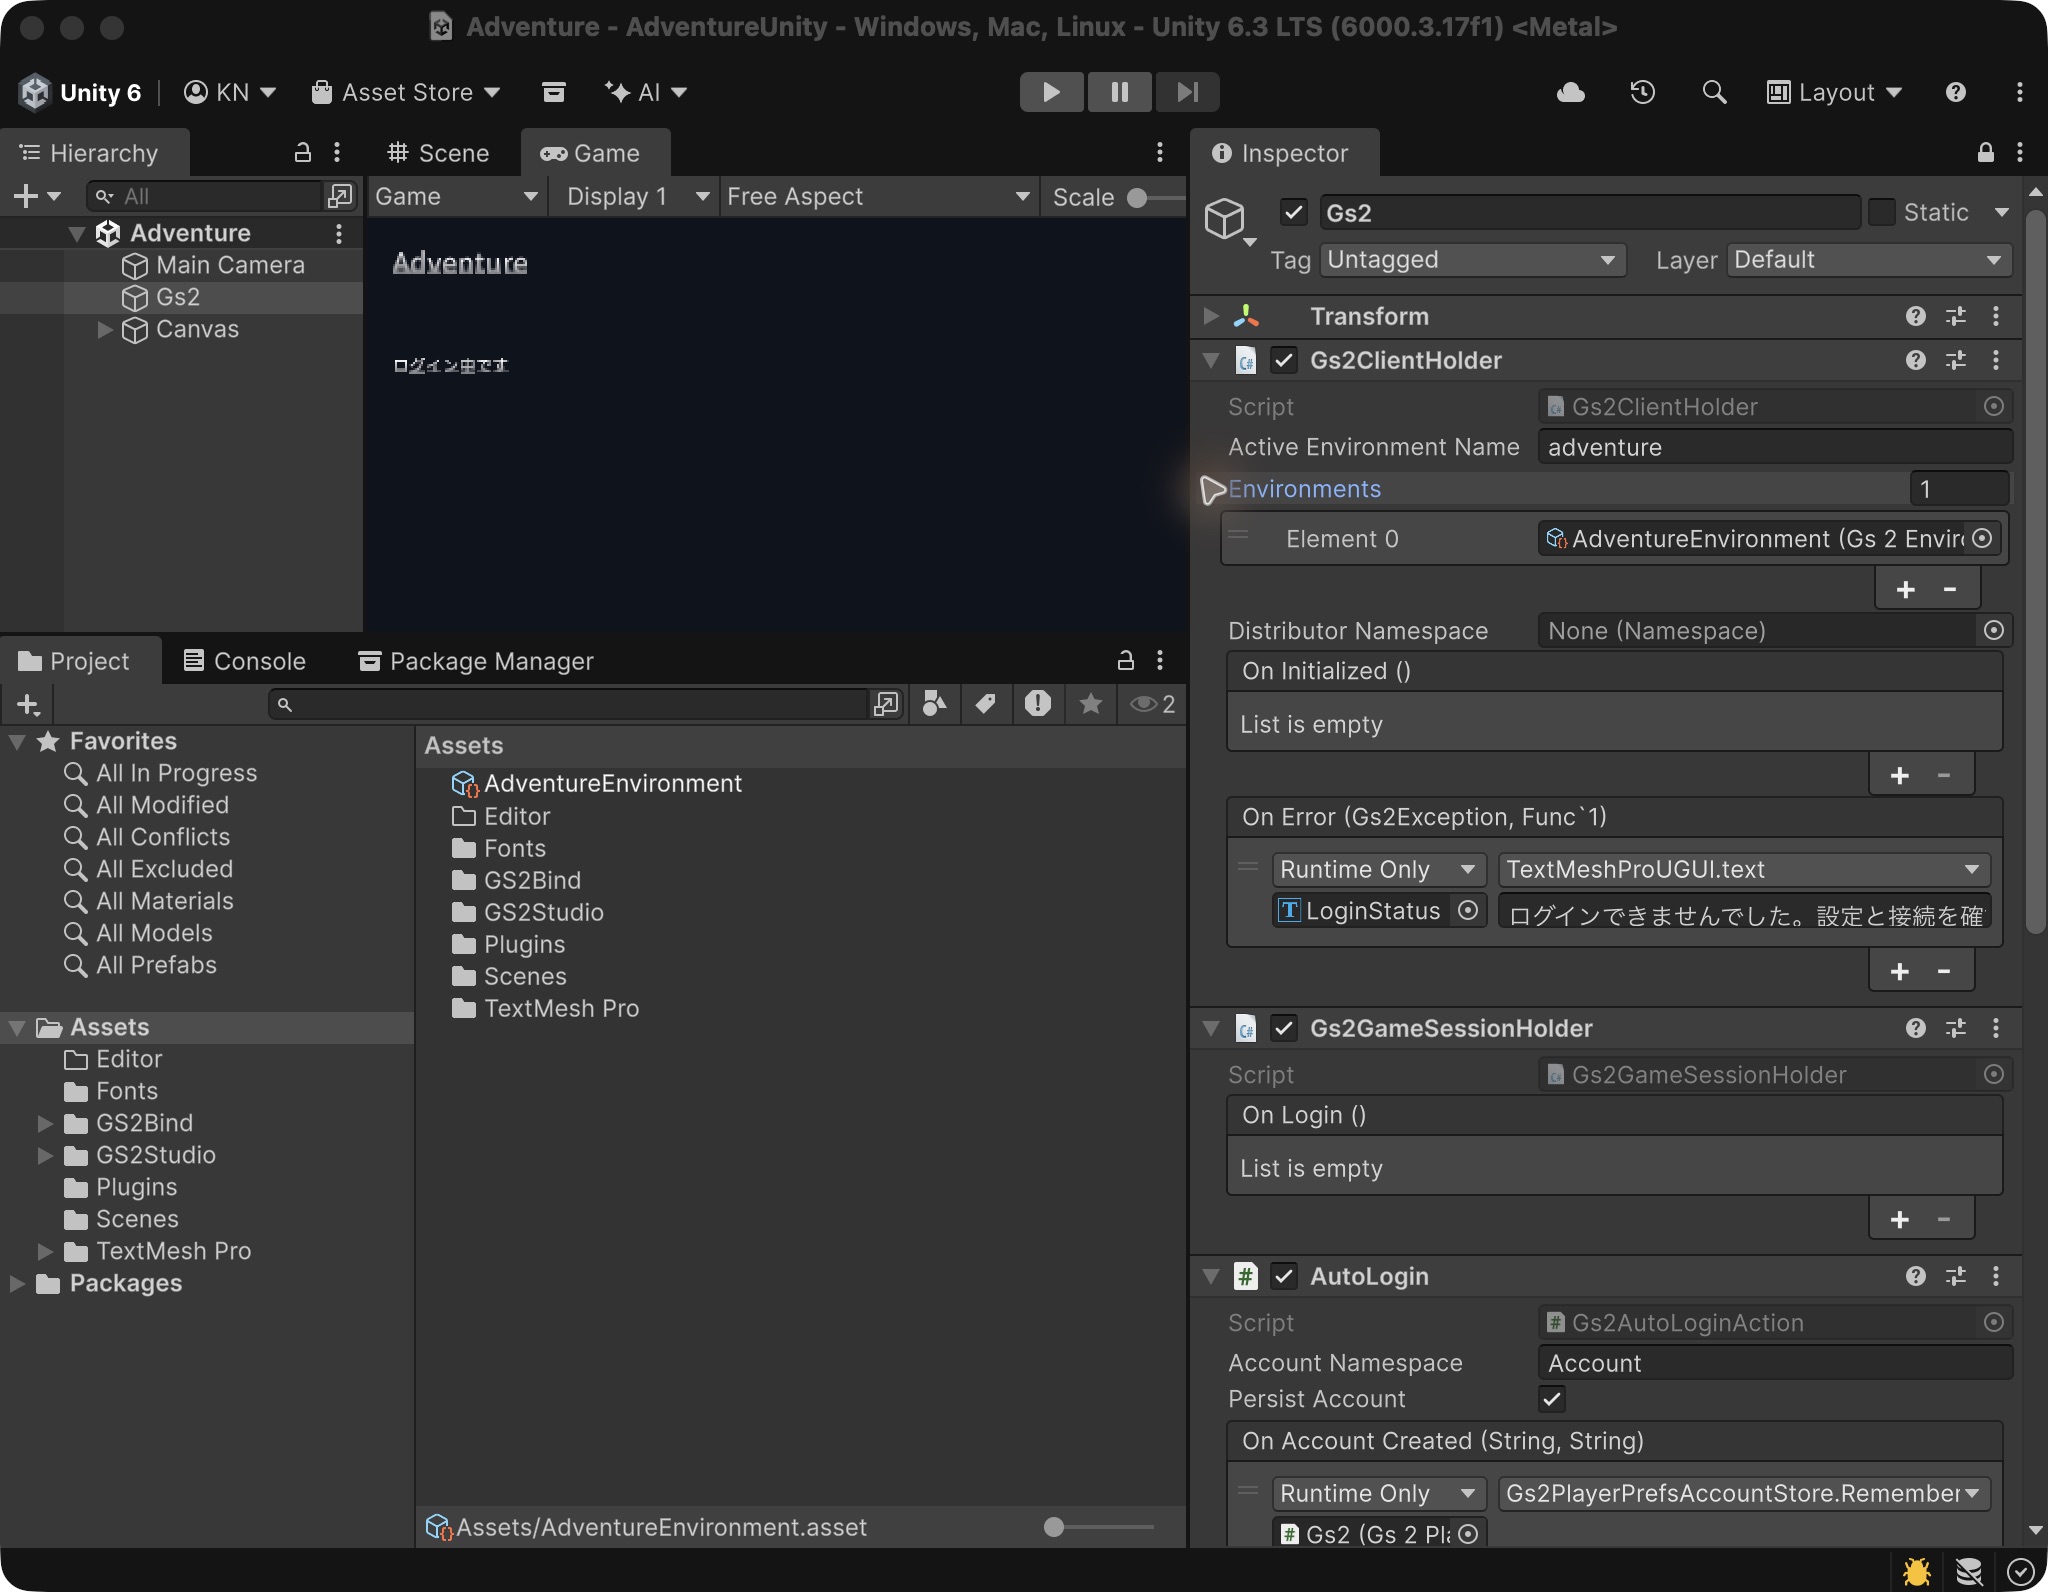
In the scene, select GameObject → Create Empty and name it Gs2. Use Add Component in the Inspector to add the following components.
| Component | Settings |
|---|---|
GS2/Core/Gs2ClientHolder | Add AdventureEnvironment as one entry in Environments. Set Active Environment Name to adventure. |
GS2/Core/Gs2GameSessionHolder | Use the default settings. |
GS2/Account/AutoLogin | Set Account Namespace to Account and enable Persist Account. |
GS2/Account/PlayerPrefs Account Store | Set Key Prefix to adventure.main. |
GS2 Studio/Runtime/Gs2HolderRuntimeContextProvider | Assign the components above to Client Holder and Session Holder. |
The Name field in Environment must match Active Environment Name in Client Holder. Renaming the asset file alone does not set this value.
Connect the events that save and restore the account
Click + in AutoLogin’s events and assign the same Gs2 object. When choosing a function, select the Dynamic entry that accepts arguments.
| AutoLogin event | Function to connect |
|---|---|
| On Account Created | Gs2PlayerPrefsAccountStore.Remember (Dynamic string, string) |
| On Restore Account | Gs2PlayerPrefsAccountStore.Restore (Dynamic Gs2AutoLoginAction) |
Enable Persist Account and connect both events. These connections save the account credentials when the account is created and load them the next time you enter Play Mode.
Display the player ID
Connect a Unity text component to Player ID Label to display the logged-in player’s ID.
1. Create the text object
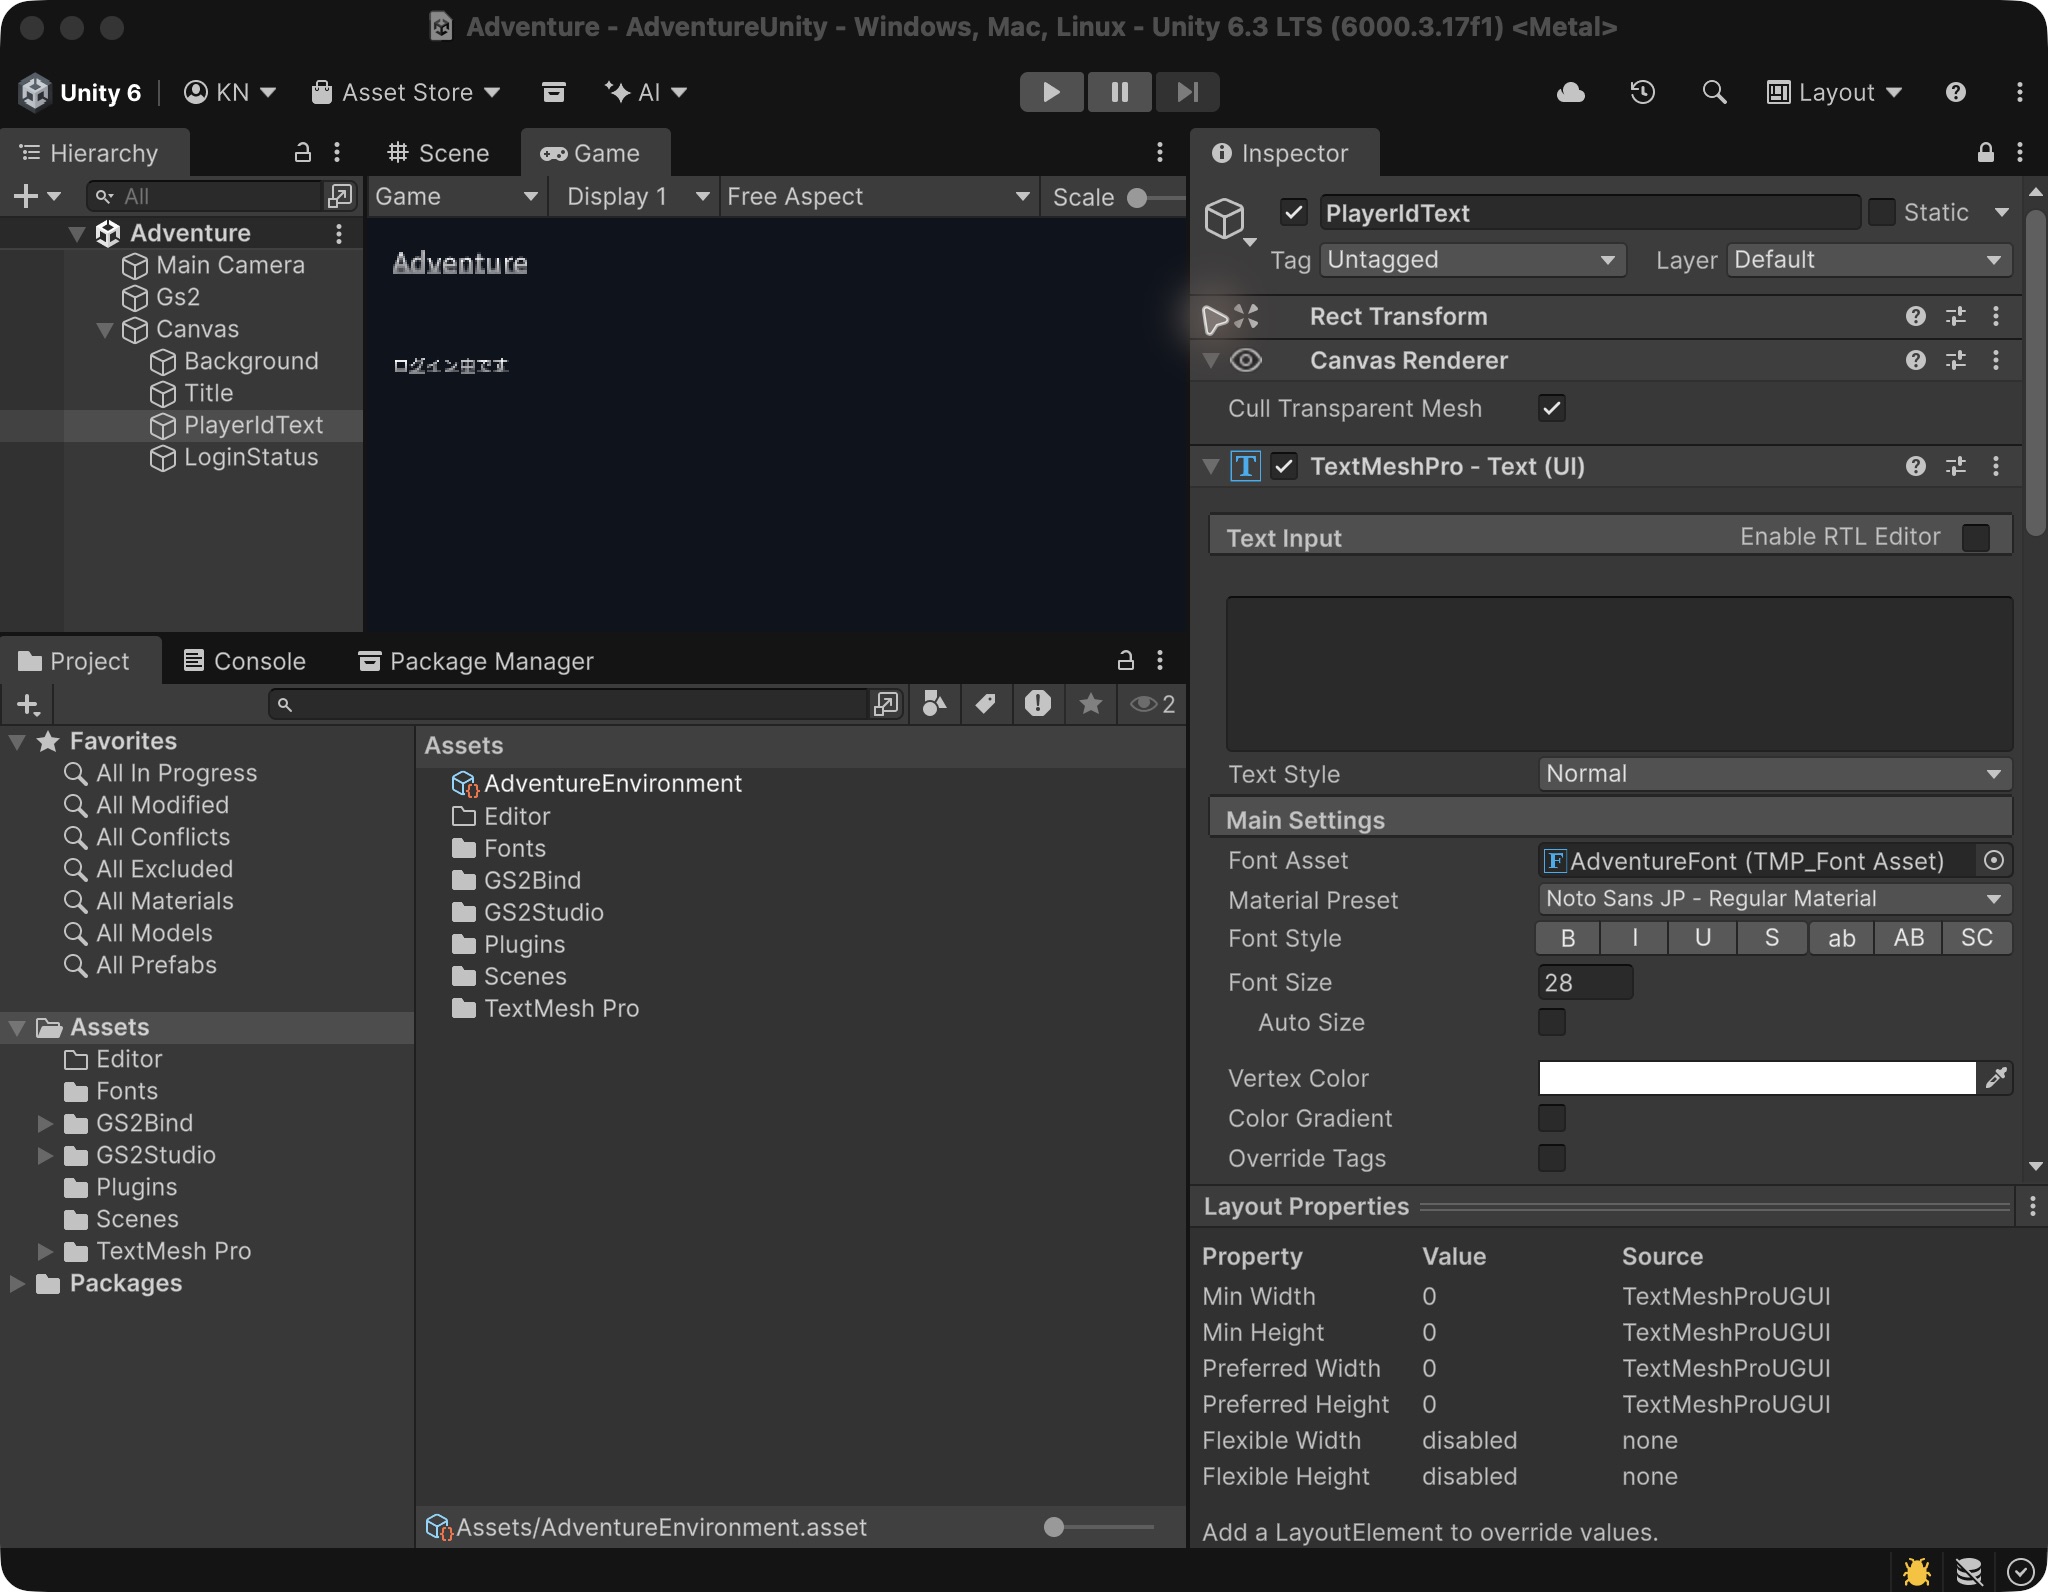
- Select GameObject → UI (Canvas) → Text - TextMeshPro and name it
PlayerIdText. Unity also creates a Canvas if there isn’t one yet. - If TMP Importer opens, click Import TMP Essentials.
- To use the font shown in the examples, open the Noto Sans JP font file (new tab) and click Download raw file. Create
Assets/Fontsin Unity’s Project window and dragNotoSansJP-Regular.otfinto it. - Select the font and choose Assets → Create → TextMeshPro → Font Asset → SDF. Name the Font Asset
AdventureFontand set Atlas Population Mode to Dynamic in the Inspector. - Select
PlayerIdTextin the Hierarchy and assignAdventureFontto TextMeshPro’s Font Asset. - Adjust its position and width in Rect Transform so it appears near the top of the screen. Make it wide enough to show a long player ID.
- Clear TextMeshPro’s Text Input. The component supplies the text after login.
2. Connect Player ID Label
With PlayerIdText selected, choose Add Component → GS2 → Core → Player ID Label in the Inspector.
| Field | Settings |
|---|---|
| Session Holder | Drag in Gs2 from the Hierarchy. |
| Format | Player ID: {userId} |
Click + under On Update and assign PlayerIdText itself. Choose TextMeshProUGUI → Dynamic string → text. Use the Dynamic string entry that displays the received string, rather than an entry with a fixed text input.
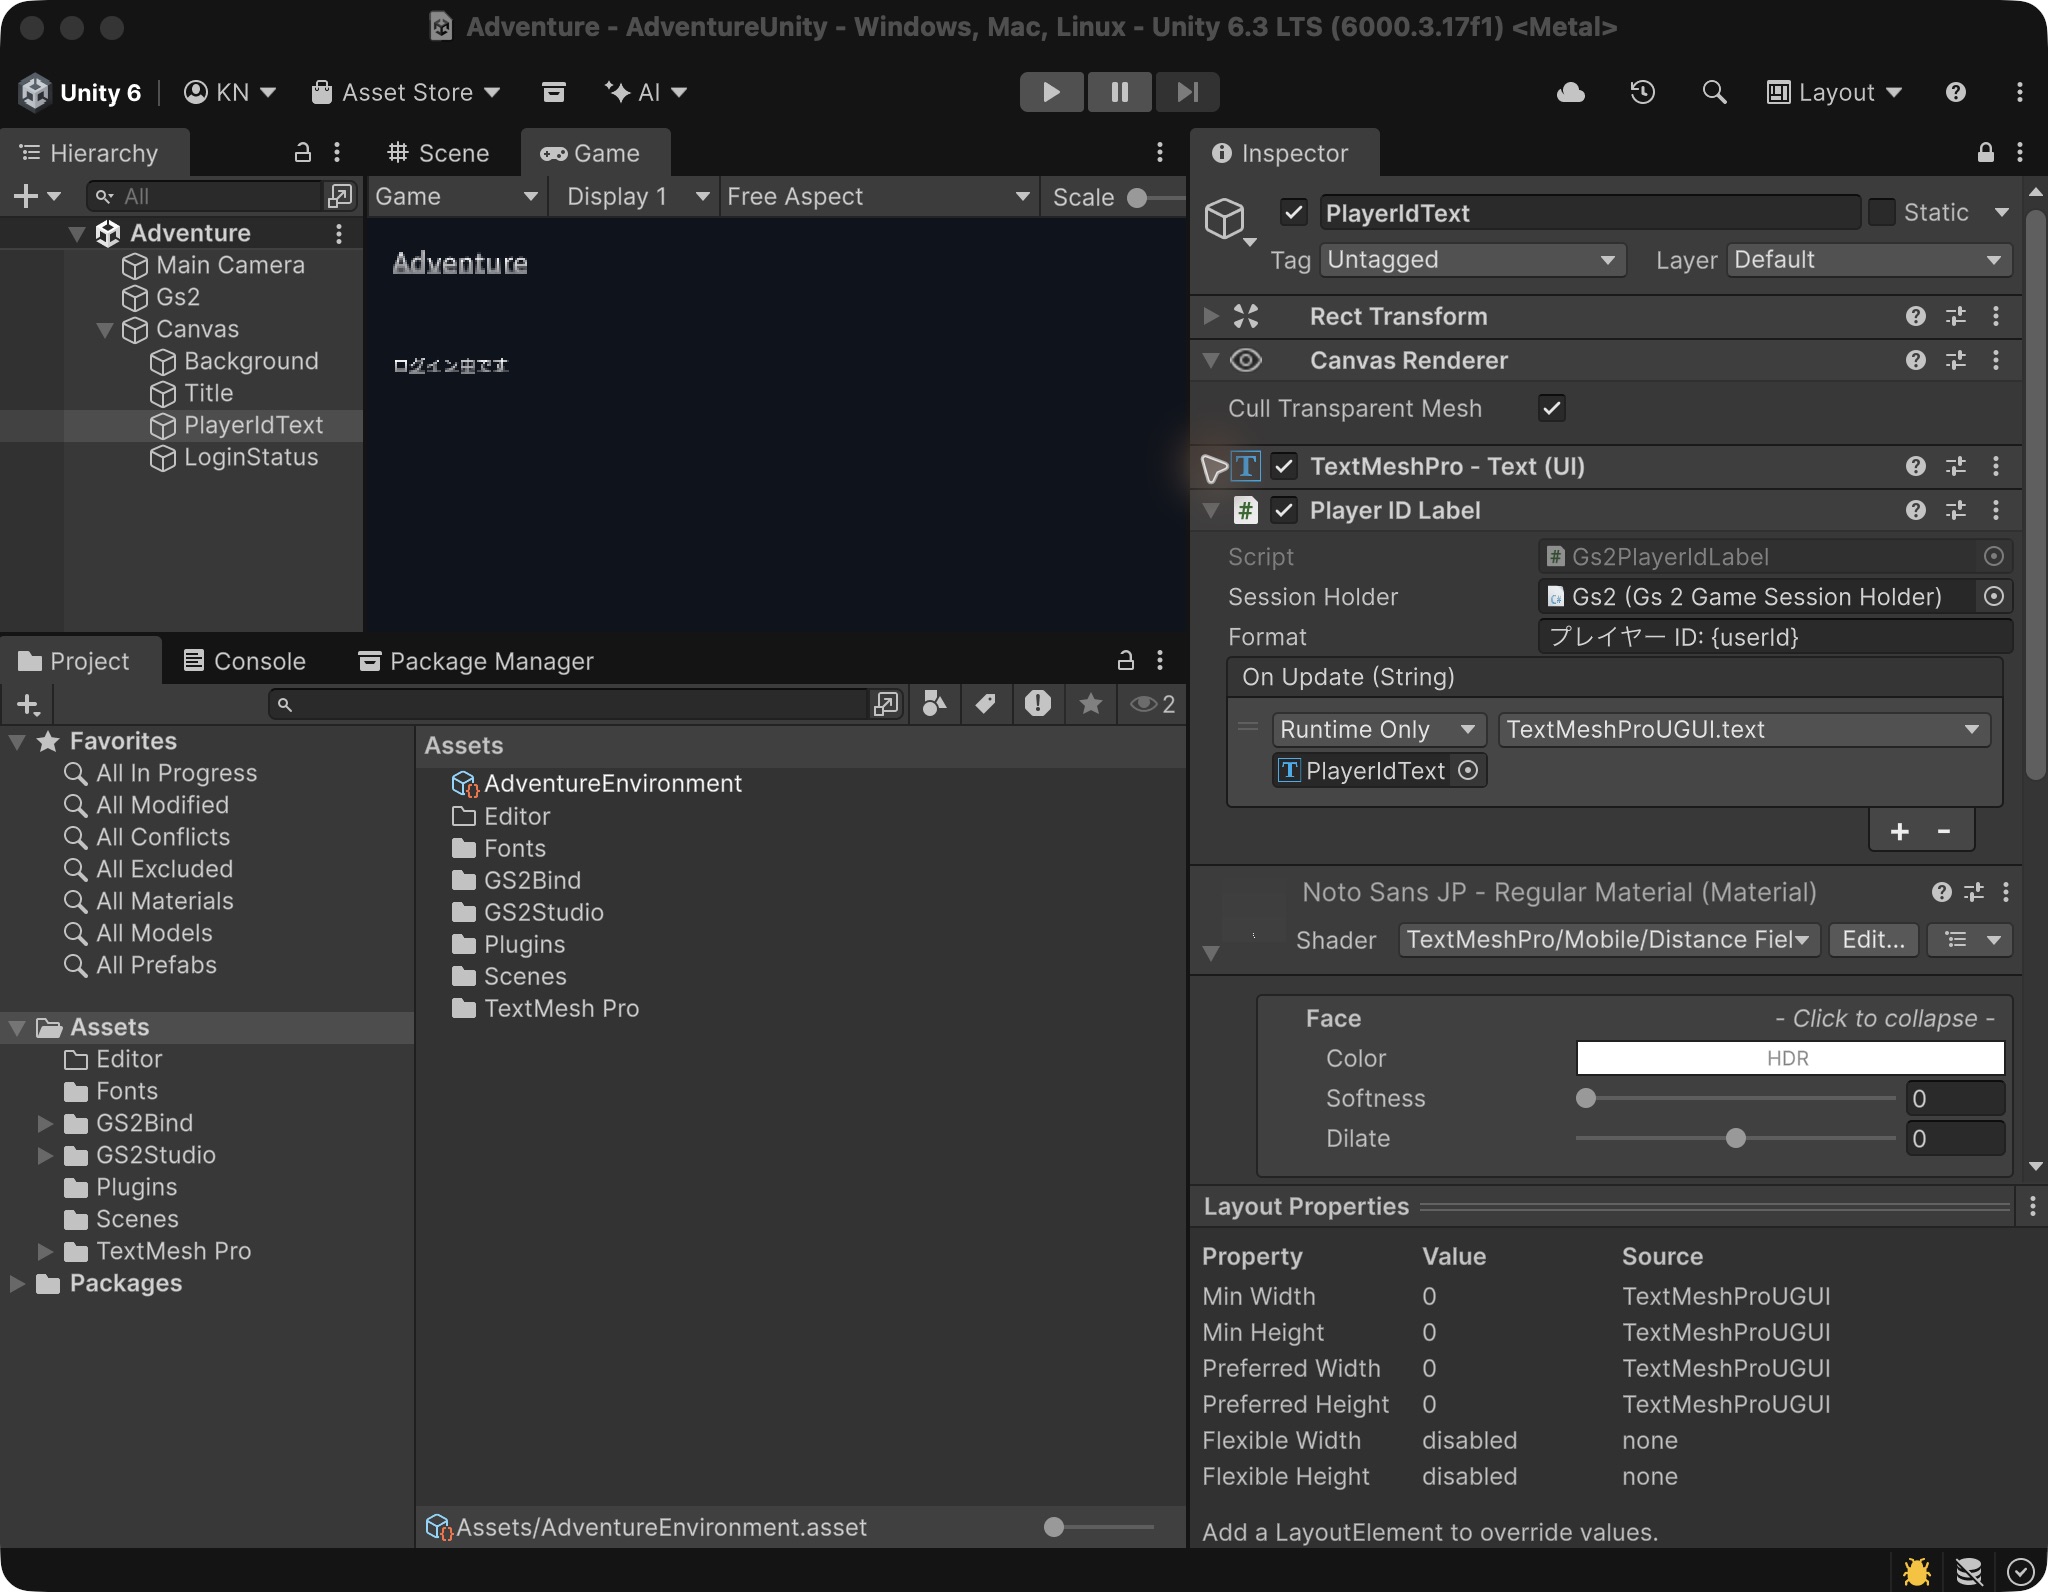
The ID now appears after a successful login. It also updates to the current ID when you log in with the saved account or enable this text after login.
Show login status and errors
Add a separate text object to show the login status.
- Create another Text - TextMeshPro under the Canvas. Name it
LoginStatusand place it belowPlayerIdText. - Assign
AdventureFontto Font Asset and enterLogging in…in Text Input. - In AutoLogin on
Gs2, click + under On Auto Login Complete and assignLoginStatus. Select the TextMeshProUGUI → text entry with a fixed string input and leave that input empty. This clears the status text after login. - Assign
LoginStatusto On Error on both Client Holder and AutoLogin. Select the TextMeshProUGUI → text entry with a fixed string and enterLogin failed. Check the settings and connection.Do not use the Dynamic entry for these events.
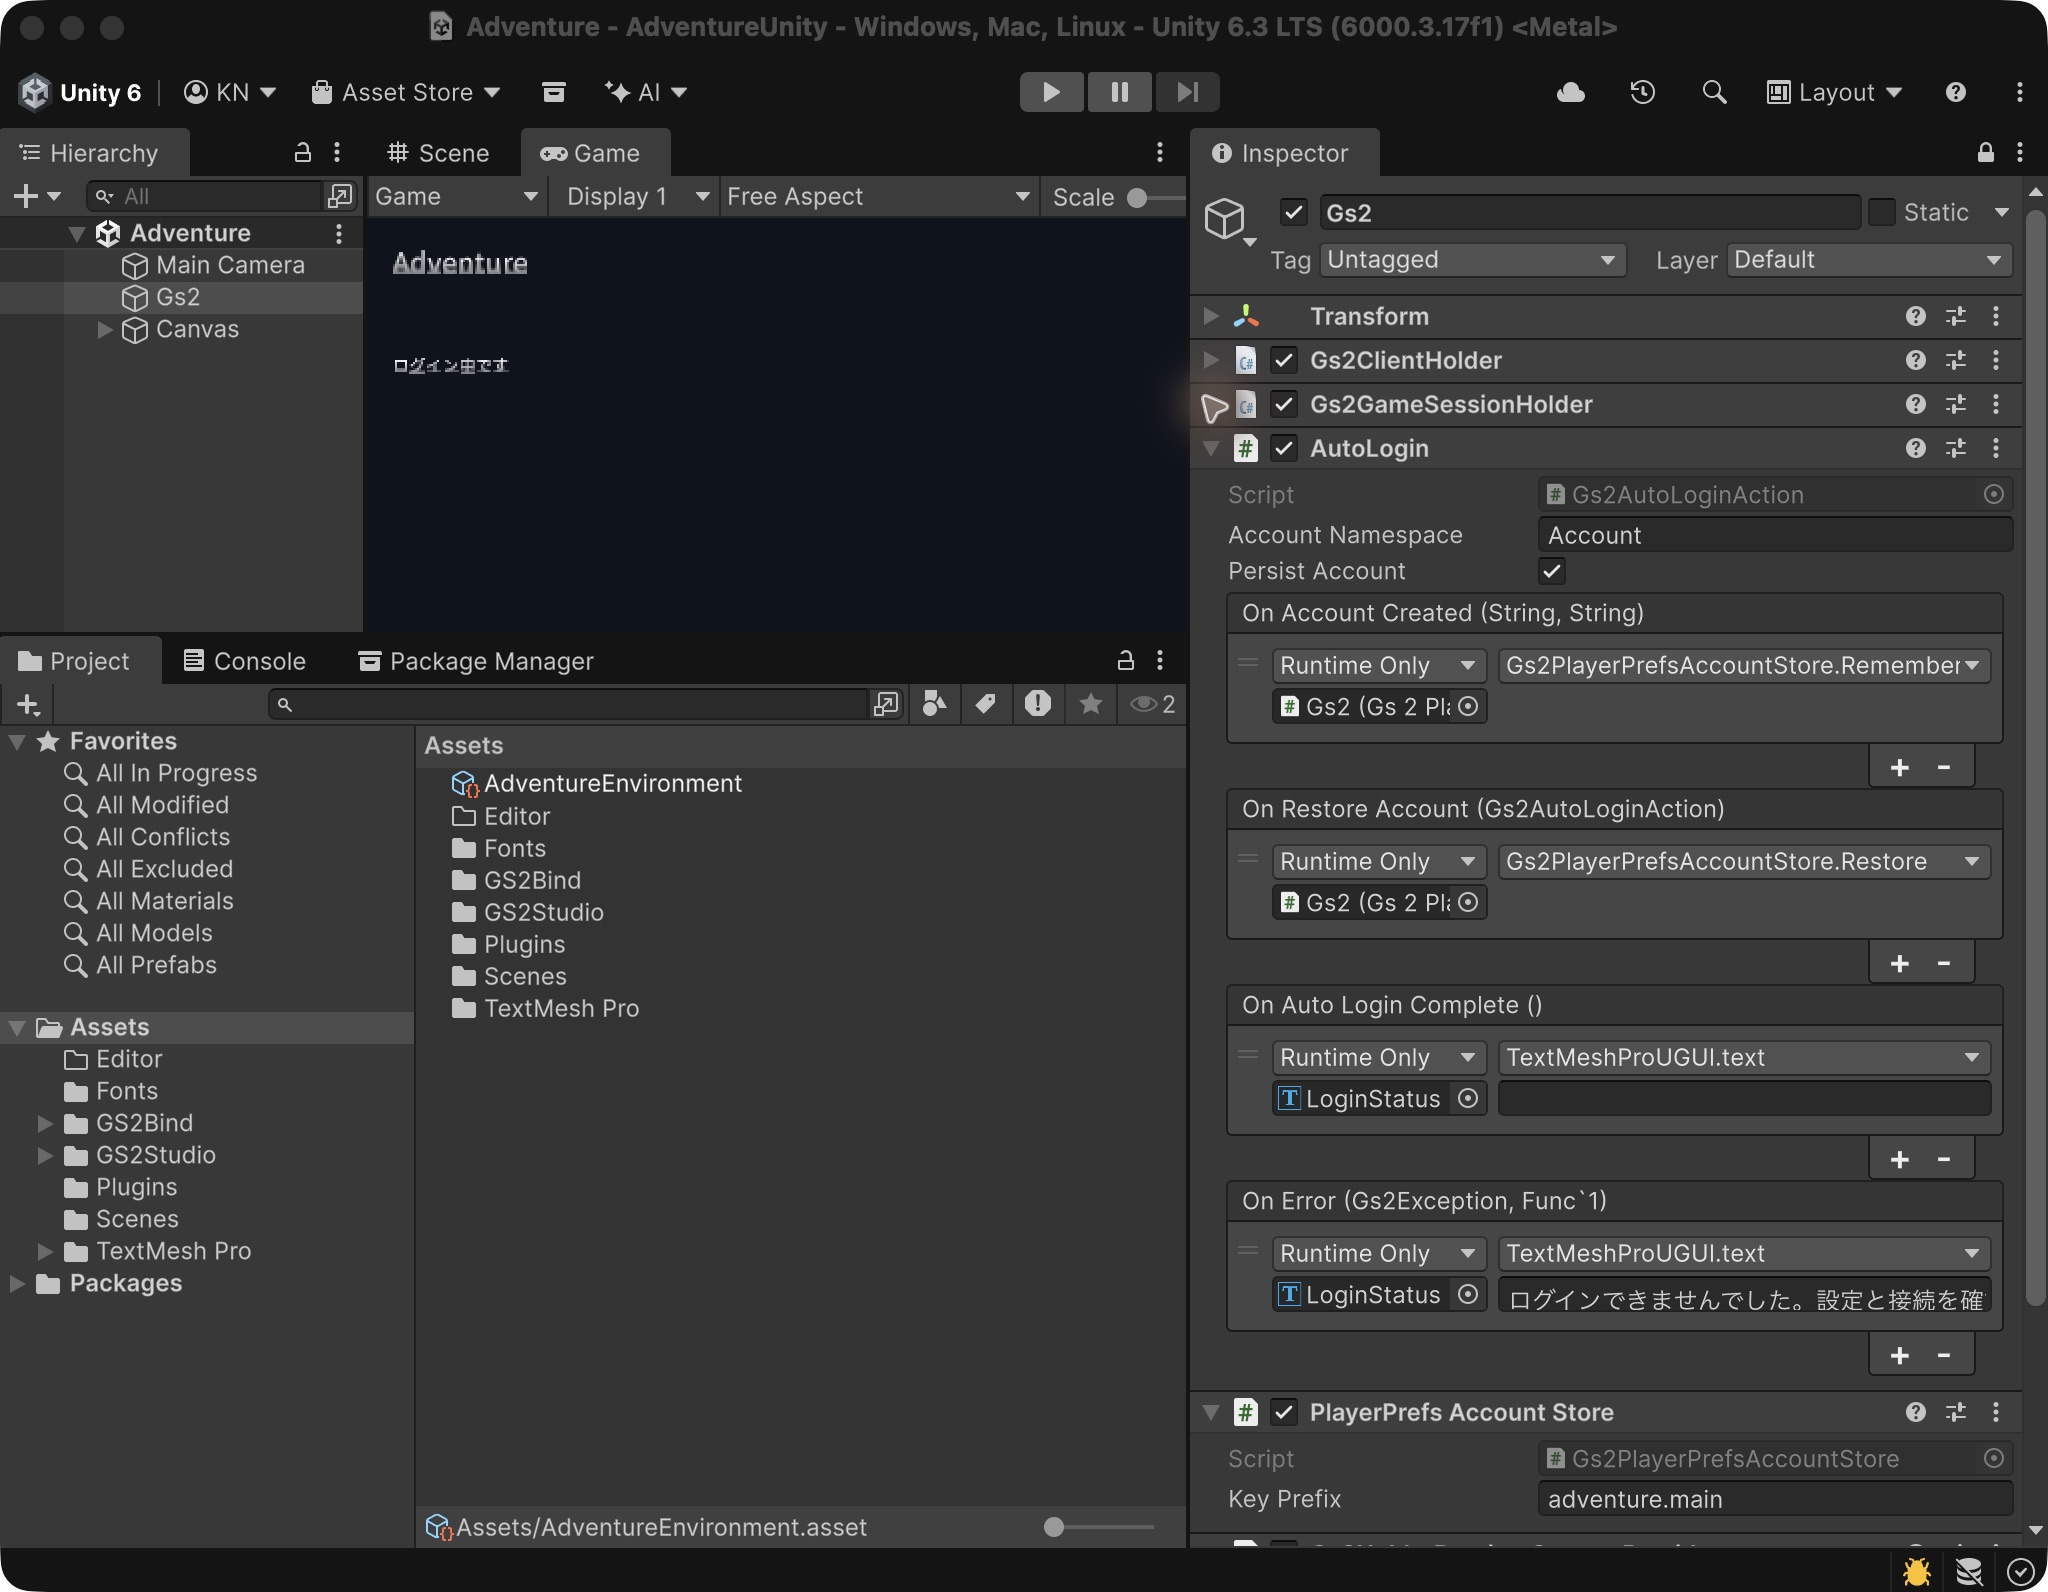
Save the scene and enter Play Mode. Login is working if the status message disappears and the player ID appears.
Attach the login script
Use UniTask to await the SDK’s asynchronous operations. Code after await runs once the request completes; catch handles errors.
- Create
Assets/AdventureLogin.csand paste in the code below. - Create an empty GameObject in the scene and name it
Adventure. - Add
AdventureLoginand set Client Id and Client Secret in the Inspector to the outputs fromDefault. - Set Account Namespace to
adventure-accountand Account Slot tomain. - Enter Play Mode. Click Log in at the top left and check that the player ID appears.
using Cysharp.Threading.Tasks;
using Gs2.Core.Model;
using Gs2.Unity.Core;
using Gs2.Unity.Util;
using UnityEngine;

public sealed class AdventureLogin : MonoBehaviour
{
    [SerializeField] private string clientId = "YOUR_CLIENT_ID";
    [SerializeField] private string clientSecret = "YOUR_CLIENT_SECRET";
    [SerializeField] private string accountNamespace = "adventure-account";
    [SerializeField] private string accountSlot = "main";

    public Gs2Domain Gs2 { get; private set; }
    public GameSession Session { get; private set; }
    private bool busy;
    private string message = "Please log in";
    private string SaveKey => $"adventure.{clientId}.{accountNamespace}.{accountSlot}";

    private void OnGUI()
    {
        GUILayout.BeginArea(new Rect(20, 20, 650, 170), GUI.skin.box);
        GUILayout.Label(message);
        GUI.enabled = !busy && Session == null;
        GUILayout.Label("Account slot (main / practice, etc.)");
        accountSlot = GUILayout.TextField(accountSlot);
        if (GUILayout.Button("Log in")) Login().Forget();
        GUI.enabled = true;
        GUILayout.EndArea();
    }

    private async UniTask Login()
    {
        busy = true;
        message = "Logging in...";
        try
        {
            if (Gs2 == null)
            {
                Gs2 = await Gs2Client.CreateAsync(
                    new BasicGs2Credential(clientId, clientSecret), Region.ApNortheast1);
            }

            var userId = PlayerPrefs.GetString(SaveKey + ".userId", "");
            var password = PlayerPrefs.GetString(SaveKey + ".password", "");
            if (string.IsNullOrEmpty(userId) != string.IsNullOrEmpty(password))
            {
                message = "Saved credentials are incomplete. Check the account slot.";
                return;
            }
            if (string.IsNullOrEmpty(userId))
            {
                var create = await Gs2.Account.Namespace(accountNamespace).CreateAsync();
                var model = await create.ModelAsync();
                userId = model.UserId;
                password = model.Password;
                PlayerPrefs.SetString(SaveKey + ".userId", userId);
                PlayerPrefs.SetString(SaveKey + ".password", password);
                PlayerPrefs.Save();
            }

            var login = await Gs2.LoginAsync(
                new Gs2AccountAuthenticator(new AccountSetting
                {
                    accountNamespaceName = accountNamespace,
                    keyId = "grn:gs2:{region}:{ownerId}:key:default:key:default"
                }), userId, password);
            Session = login;
            message = "Logged in. Player ID: " + Session.AccessToken.UserId;
        }
        catch (System.Exception error) { message = "Could not connect: " + error.GetType().Name; }
        finally { busy = false; }
    }
}The {region} and {ownerId} placeholders in AccountSetting.keyId identify the default key and are resolved by GS2. Leave them as written. Both the key namespace and key name are default.
The code saves a new account’s credentials before login. If the login request fails, the next click retries with the same account. Failure to log in with saved credentials does not create a different account automatically.
This tutorial stores credentials locally with PlayerPrefs. It is not encrypted, so choose an appropriate storage method for a released game. Keep player passwords and Client Secrets out of screens, logs, and public repositories.
3. Log in again with the same account
Stop Play Mode, then start again and log in. If the player ID is unchanged, the saved account was restored successfully.
| Action | Expected result |
|---|---|
| Log in for the first time | A player ID appears. |
| Stop Play Mode, start again, and log in | The same ID appears. |
| Stop Play Mode, disconnect the network, then start again and log in | An error message appears. |
| Restore the network, stop and restart Play Mode, then log in | Login succeeds with the saved account. |
Studio logs in automatically when Play Mode starts. With the SDK, click the login button. Saved credentials remain after Play Mode stops.
Practice: create a second player
In Studio, stop Play Mode, change Key Prefix in PlayerPrefs Account Store to adventure.practice, then start again. With the SDK, stop Play Mode, change Account Slot in the AdventureLogin Inspector to practice, start again, and log in. Is the player ID different now?
When finished, stop Play Mode. Restore Studio’s Key Prefix to adventure.main, or the SDK’s Account Slot to main, then start again and log in. Check that the original player ID returns.